 Blueprint: Building a MSEL
Overview
Blueprint is a web app that helps users create a Master Scenario Event List (MSEL) and events more easily. It lets users choose and define simulated entities, attacks, time frames, and regulators affected by the scenario. Users can view, edit, create, and approve events in the MSEL using Blueprint.
Blueprint makes it easier to build and view the MSEL compared to using an Excel spreadsheet. It also helps teams collaborate, even if they are from different teams. Blueprint can connect with Player, Gallery, CITE, and Steamfitter to help automate exercise setup.
For installation, refer to these GitHub repositories.
Configuration
Configure and deploy Blueprint using the Blueprint Helm Chart. The Helm Chart README provides detailed instructions for all deployment settings.
Classification Banner
Blueprint UI supports an optional, customizable classification banner that displays persistently at the top of the application. The banner can show classification labels (such as "UNCLASSIFIED" or "SECRET"), maintenance messages, or any other persistent notification. Configure the banner through HeaderBarSettings in the Helm chart. See the Classification Banner section of the Blueprint Helm Chart README for configuration details.
Permissions and Roles
To use Blueprint, a System Admin must assign Content Developer permissions to the user and add them to a team.
There are three levels of permissions in Blueprint that affect the way a user interacts with the Blueprint application and collaborates on the MSEL creation.
- System Admin: Can add users to a team, as well as assign the required permissions to users. Additionally, users with this permission can view, edit, create, and approve events on the MSEL.
- Content Developer: Can view, edit, create, and approve events on the MSEL.
- Facilitator: Manages the exercise, can advance moves, execute events, and check events as completed.
Most users will have the Content Developer permission, because it is the minimum required permission to create and collaborate with other teams on MSEL creation.
Refer to the Administrator Guide for more information on additional administrative actions.
Administrator Guide
Blueprint administrators use the Administration View to manage users and units, and to configure organization, Gallery card, CITE action, and CITE role templates for content developers building MSELs.
Administration View
Across the Crucible exercise applications, the Administration View is where privileged users configure the platform and control access. It includes user and team management, role and permission assignment, and setup and maintenance of app-specific templates and content. The Administration View is where admins prepare and manage the environment so events run smoothly for participants.
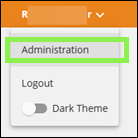
Accessing the Administration View is the same in all Crucible exercise applications: expand the dropdown next to your username in the top-right corner and select Administration.
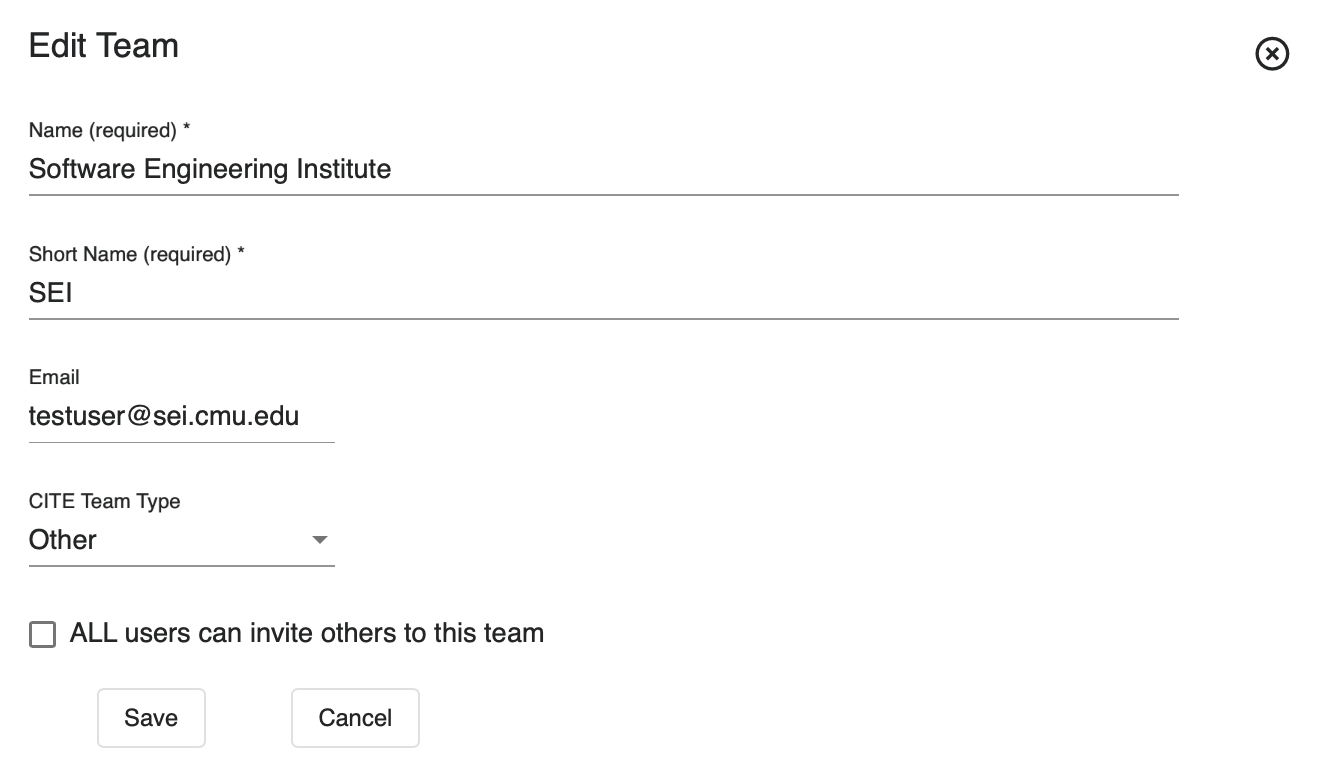
Units
The Units page lists all the units in Blueprint. A unit is an organizational entity, such as a team, department, or agency, that groups users for exercise purposes. Administrators can add, edit, and delete units, and assign users to their respective units.
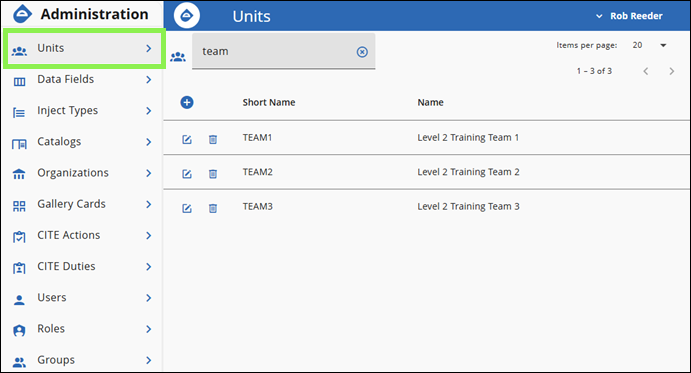
Add a Unit
- Expand the dropdown next to your username in the top-right corner and select Administration.
- Under Units, click + (Add Unit).
- In Name, enter the unit name (for example,
Carnegie Mellon University). - In Short Name, enter a short name or acronym (for example,
CMU). - Click Save.
Edit, Delete, and Search for a Unit
- Edit: Click Edit (pencil icon) next to the unit, make the desired changes, and click Save.
- Delete: Click Delete (trash can icon) next to the unit.
- Search: In the Search field, enter the name of the unit.
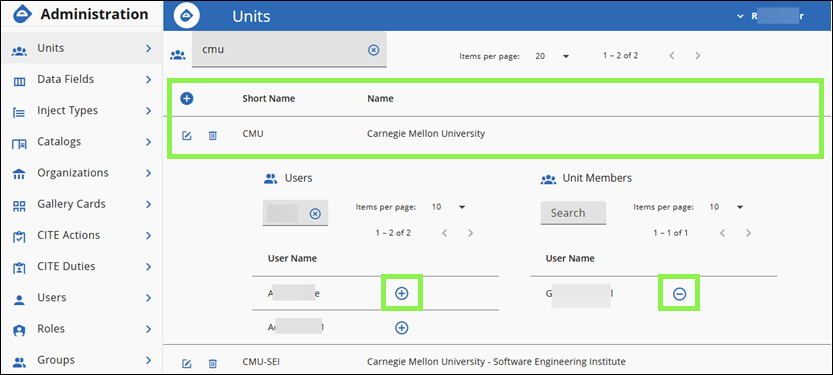
Add/Remove Users from a Unit
To add a user to a unit:
- Click the unit row to expand its configuration.
- Under All Users, find the user and click Add User.
To remove a user from a unit, under Unit Users, find the user and click Remove.
Data Fields
The Data Fields page lists all data field templates available for use in MSEL scenario events. Data fields define the columns that appear on a MSEL - similar to column headers in a spreadsheet. The Info and Facil checkboxes control whether the field displays for information events and facilitation events, respectively. Content developers can pull these templates into a MSEL from the Data Fields tab.
Add a Data Field Template
- Under Data Fields, click + (Add a template data field).
- In Name, enter the field name (for example,
Delivery Method). - In Data Type, select the data type. Available types: Boolean, Card, Checkbox, Datetime, Double, HTML, Integer, Move, Organization, SourceType, Status, String, Team, TeamsMultiple, Url, User.
- Check Use Option List to provide a predefined list of selectable values for the field (for example,
Unused, Open, Closed, Critical, Affected). - Click Save.
Edit, Delete, and Search for a Data Field Template
- Edit: Click Edit (pencil icon) next to the field, make the desired changes, and click Save.
- Delete: Click Delete (trash can icon) next to the field.
- Search: In the Search field, enter the name of the data field template.
Inject Types
The Inject Types page lists all inject type templates available for use in MSELs. An inject type defines the structure and data fields for a category of scenario events.
Add an Inject Type
- Under Inject Types, click + (Add Inject Type).
- In Name, enter the inject type name (for example,
Email). - In Description, enter a brief description (for example,
Email-based scenario events). - Click Save.
Edit, Delete, and Search for an Inject Type
- Edit: Click Edit (pencil icon) next to the inject type, make the desired changes, and click Save.
- Delete: Click Delete (trash can icon) next to the inject type.
- Search: In the Search field, enter the name of the inject type.
Catalogs
The Catalogs page lists all catalog templates available for use in MSELs. A catalog is a reusable collection of scenario events associated with a specific inject type.
Add a Catalog
- Under Catalogs, click + (Add Catalog).
- In Name, enter the catalog name.
- In Description, enter a brief description.
- In Inject Type, select the inject type for this catalog.
- Check Is a Public Catalog to make the catalog available to all users.
- Under Data Fields to Show on Inject List, check the fields to display.
- Click Save.
Edit, Delete, and Search for a Catalog
- Edit: Click Edit (pencil icon) next to the catalog, make the desired changes, and click Save.
- Delete: Click Delete (trash can icon) next to the catalog.
- Search: In the Search field, enter the name of the catalog.
Organizations
The Organizations page lists all organization templates available for use in MSELs. An organization template defines a reusable entity - such as a government agency, company, or media outlet - that can be added to MSEL events. Content developers can pull these templates into a MSEL from the Organizations tab.
Add an Organization Template
- Under Organizations, click + (Add Organization Template).
- In Long Name, enter the full organization name (for example,
Cybersecurity and Infrastructure Security Agency). - In Short Name, enter a short name or acronym (for example,
CISA). - In Summary, enter a brief description (for example,
Security agency). - In Email, enter the organization's email address (for example,
john@cisa.gov). - In Description, enter the full organization description.
- Click Save.
Edit, Delete, and Search for an Organization Template
- Edit: Click Edit (pencil icon) next to the organization template, make the desired changes, and click Save.
- Delete: Click Delete (trash can icon) next to the organization template.
- Search: In the Search field, enter the name of the organization template.
Gallery Cards
The Gallery Cards page lists all Gallery card templates available for use in MSELs. A Gallery card template defines a reusable card category that can be pushed to Gallery during an exercise. Content developers can pull these templates into a MSEL from the Gallery Cards tab.
Add a Gallery Card Template
- Under Gallery Cards, click + (Add Gallery Card Template).
- In Name, enter the card name (for example,
Information Technology Sector). - In Card Description, enter a brief description (for example,
Status of the Information Technology Sector). - Click Save.
Edit, Delete, and Search for a Gallery Card Template
- Edit: Click Edit (pencil icon) next to the card template, make the desired changes, and click Save.
- Delete: Click Delete (trash can icon) next to the card template.
- Search: In the Search field, enter the name of the card template.
CITE Actions
The CITE Actions page lists all CITE action templates available for use in MSELs. A CITE action template defines a reusable task that teams complete during an exercise. Content developers can pull these templates into a MSEL from the CITE Actions tab.
Add a CITE Action Template
- Under CITE Actions, click + (Add CITE Action Template).
- In Description of the Action, enter the action description (for example,
Score the incident). - Click Save.
Edit, Delete, and Search for a CITE Action Template
- Edit: Click Edit (pencil icon) next to the action template, make the desired changes, and click Save.
- Delete: Click Delete (trash can icon) next to the action template.
- Search: In the Search field, enter the name of the action template.
CITE Duties
The CITE Duties page lists all CITE duty templates available for use in MSELs. A CITE duty template defines a reusable role or responsibility assigned to team members during an exercise. Content developers can pull these templates into a MSEL from the CITE Roles tab.
Add a CITE Duty Template
- Under CITE Duties, click + (Add CITE Duty Template).
- In Name, enter the duty name (for example,
Reviewer). - Click Save.
Edit, Delete, and Search for a CITE Duty Template
- Edit: Click Edit (pencil icon) next to the duty template, make the desired changes, and click Save.
- Delete: Click Delete (trash can icon) next to the duty template.
- Search: In the Search field, enter the name of the duty template.
Users
The following image shows the Users Administration Page. Here, administrators can add and delete users. Additionally, administrators can assign the necessary permissions to each user.
The available permissions are:
- System Admin: Can use all administration privileges on the Blueprint application.
- Content Developer: Can view, edit, create, and approve events on the MSEL.

Add a User
If the exercise administrator has granted the appropriate permissions, follow these steps to add a user.

- Under the Users Administration View, click +.
- Fill the fields as necessary following the Data Format Table specifications.
Data Format Table
| Field | Data Type | Description | Example |
|---|---|---|---|
| User ID | GUID | Unique ID for the user | 9dd4e3d8-5098-4b0a-9216-697cda5553f8 |
| User Name | String | User name identifier | user-2 |
Click the Save icon (a user with a + sign), then select the permissions you want to assign by checking the boxes next to the user's name.
Delete a User
To delete a user, follow these steps:
- Click the Gear icon in the top-right corner.
- Under the Users Administration View, select the user you want to delete and click the Trash Can next to the user.
Search for a User
To search for a specific user, follow these steps:
- Click the Gear icon in the top-right corner.
- Under the Users Administration View, click the Search Bar and type the name of the desired user.
Roles
Groups
User Guide
Content developers use Blueprint to build and manage MSELs.
Blueprint Landing Page
The landing page of Blueprint provides a variety of interaction modalities for exercises, tailored according to the permissions assigned to each user. The functionalities available are as follows:

Join an Event
Users with an invitation or membership on a participating team can join an event already in progress. Users click Join Event to open a page that lists all ongoing events available to them. They select an event to proceed to Player, where they access exercise information and related applications.
Start an Event
Users with an invitation to an exercise MSEL designated as a template can initiate the event and engage with the exercise.
After users click Start Event, the system redirects them to a page listing all available events other users have invited them to. They should select a template to launch the event and proceed to Player, where they can access all exercise information and deployed applications.
Manage an Event
Users with administrative roles, content developer permissions, or contributor designation on the MSEL can see this option. They can continue developing the current MSEL or create a new one.
Player Manage Event Page
When a user starts an event (as described above), Blueprint adds a Manage Event application to the left side panel of the Player view. The Manage Event application lets the user change the event end time, end the event, and invite others to join.
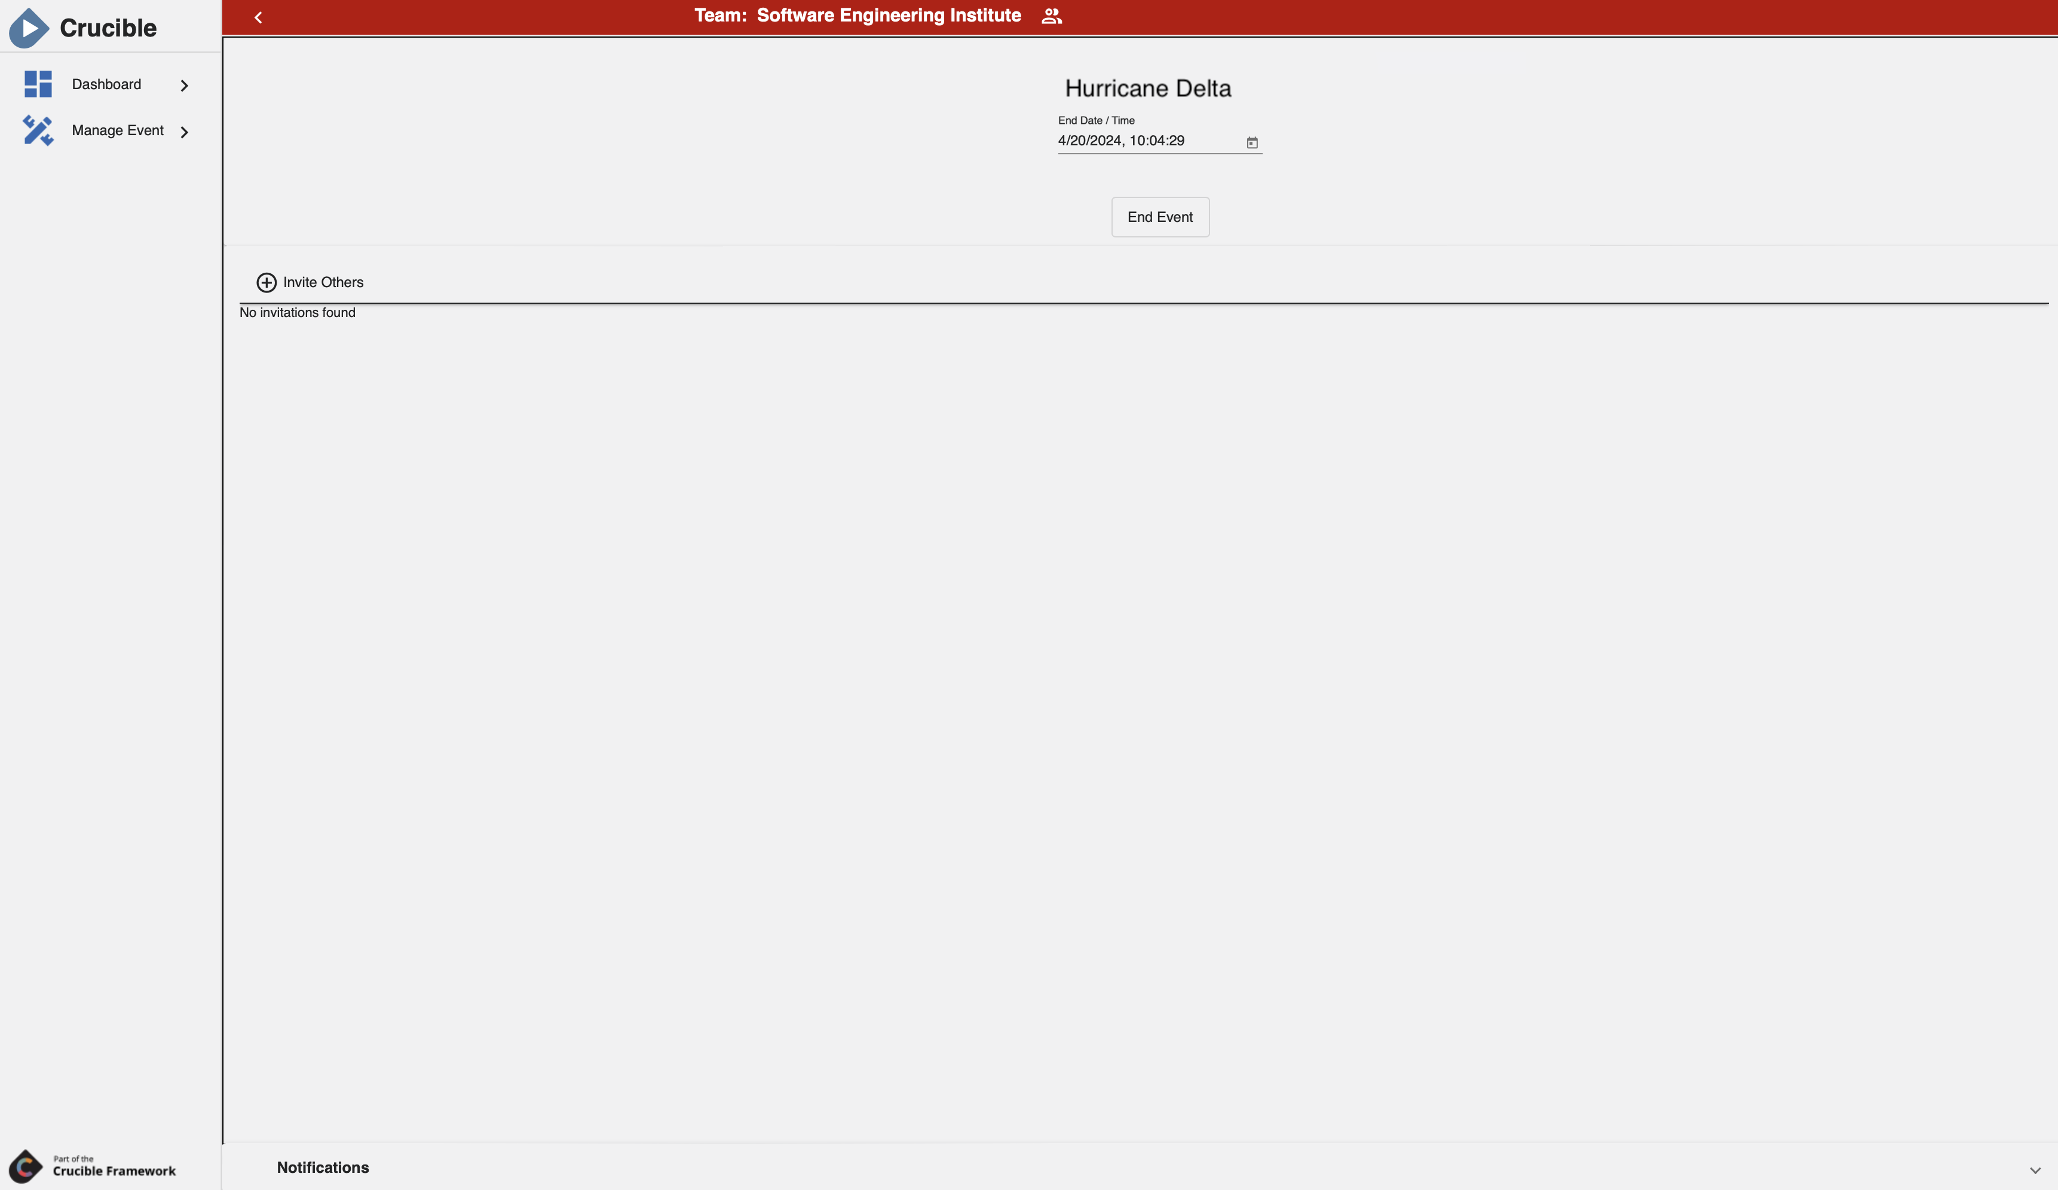
Launched Event User Invitations
To invite other users to the launched event, follow these steps:
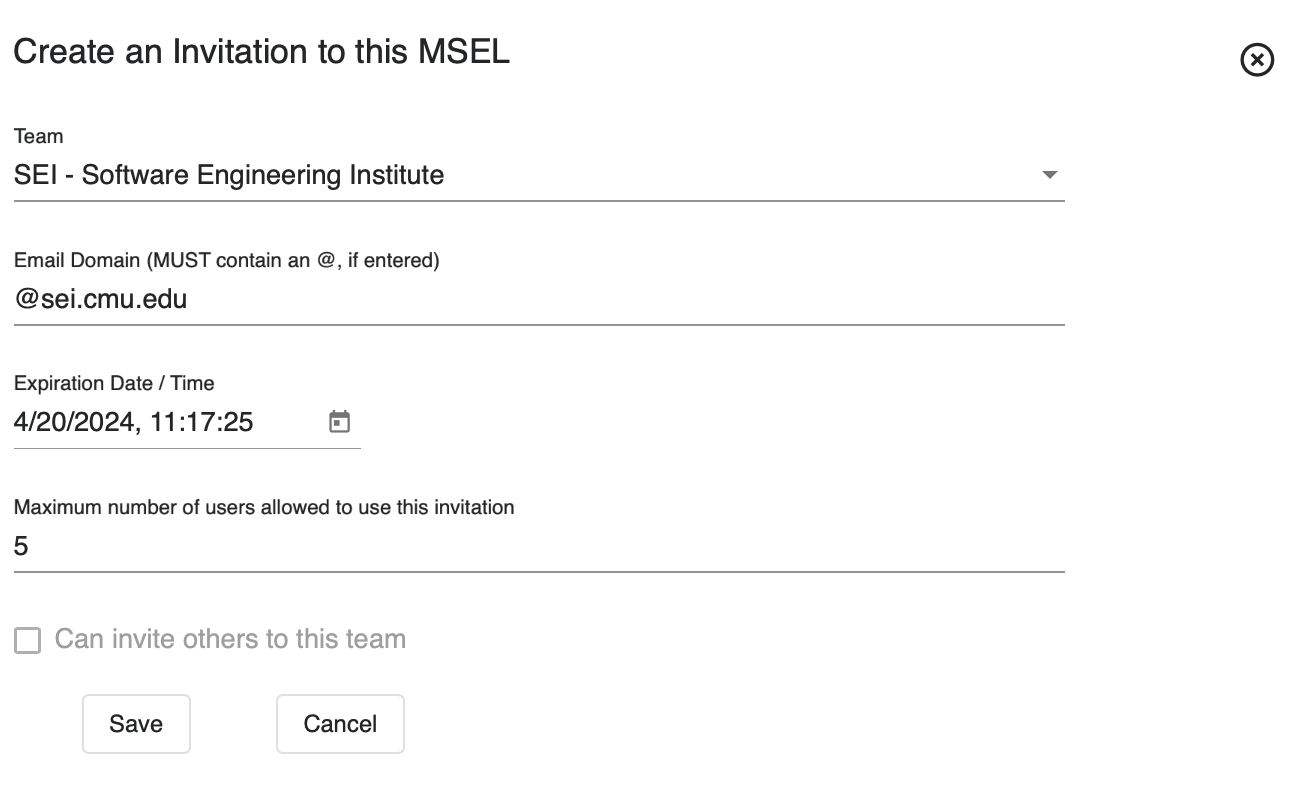
- Navigate to the Manage Event application from Player's side panel.
- Click Invite Others.
- Fill the fields as necessary following the Data Format Table specifications.
Data Format Table
| Field | Data Type | Description | Example |
|---|---|---|---|
| Team | Dropdown Text | User's team | SEI - Software Engineering Institute |
| Email Domain | String | User's email domain tied to the invitation | @sei.cmu.edu |
| Expiration Date/Time | Datetime | Date/Time when the invitation should expire | 04/20/2024 11:17:25 |
| Maximum Number of Users Allowed to Use this Invitation | Integer | Number of users allowed to use the invitation | 5 |
| Can Invite Others to this team | Boolean | Allows new users to invite others to the exercise | False |
After you've added all desired configurations, click Save.
Ending a Launched Event
To end an event, follow these steps:
- Navigate to the Manage Event application from Player's side panel.
- Click End Event.
- On the confirmation screen, click Yes to successfully end the event.
MSEL Catalog
The MSEL Catalog shows created MSELs. Users can select a MSEL to work on, create a new one, and delete an existing one.

Add Blank MSEL
Blueprint lets users create a MSEL from scratch directly in the application. This removes the hassle of Excel and makes visualizing information easier.
Upload an Existing MSEL
Users can upload a pre-existing MSEL and continue editing it in the application. This is useful to share existing MSEL work without having to add information to a blank MSEL one by one.
Filter Display
Use the filter options to narrow down MSELs shown in the catalog.
Types
Filter MSELs by categorization. Options are: All Types, Templates, and Not Templates.
Statuses
Filter MSELs by current status. Options are: All Statuses, Pending, Entered, Approved, and Completed.
Search
Search for a specific MSEL by name.
Load All MSELs
Users with the appropriate administrative permissions can load and view all MSELs created.
Gear
Users with the appropriate administrative permissions can use the Gear icon to access Blueprint's administrative settings.
Manage MSEL
Click a MSEL card to open it. The following actions are available from the MSEL card.
Download
Users can download a copy of any MSEL for offline use. Offline work is not recommended as users will miss Blueprint's features and updates.
Upload
The Upload feature updates the MSEL card with information from a new .xlsx file, replacing all existing content.
Important
When importing MSELs into Blueprint, verify that events and settings align with your preferences. Some fields may require reconfiguration after import.
Delete
The Delete feature removes an existing MSEL card and all associated information.
Copy
The Copy feature duplicates an existing MSEL card. Use this to modify a copy instead of the original.
MSEL Cards
Click a MSEL card to view its information. Users can edit or update existing information, and changes appear live for all collaborators.
MSEL Definition
After uploading or creating a MSEL, users can edit any information and add additional information to the MSEL. Users edit the same MSEL, instead of working on separate copies and sending edits to one person. This ensures everyone has the same version during the live scenario.
Basic Information
On this tab, users can edit and configure MSEL settings, as well as enable/disable integrations.
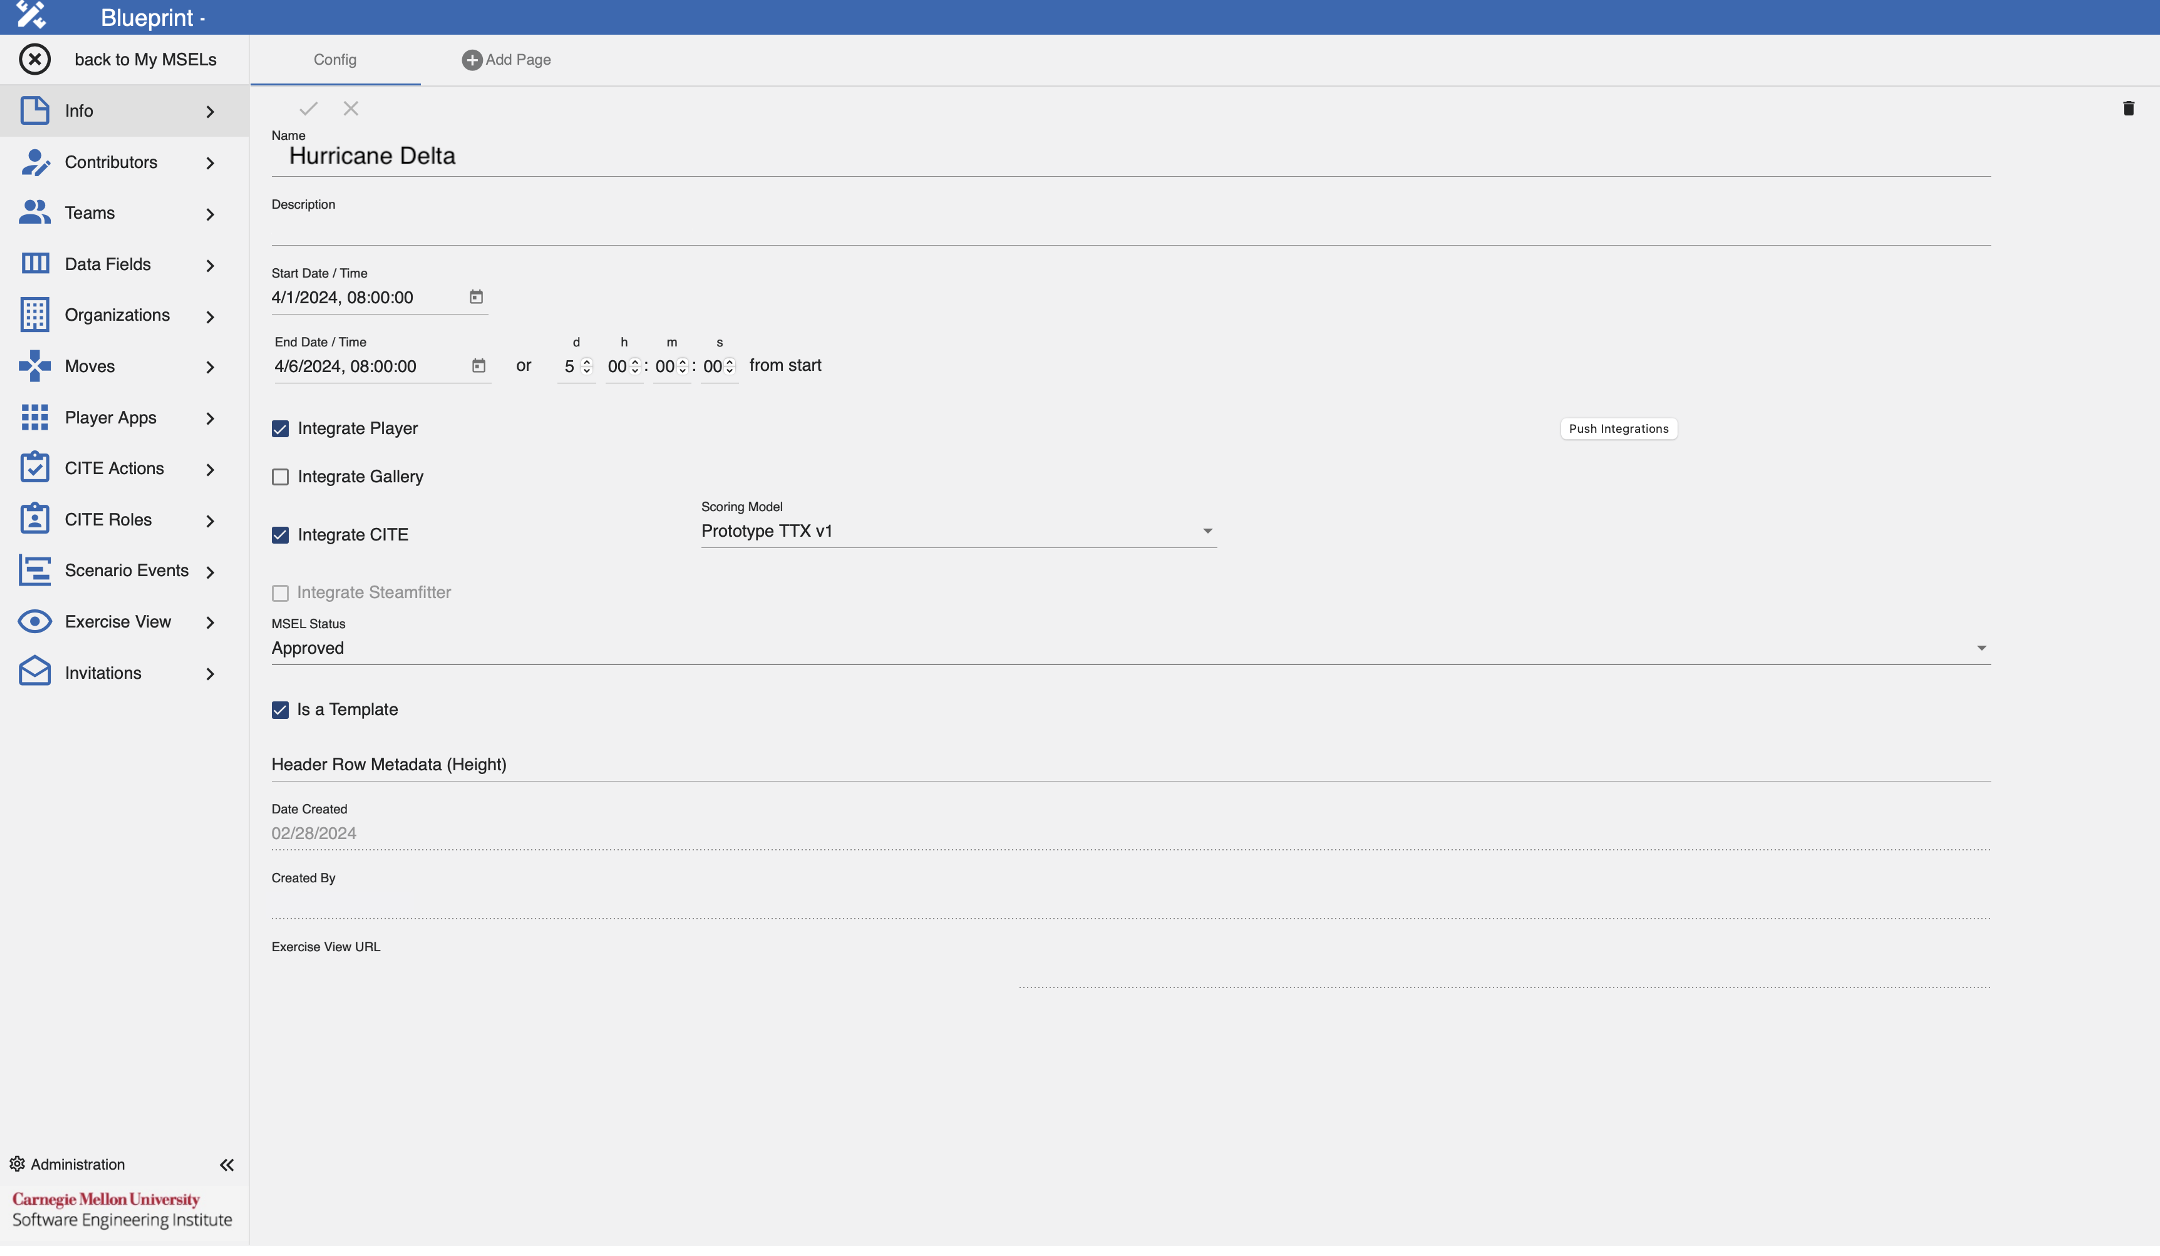
To edit the MSEL's basic information and configuration, follow these steps:
- Navigate to the Info tab.
- Ensure you are in the Config section.
- Fill the fields as necessary following the Data Format Table specifications.
Data Format Table
| Field | Data Type | Description | Example |
|---|---|---|---|
| Name | String | Name of the MSEL | Hurricane Delta MSEL |
| Description | String | Details and/or characteristics of the MSEL | Hurricane Delta Fort Myers Scenario |
| Start Date/Time | Datetime | Start date/time of the MSEL | 09/10/2024 20:00:00 |
| End Date/Time | Datetime | End date/time of the MSEL | 10/10/2024 08:00:00 |
| Is a Template | Boolean | Designate if this MSEL should be a system template | True |
| Integrate Player | Boolean | Add Player integration functionality to the MSEL | True |
| Integrate Gallery | Boolean | Add Gallery integration functionality to the MSEL | True |
| Integrate CITE | Boolean | Add CITE integration functionality to the MSEL | True |
| Select Scoring Model | Dropdown Text | Select a CITE Scoring Model | CISA NCISS |
| Integrate Steamfitter | Boolean | Add Steamfitter integration functionality to the MSEL | False |
| MSEL Status | Dropdown Text | Select MSEL status designation | Active |
| Header Row Metadata (Height) | Integer | An integer value that defines the height of the header row when exporting this MSEL as an .xlsx file | 30 |
To save these settings, click the checkmark at the top.
Integrations
- Gallery: Blueprint will add the collections, exhibits, cards, articles, teams, and users specified on the MSEL. To learn more about this integration, reference the Gallery section.
- CITE: Blueprint will add the evaluation, moves, actions, roles, teams, and users specified on the MSEL. To learn more about this integration, reference the CITE section.
- Player & Steamfitter: Blueprint will automate the adding of events specified on the MSEL, as well as configure exercise details in Player.
Add Page
On this tab, users can add notes to the MSEL for team members with the appropriate permissions to work on and access.
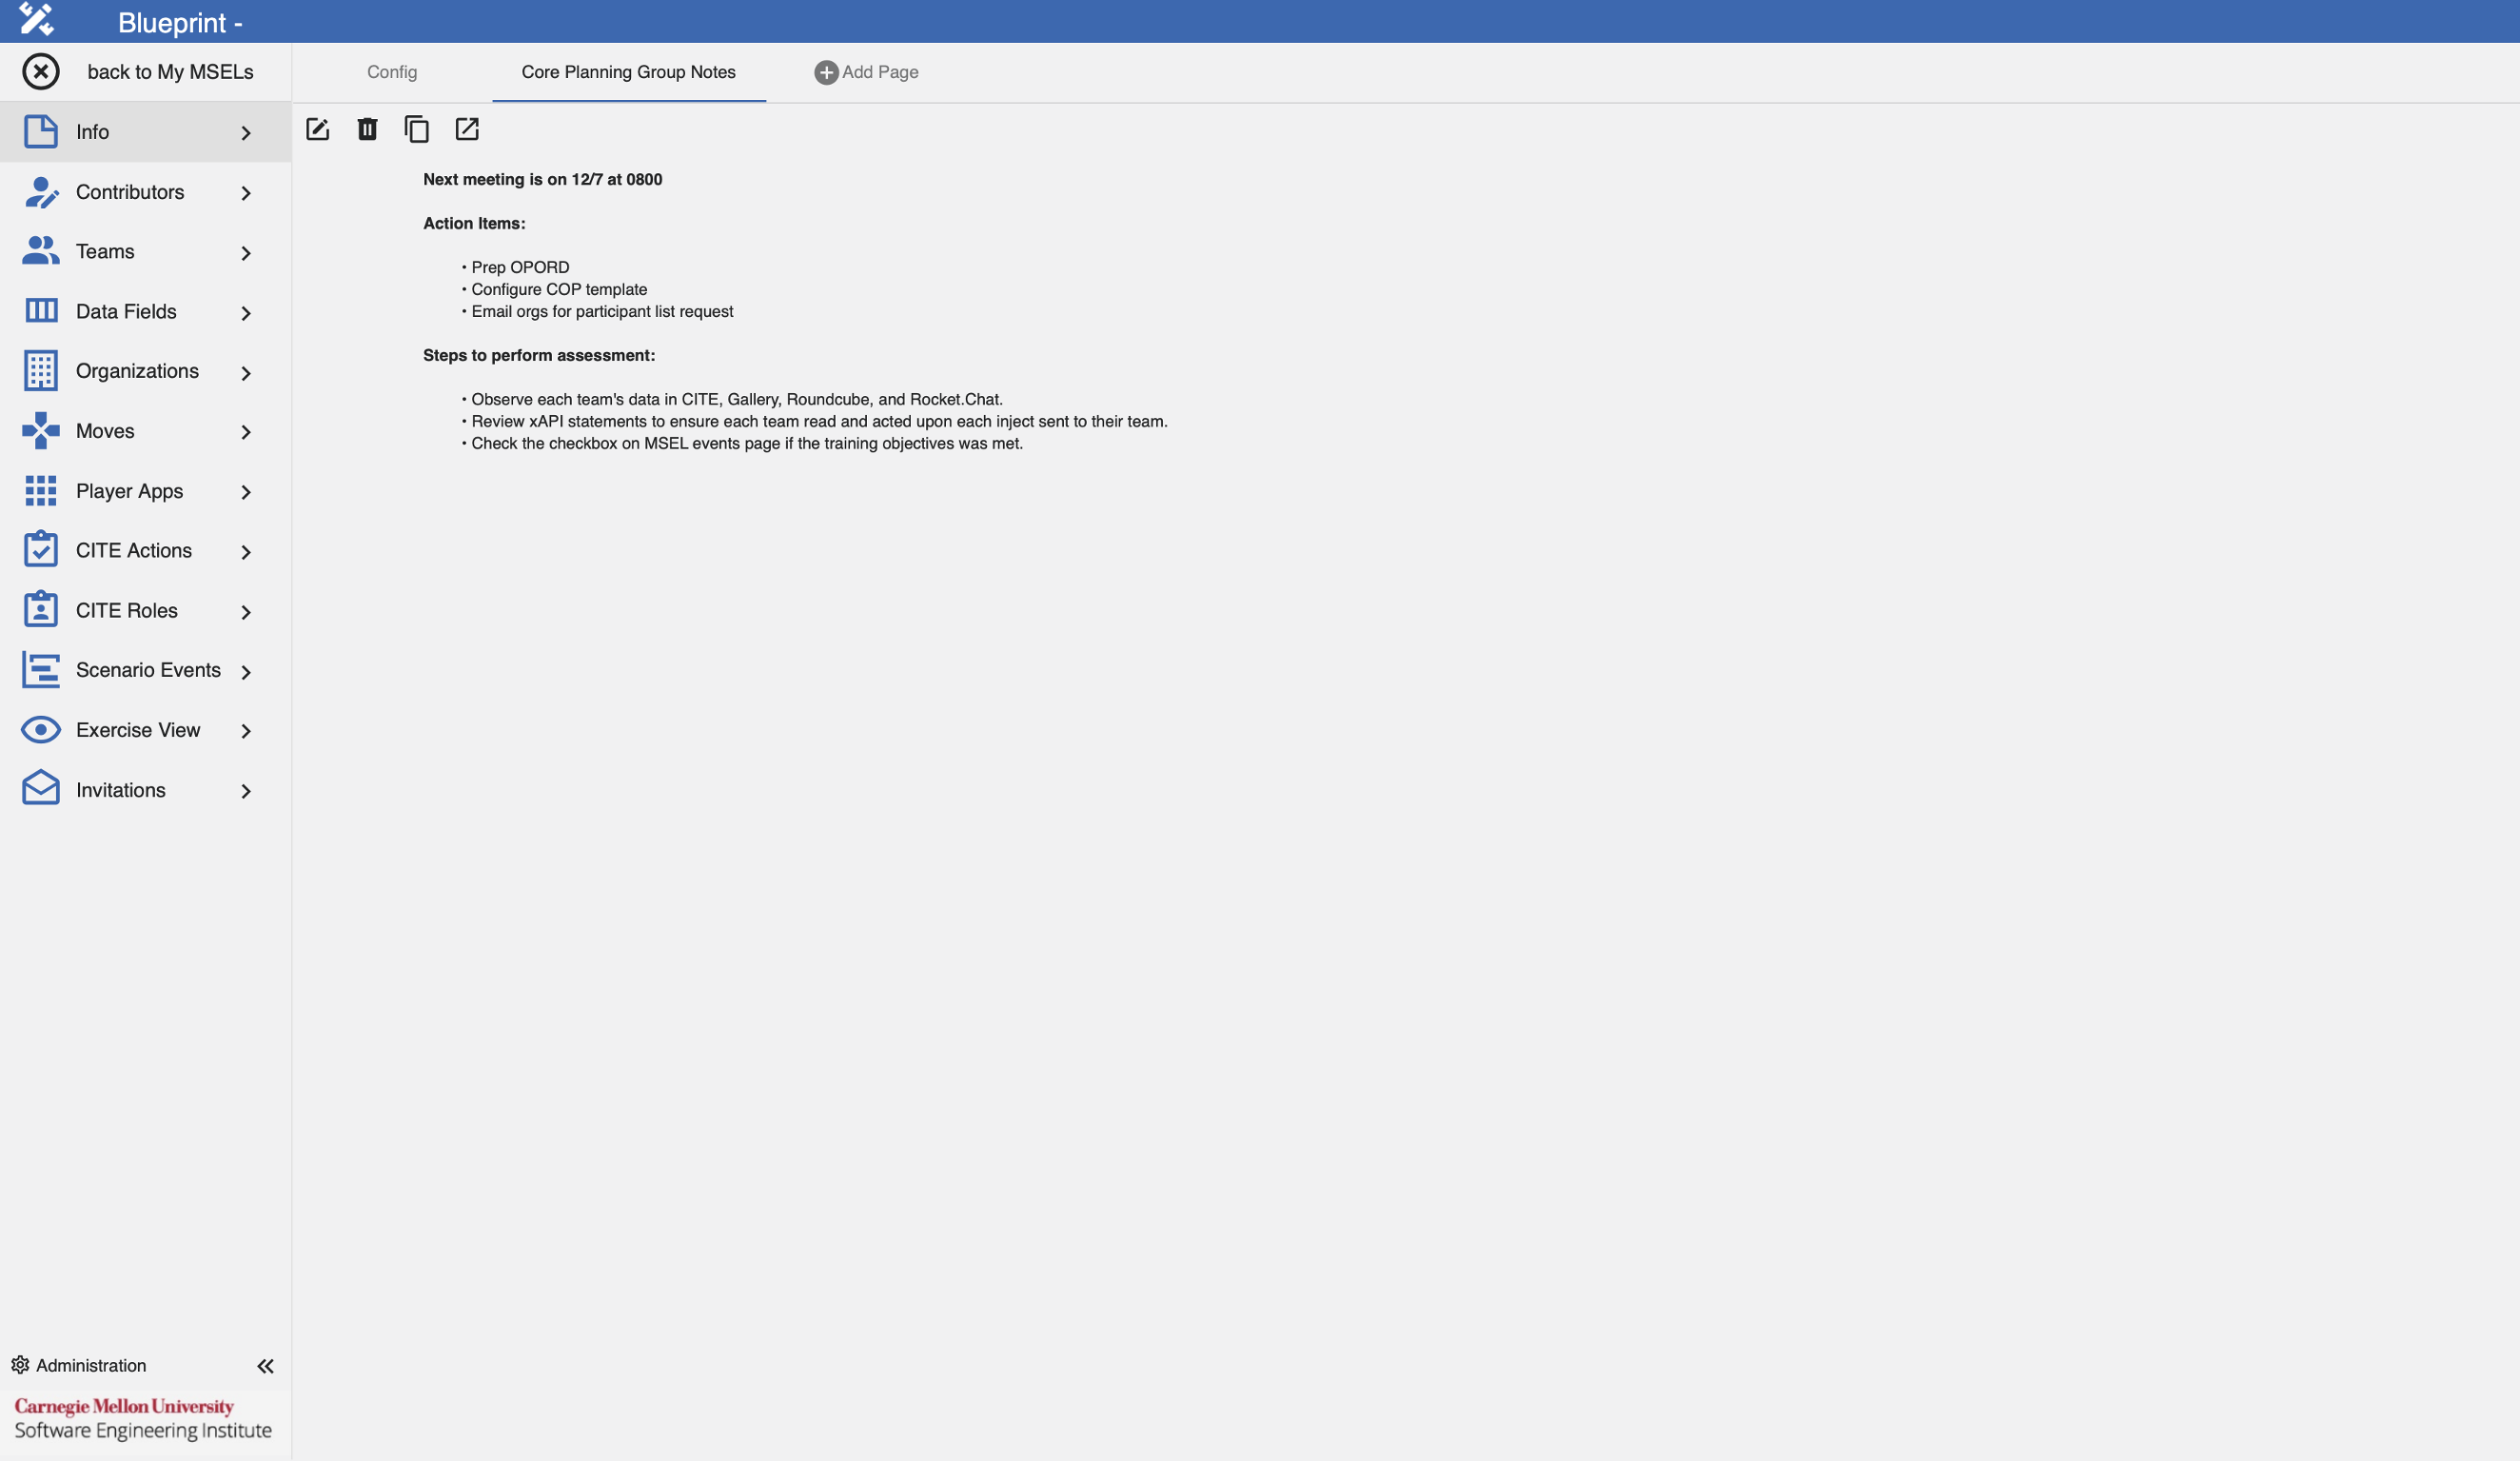
To add MSEL notes, follow these steps:
- Navigate to the Info tab.
- Click Add Page.
- Fill the fields as necessary following the Data Format Table specifications.
Data Format Table
| Field | Data Type | Description | Example |
|---|---|---|---|
| Page Name | String | Name of the Page | Core Planning Group Notes |
| All MSEL users can view this page | Boolean | Enable other users who don't have elevated permissions to access this page | True |
| Notes | Rich Text | Field to add page notes | Next meeting is on 12/7 at 0800 |
After you've made your changes, click the checkmark to save the page.
Contributors
On this tab, users can add and assign contributor teams, as well as their respective roles related to the creation and management of the MSEL. Assigned teams can view and edit the MSEL.
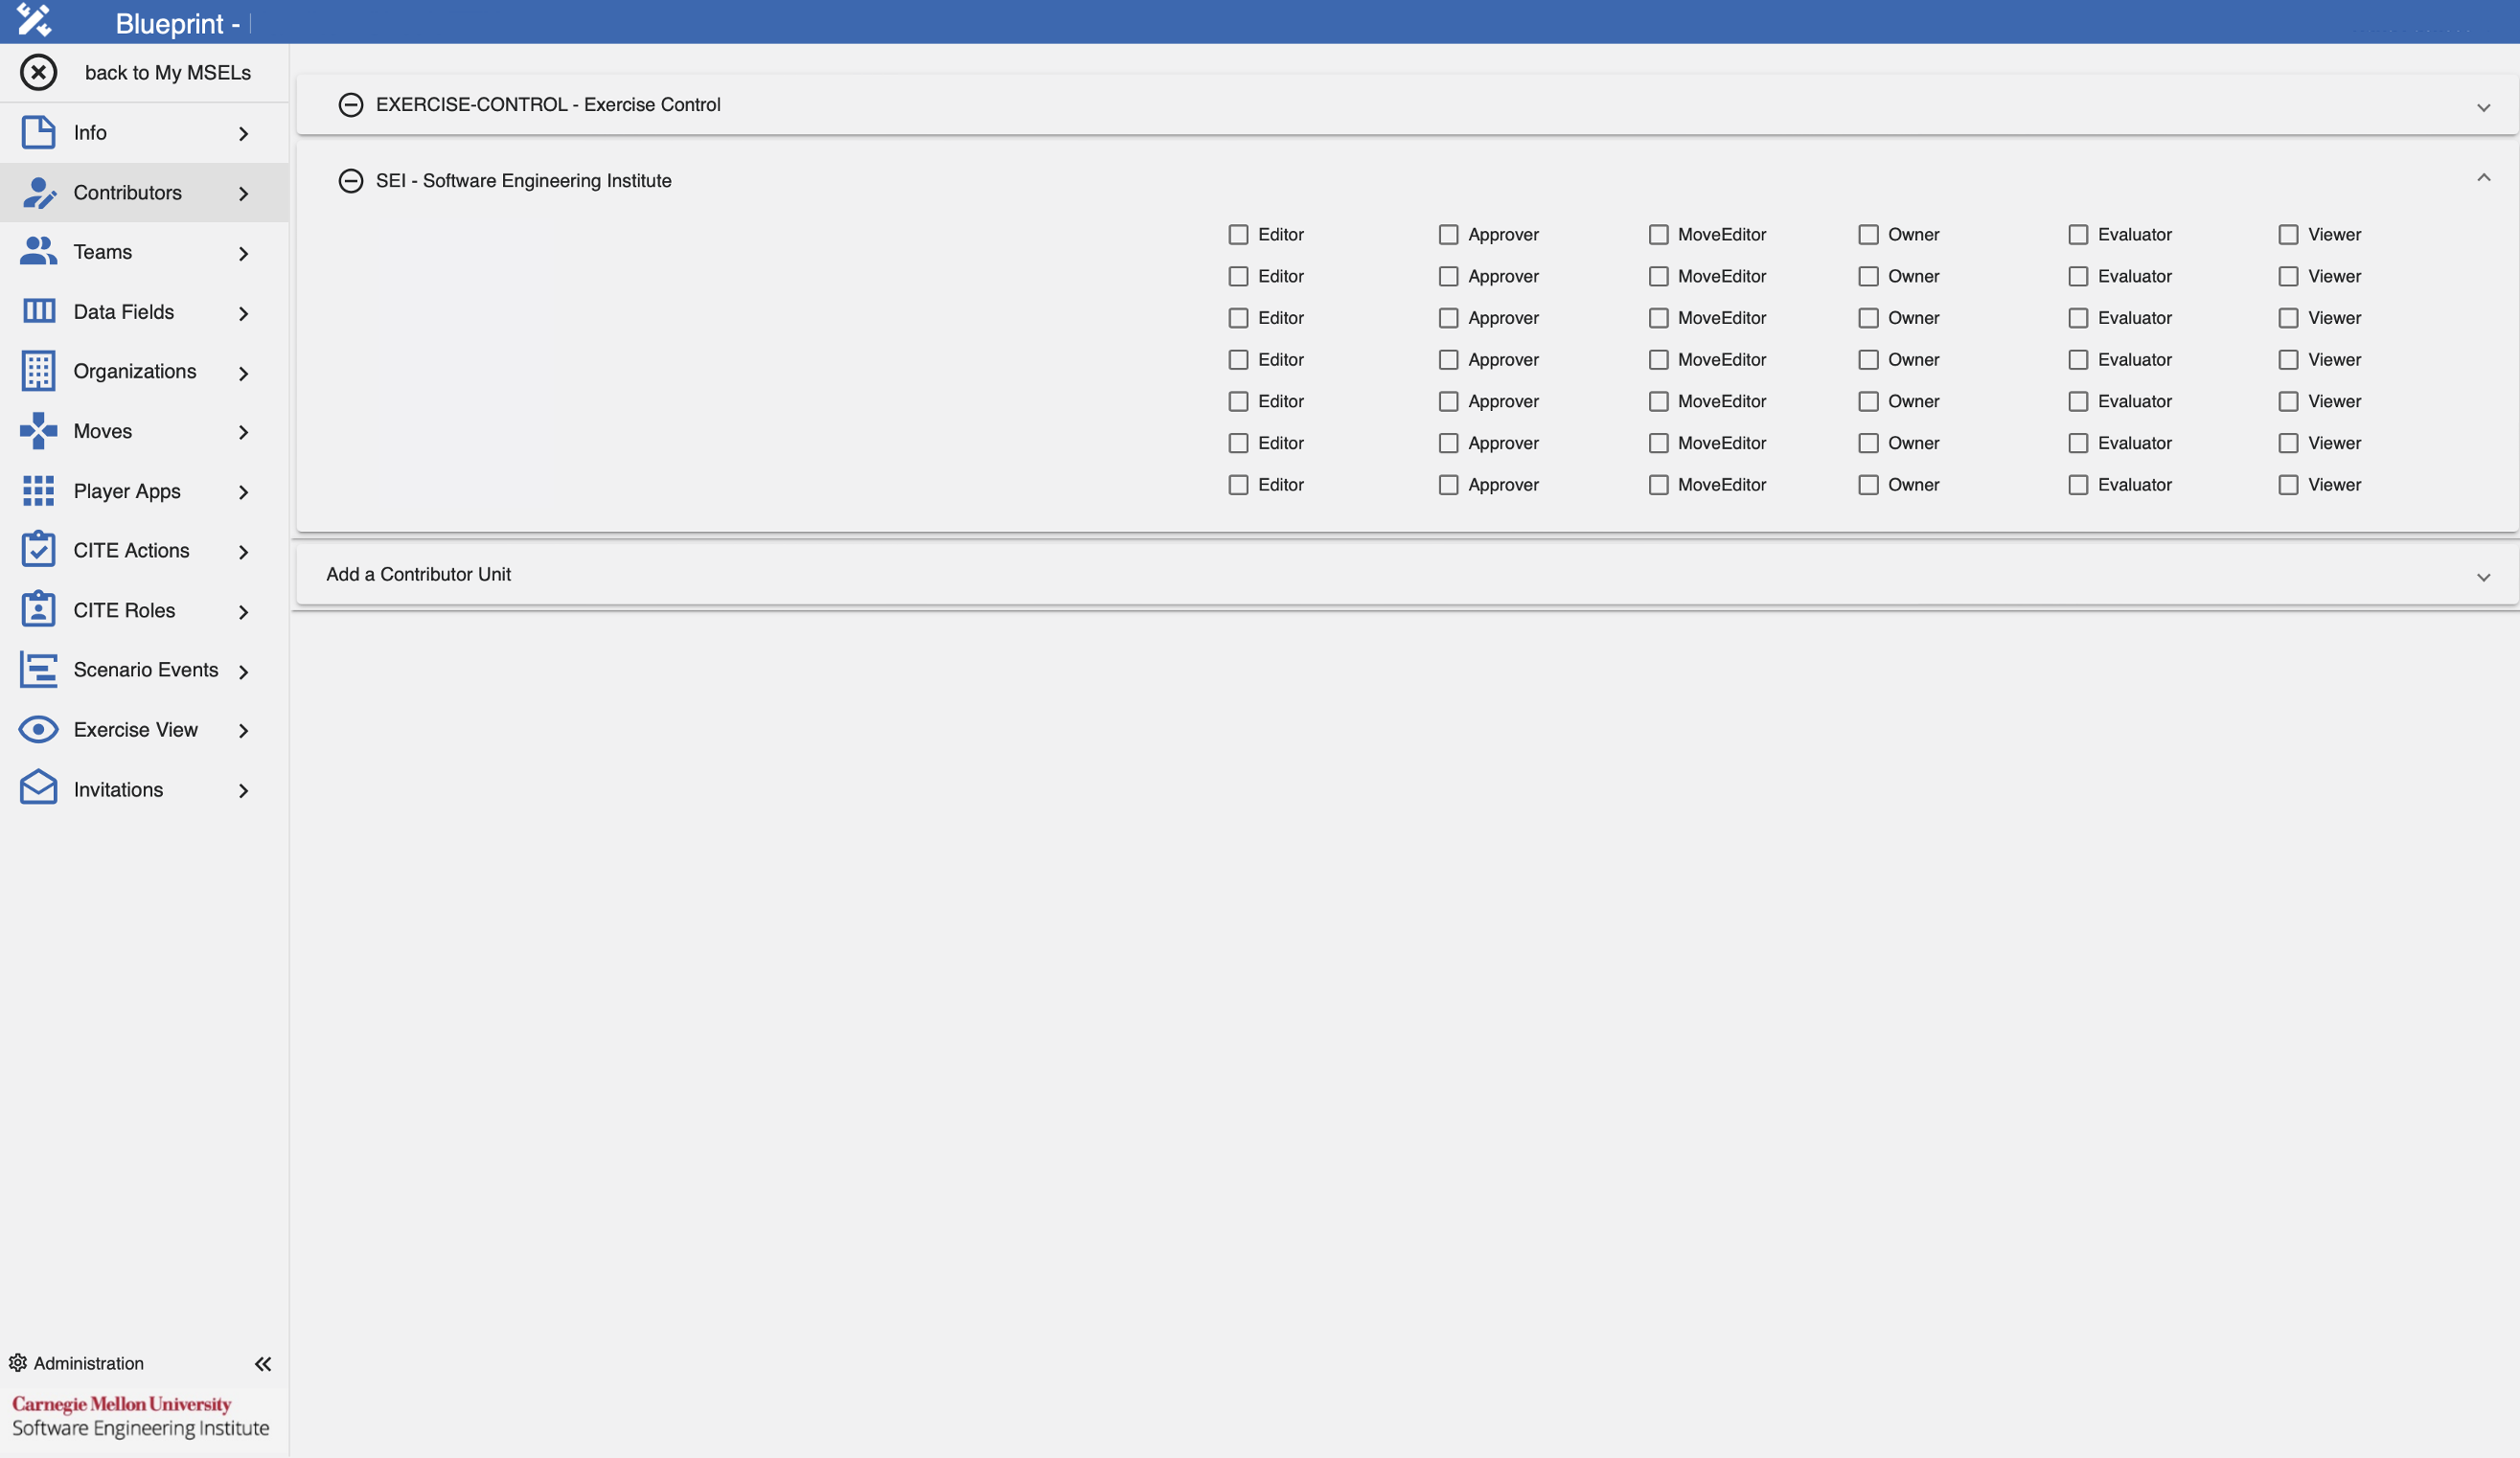
Add a Contributor
To add a contributor unit to the MSEL, follow these steps:
- Navigate to the Contributors tab.
- Click Add a Contributor Unit, then select the unit you want to add.
- After selecting the unit, click the + button.
Remove a Contributor
To remove a contributor unit from the MSEL, follow these steps:
- Navigate to the Contributors tab.
- Select the team you want to remove and click the - button.
Now that you've added the unit to the MSEL, members can view and edit it based on each unit member's role.
The available roles are:
Editor: Can edit the events assigned to them by the MSEL owner, but not other events. They cannot delete events or create new events.Approver: Can view and edit the MSEL, and will have the added feature of approving a MSEL.Move Editor: Can edit moves on the MSEL, as well as increment them during an exercise.Owner: Owner of the MSEL, can view and edit the MSEL, as well as perform all of the functionalities that the MSEL provides (e.g., Add Teams, Add Integrations, Events).Evaluator: Manages the exercise, can advance moves, execute events, and check events as completed.Viewer: Can view the MSEL, but can't edit it.
Teams
On this tab, users can add and assign teams as well as their respective roles during an event to the MSEL.
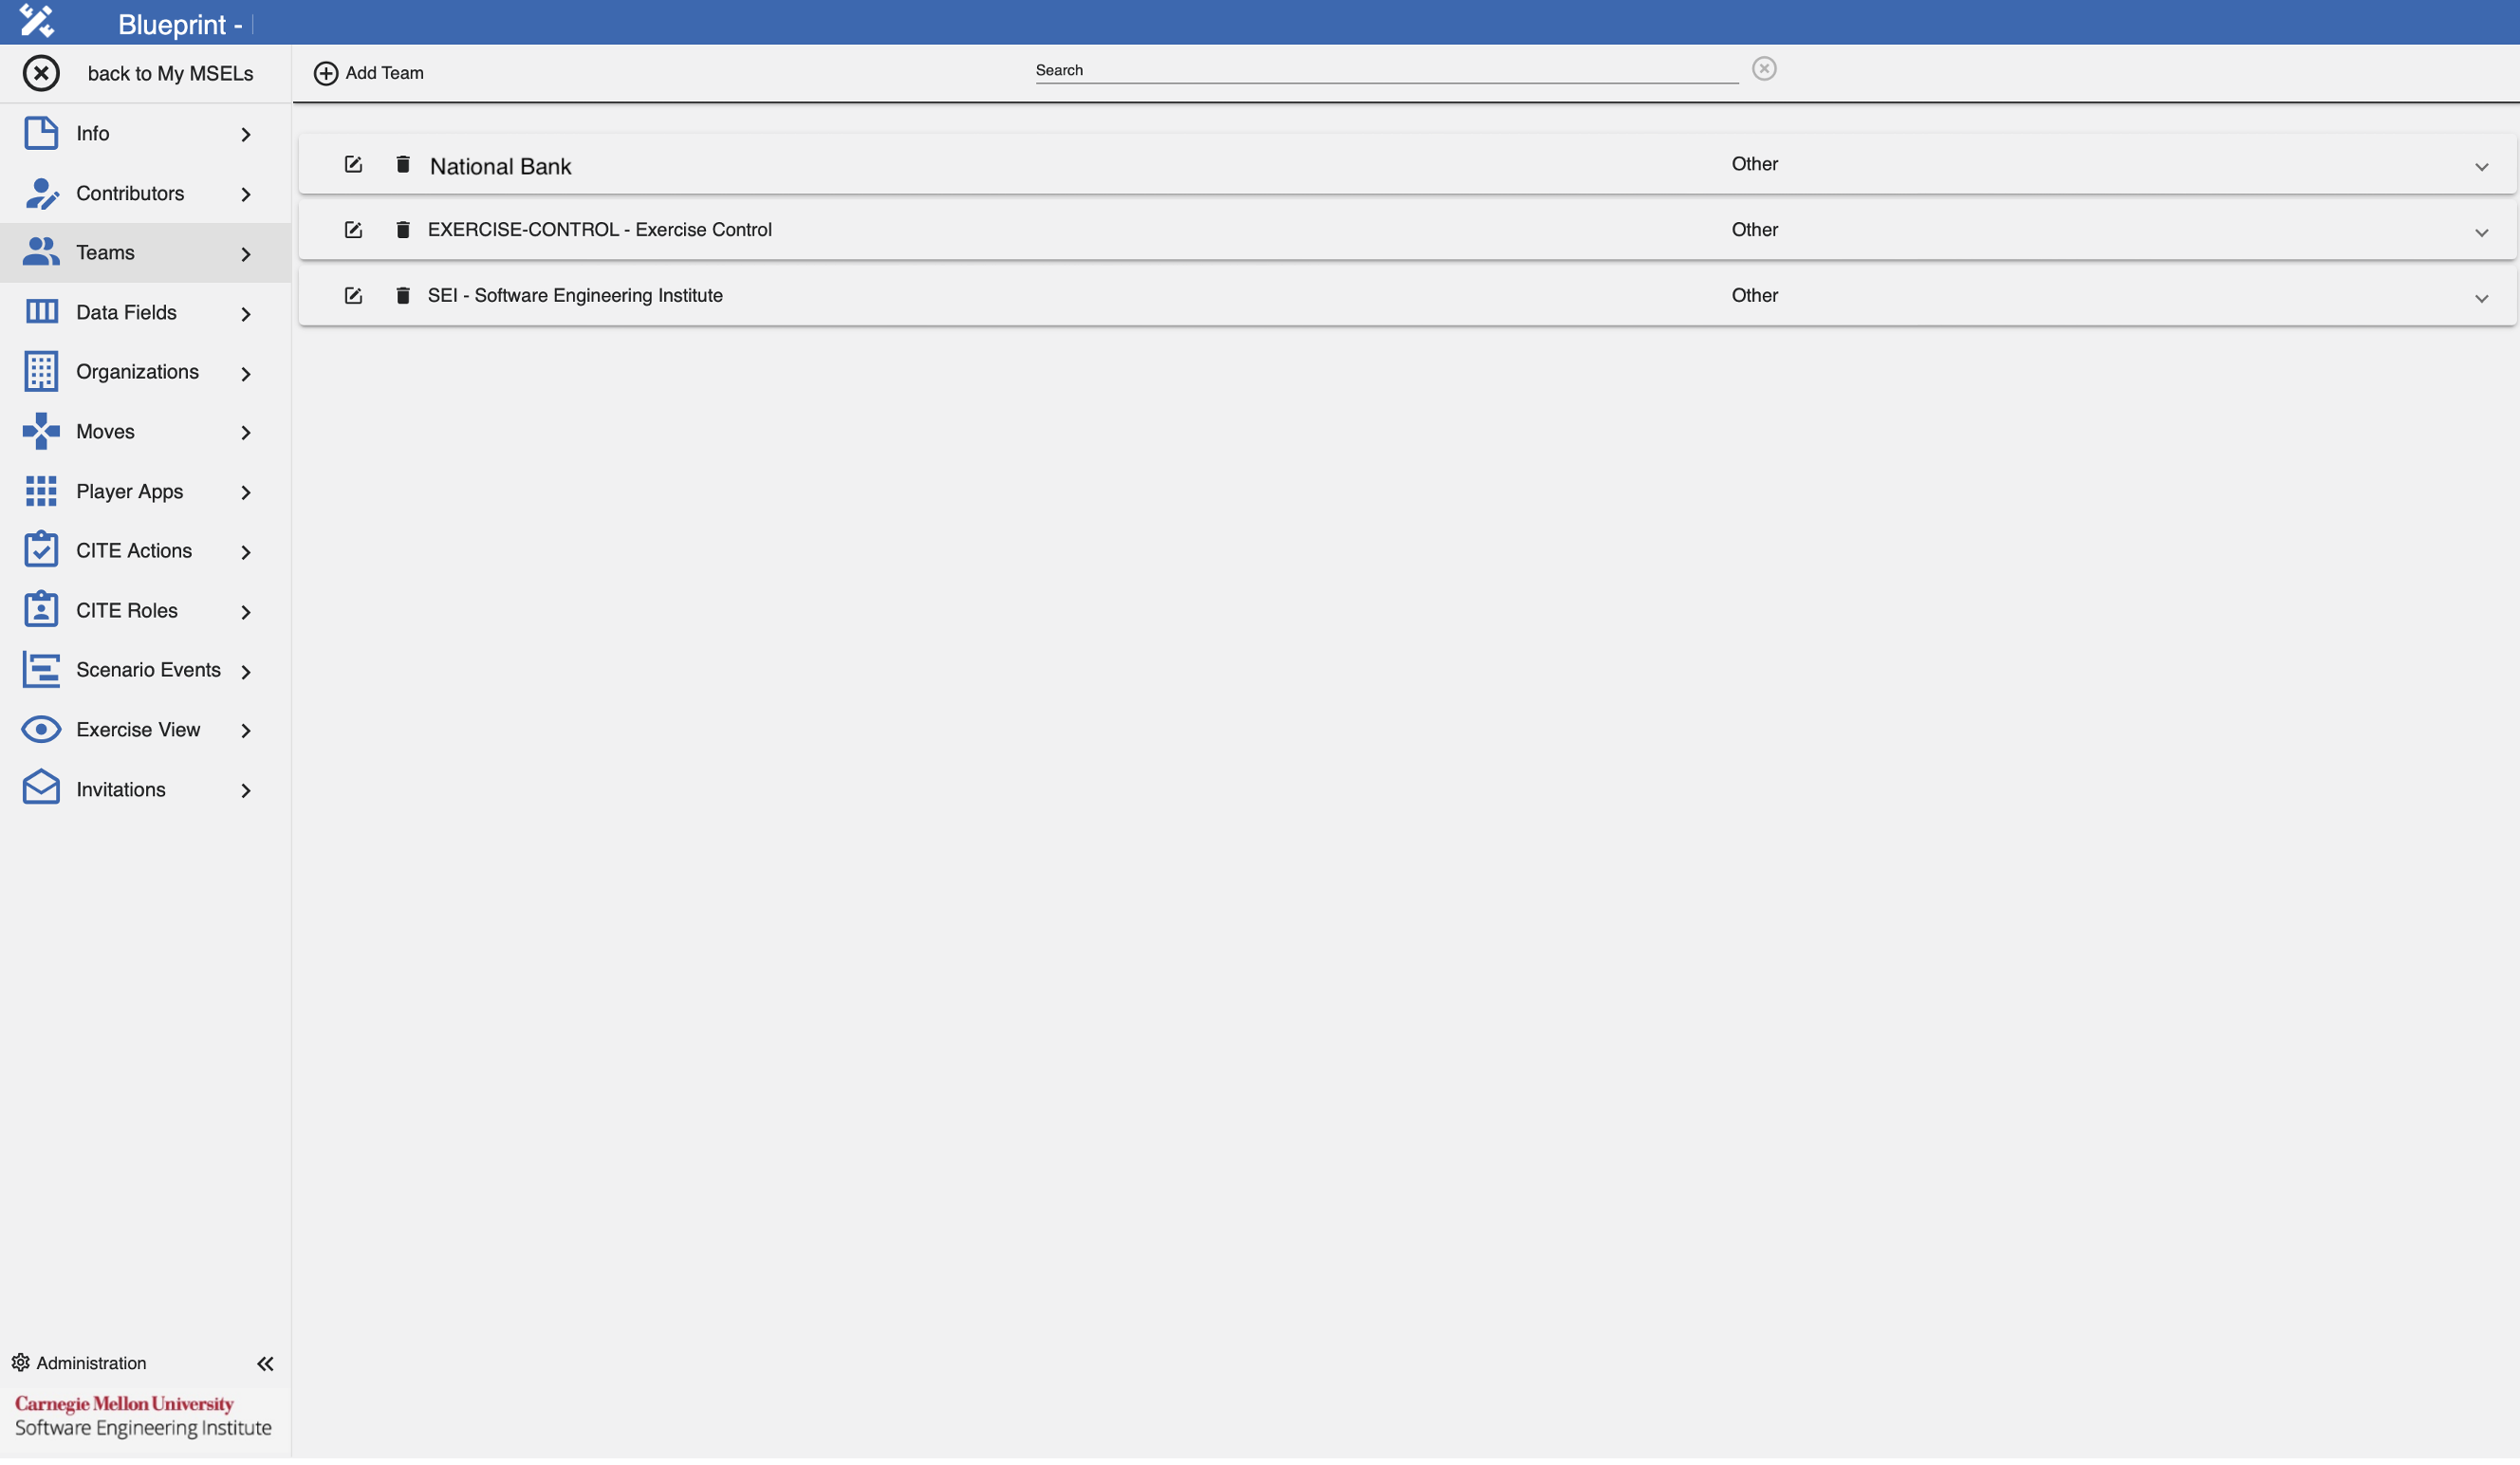
Add a Team
To add a team to the MSEL, follow these steps:
- Navigate to the Teams tab.
- Click Add a Team, then select the team you want to add.
- After selecting the team, click the + button.
Remove a Team
To remove a team from the MSEL, follow these steps:
- Navigate to the Teams tab.
- Select the team you want to remove and click the - button.
Now that you've added the team to the MSEL, members can participate on the MSEL event based on each team member's assigned role.
The available roles are:
Inviter: This role allows a user to invite others to the MSEL event.Observer: When the MSEL owner has enabled Gallery or CITE integrations, this role allows a user to observe other team's progress on CITE and Gallery applications.Incrementer: When the MSEL owner has enabled CITE integration, this role allows a user to advance the current move.Modifier: When the MSEL owner has enabled CITE integration, this role allows a user to modify the team's score.Submitter: When the MSEL owner has enabled integration, this role allows a user to submit the team's score.
Data Fields
On this tab, users can add data fields used on the MSEL. Compare these data fields to the column fields on Excel spreadsheets.
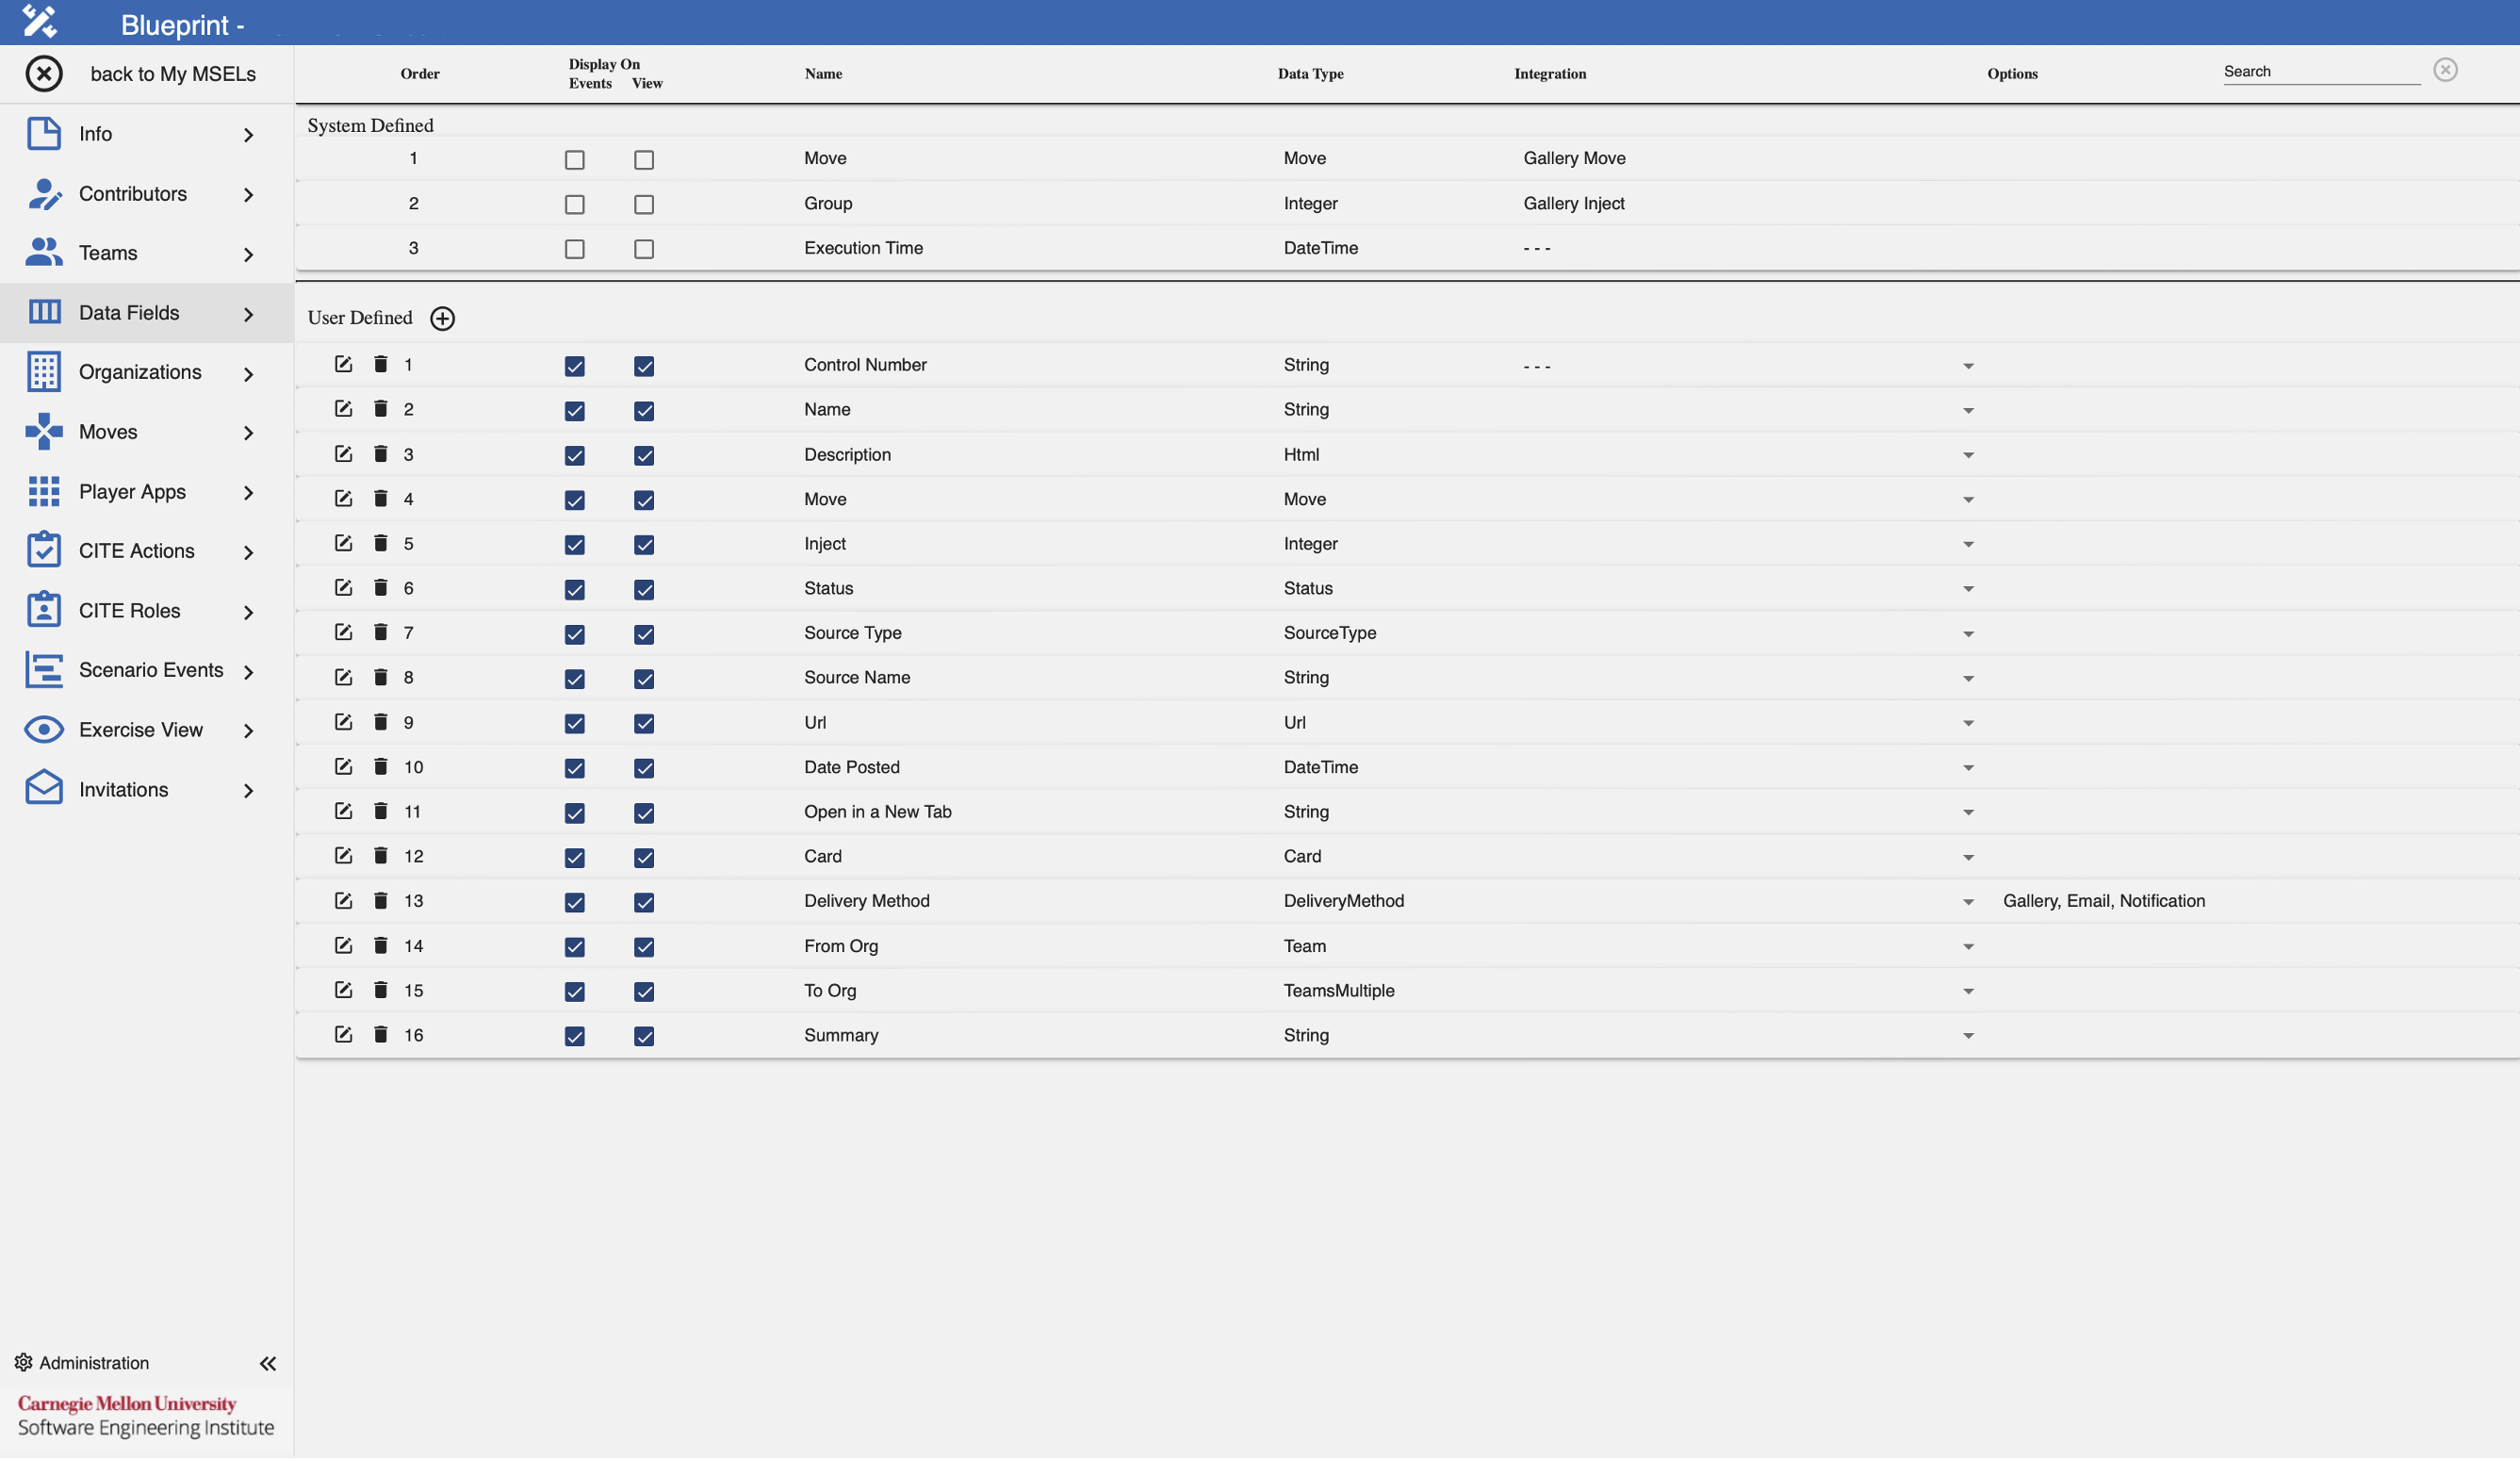
There are two categories of Data Fields:
- System Defined: Added by default in MSEL creation, since data fields under this category are essential for MSEL features to work.
- User Defined: Added by the user on an as-needed basis.
Add a Data Field
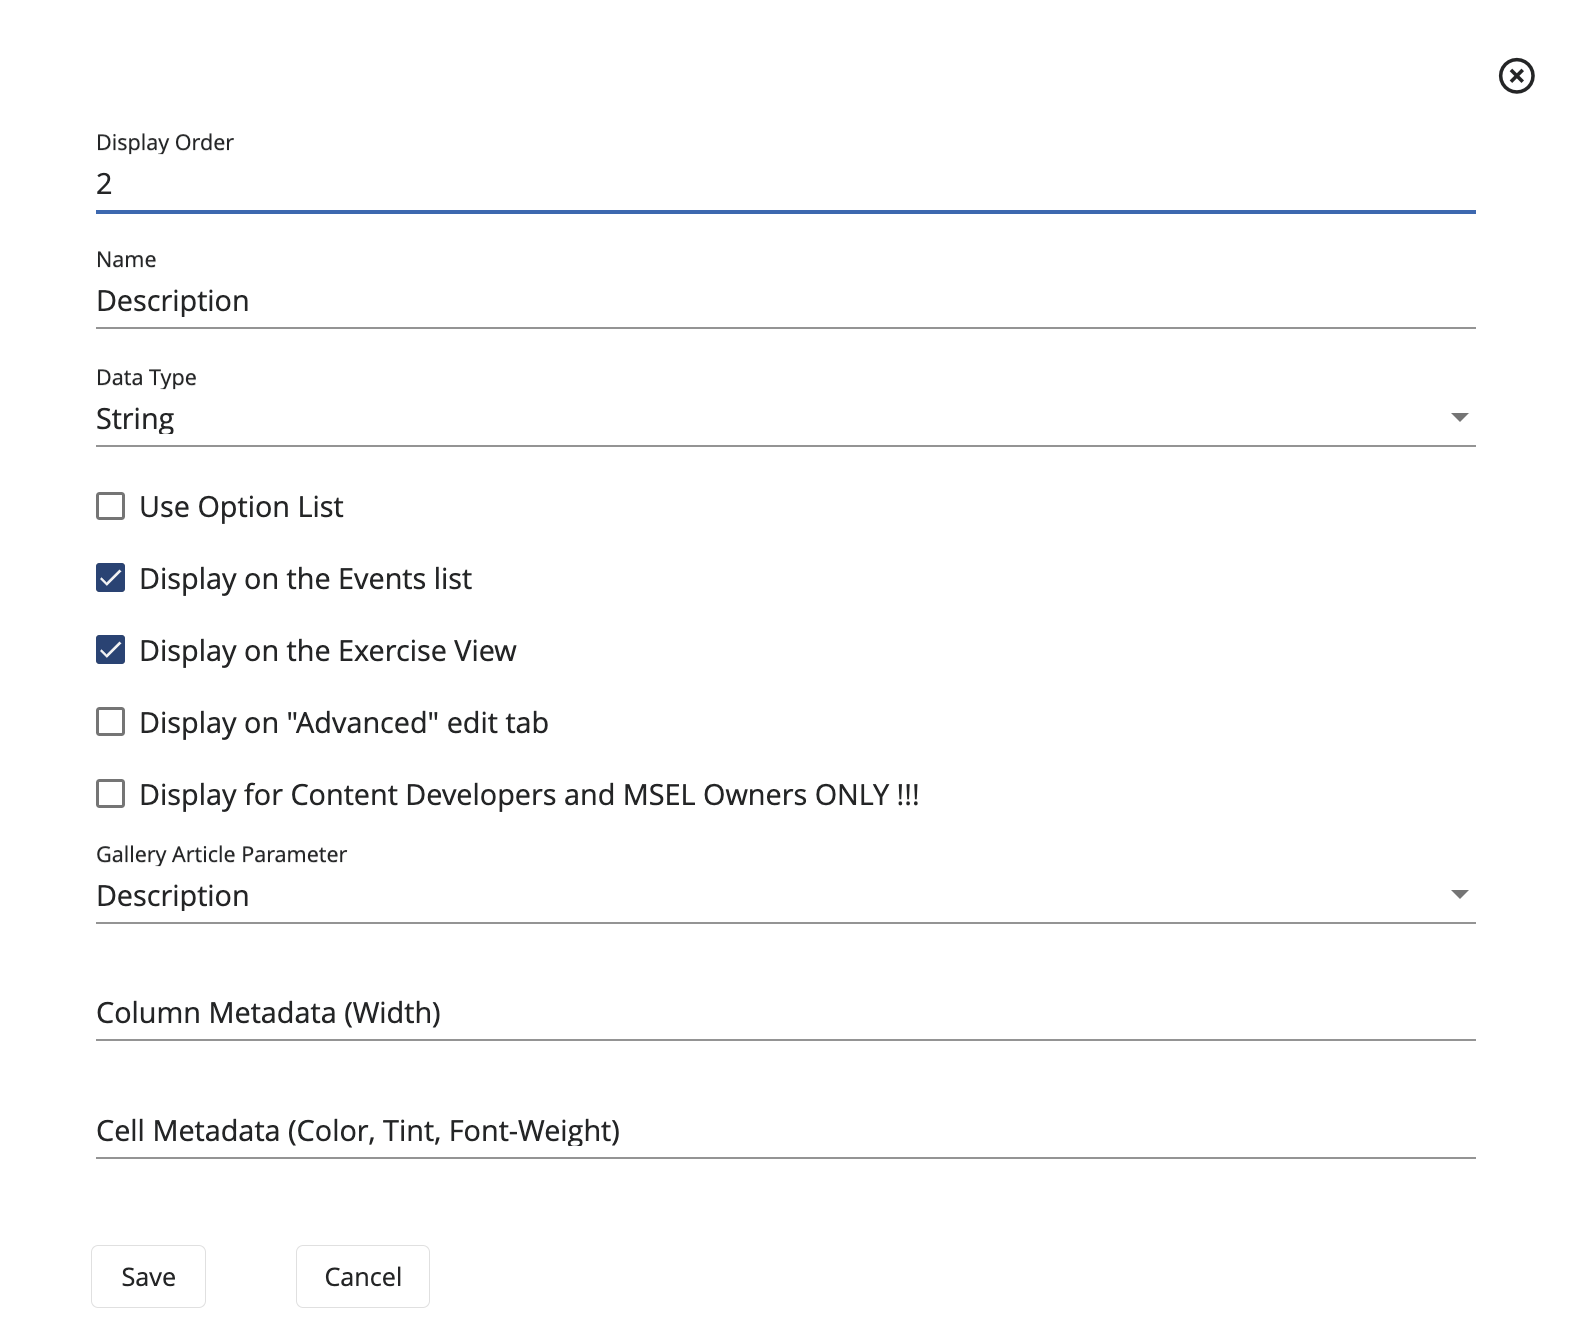
To add a Data Field to the MSEL, follow these steps:
- Navigate to the Data Fields tab.
- Click the + icon from the top left of the screen.
- Fill the fields as necessary following the Data Format Table specifications.
Data Format Table
| Field | Data Type | Description | Example |
|---|---|---|---|
| Display Order | Integer | Indicate the order of the data field | 1 |
| Name | String | Name of the data field | Description |
| Data Type | Dropdown Text | Data type for the data field | String |
| Use Option List | Boolean | Add options to select when adding an event | True |
| Display on the Events list | Boolean | Display this data field on the Events list tab | True |
| Display on the Exercise View | Boolean | Display this data field on the Exercise View tab | True |
| Display on "Advanced" edit tab | Boolean | Display this data field on the data field edit component Advanced tab | True |
| Display for Content Developers and MSEL Owners Only!!! | Boolean | Display this data field for users who are Content Developers or MSEL Owners only | True |
| Gallery Article Parameter | Dropdown Text | If using the Gallery integration, select the Gallery parameter that aligns with the data field | Description |
| Column Metadata (Width) | Integer | Width of the column when displayed | 30 |
| Cell Metadata (Color, Tint, Font-Weight) | String | Column color and font style | (Red, 20%, bold) |
After you've added all desired configurations, click Save.
Delete a Data Field
To delete a Data Field from the MSEL, follow these steps:
- Navigate to the Data Fields tab.
- Select the data field you want to delete and click the Trash Can.
Edit a Data Field
To edit an existing Data Field, follow these steps:
- Navigate to the Data Fields tab.
- Select the data field you wish to edit and click Edit to make any changes to the existing configurations.
- After making all necessary changes, click the checkmark to save them.
Search for a Data Field
To search for a specific Data Field, follow these steps:
- Navigate to the Data Fields tab.
- Click the Search Bar and add the name of the data field desired.
Organizations
On this tab, users add all related organizations (with their information) used on the MSEL and the live exercise. Users can create organizations from scratch or from a template.
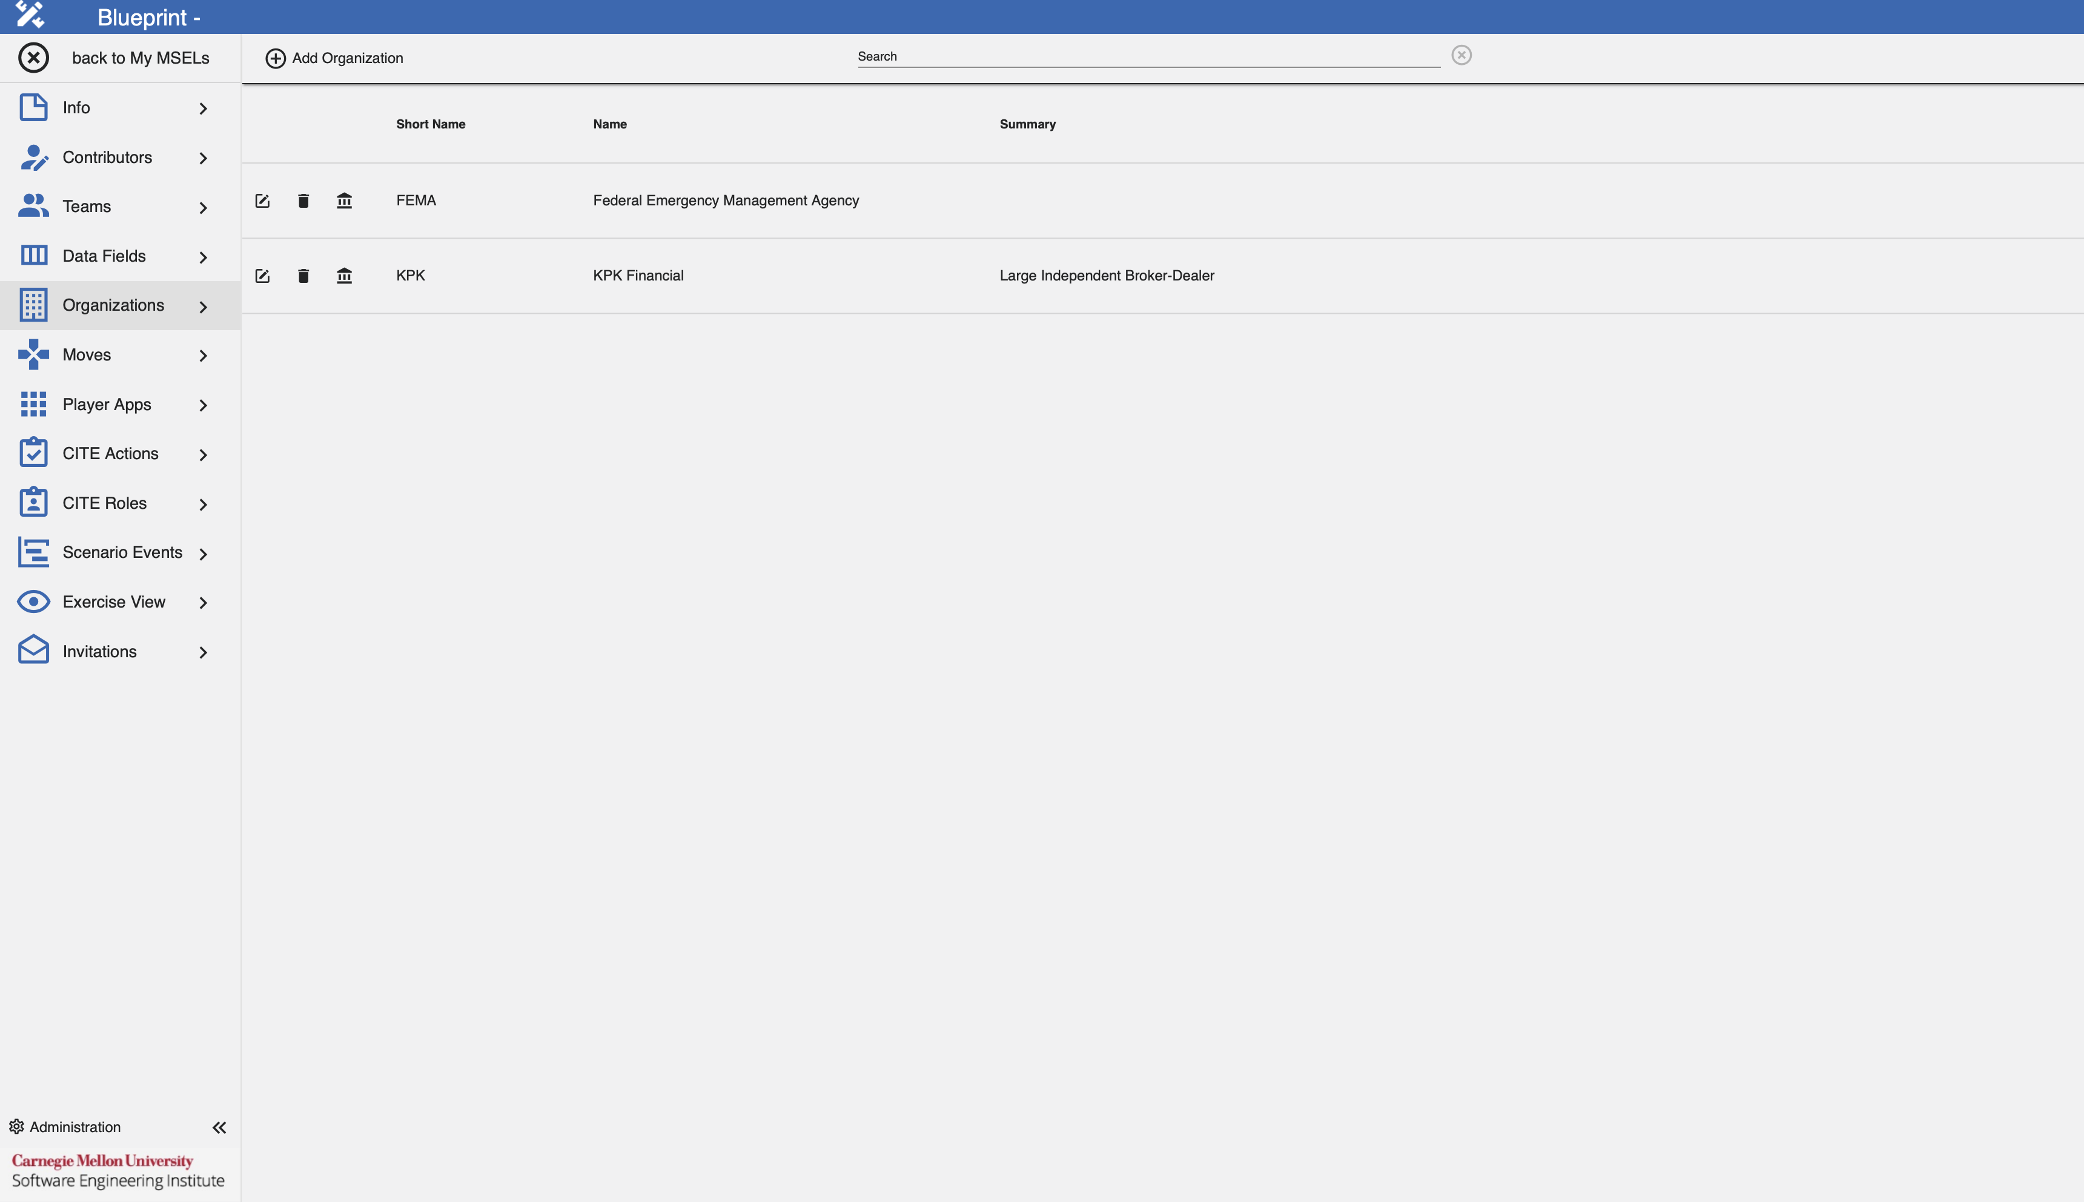
Add an Organization Card from Scratch
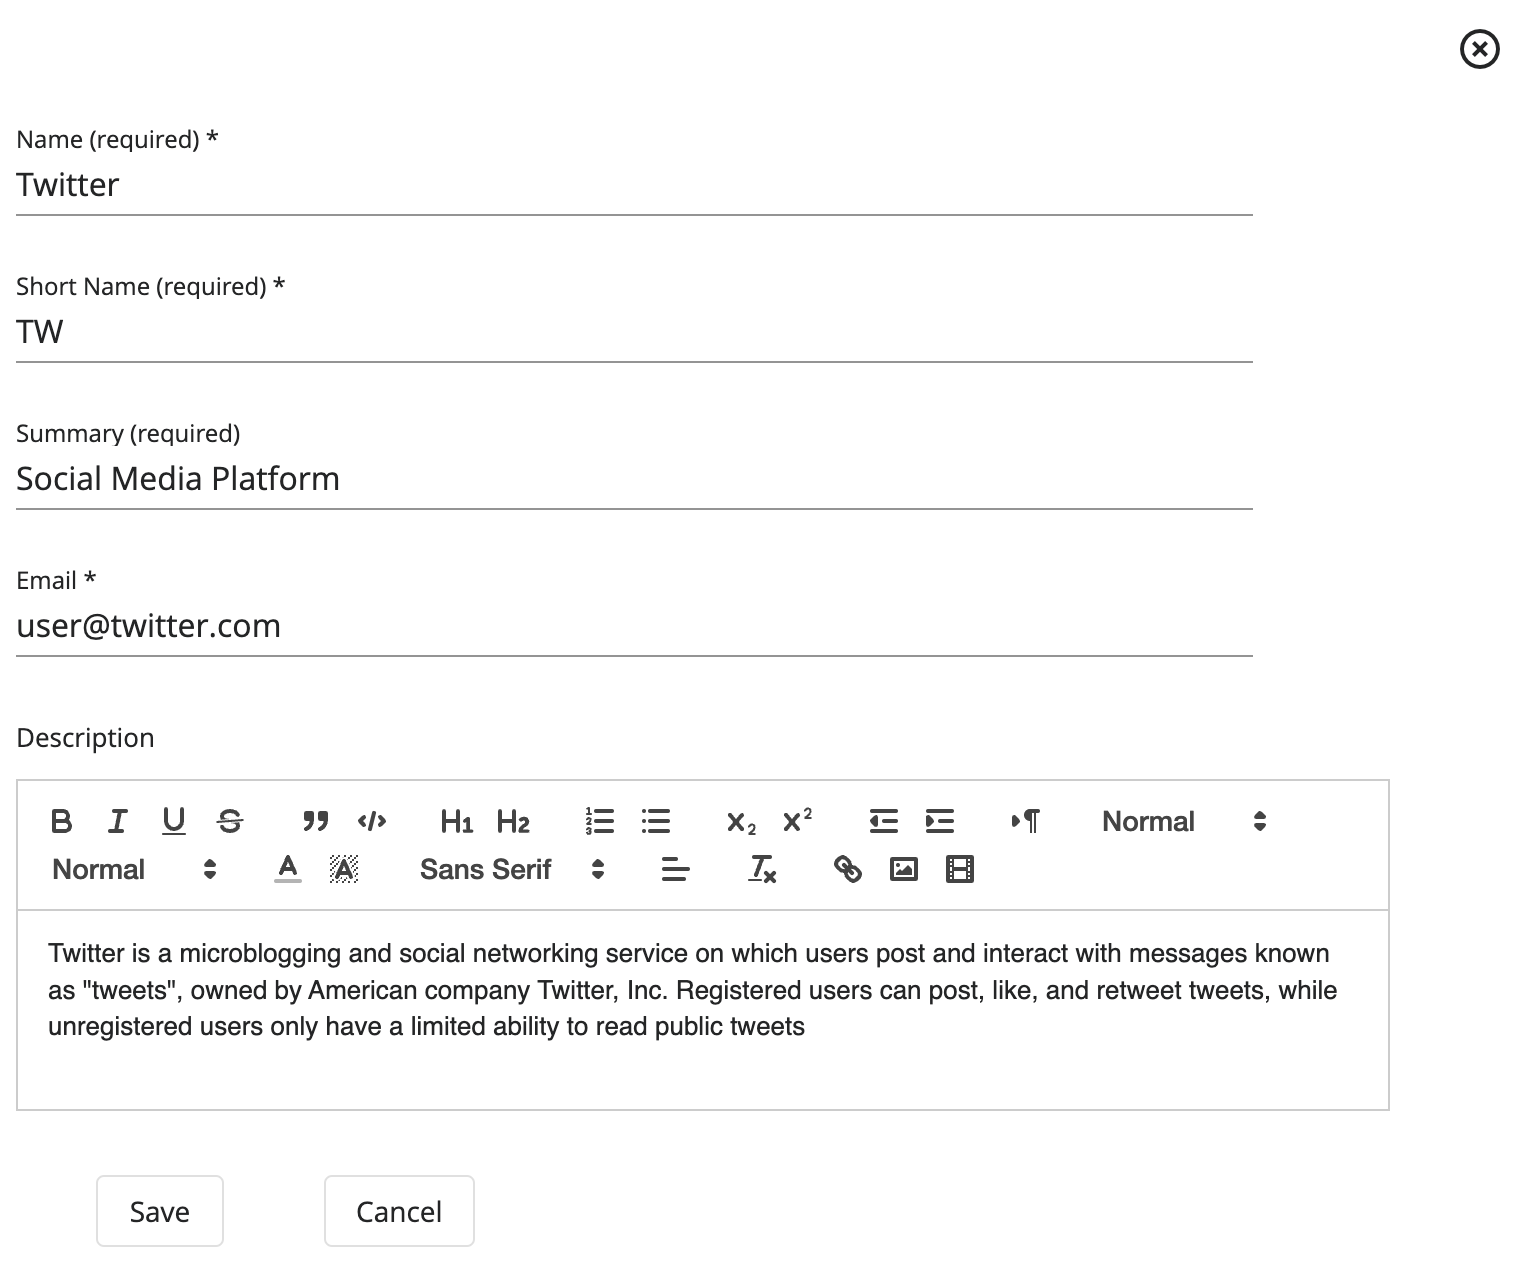
To add an Organization Card from scratch, follow these steps:
- Navigate to the Organizations tab.
- Click Add Organization.
- Select New Organization from the dropdown.
- Fill the fields as necessary following the Data Format Table specifications.
Data Format Table
| Field | Data Type | Description | Example |
|---|---|---|---|
| Name | String | Name of the organization | |
| Short Name | String | Organization's short name, such as an acronym | TW |
| Summary | String | Organization's short summary | Social media platform |
| String | Organization's email contact | user@twitter.com |
|
| Description | Rich Text | Information, details, and characteristics of the organization | Twitter is a micro-blogging and social networking service on which users post and interact with messages known as "tweets", owned by American company Twitter, Inc. |
After you've added all desired configurations, click Save.
Add an Organization Card from Template
To create an organization from a template, follow these steps:
- Navigate to the Organizations tab.
- Click Add Organization.
- Select the template you want to use from the dropdown.
- Here, users can edit all necessary information to create a new organization.
- After modifying the desired details, click Save.
Edit an Organization
To edit an existing organization, follow these steps:
- Navigate to the Organizations tab.
- Select the card you want to edit and click Edit next to the organization name.
- Here, users can edit all necessary information.
- Click Save.
Delete an Organization
To delete an organization, follow these steps:
- Navigate to the Organizations tab.
- Select the card you want to delete and click the Trash Can next to the organization name.
Search for an Organization
To search for a specific organization, follow these steps:
- Navigate to the Organizations tab.
- Click the Search Bar and type the name of the desired organization.
Moves
On this tab, users can add all related exercise moves to the MSEL.
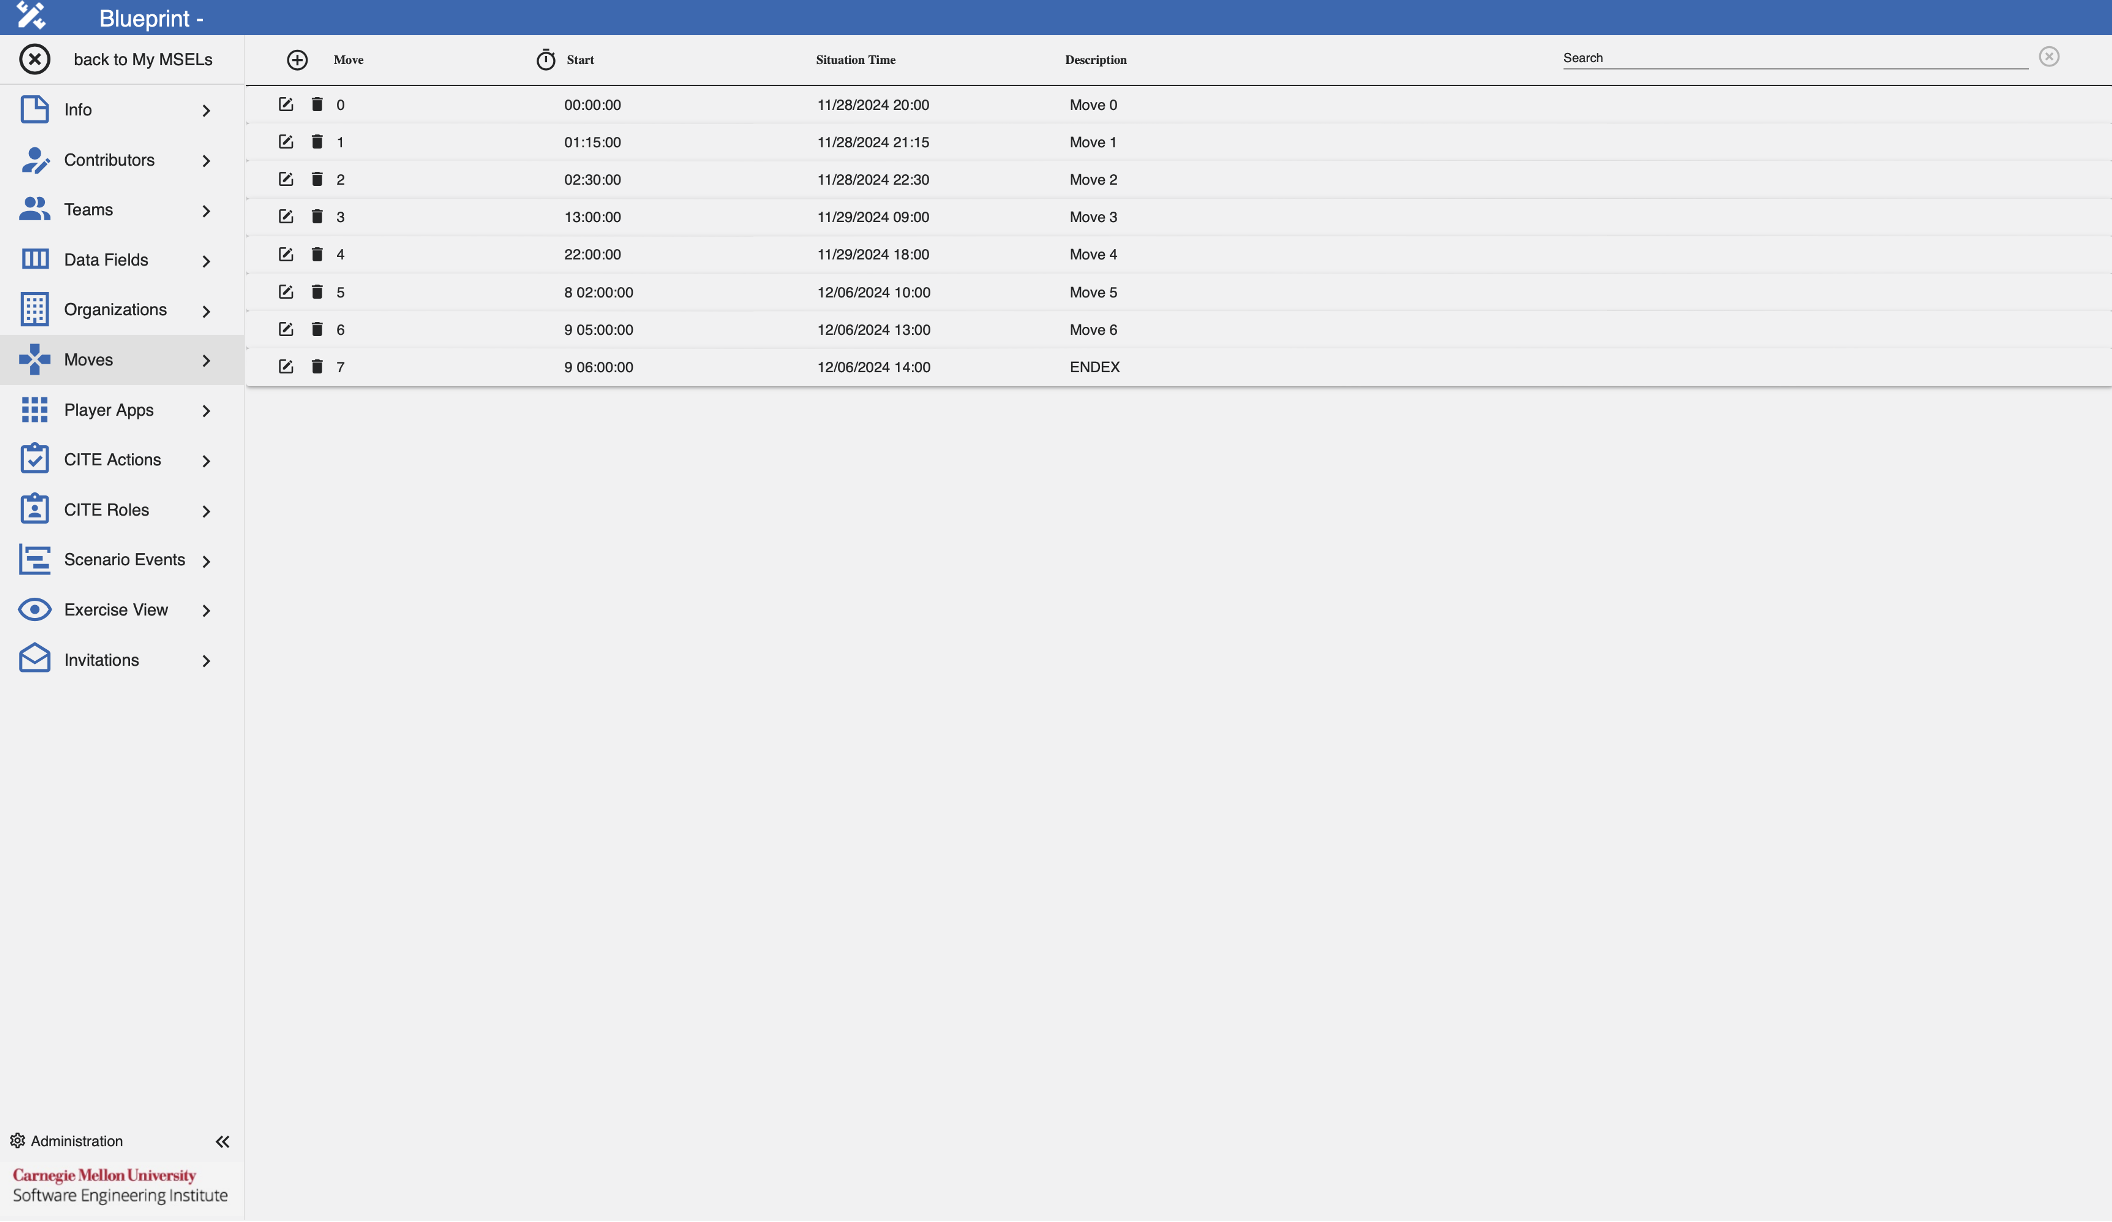
Add a Move
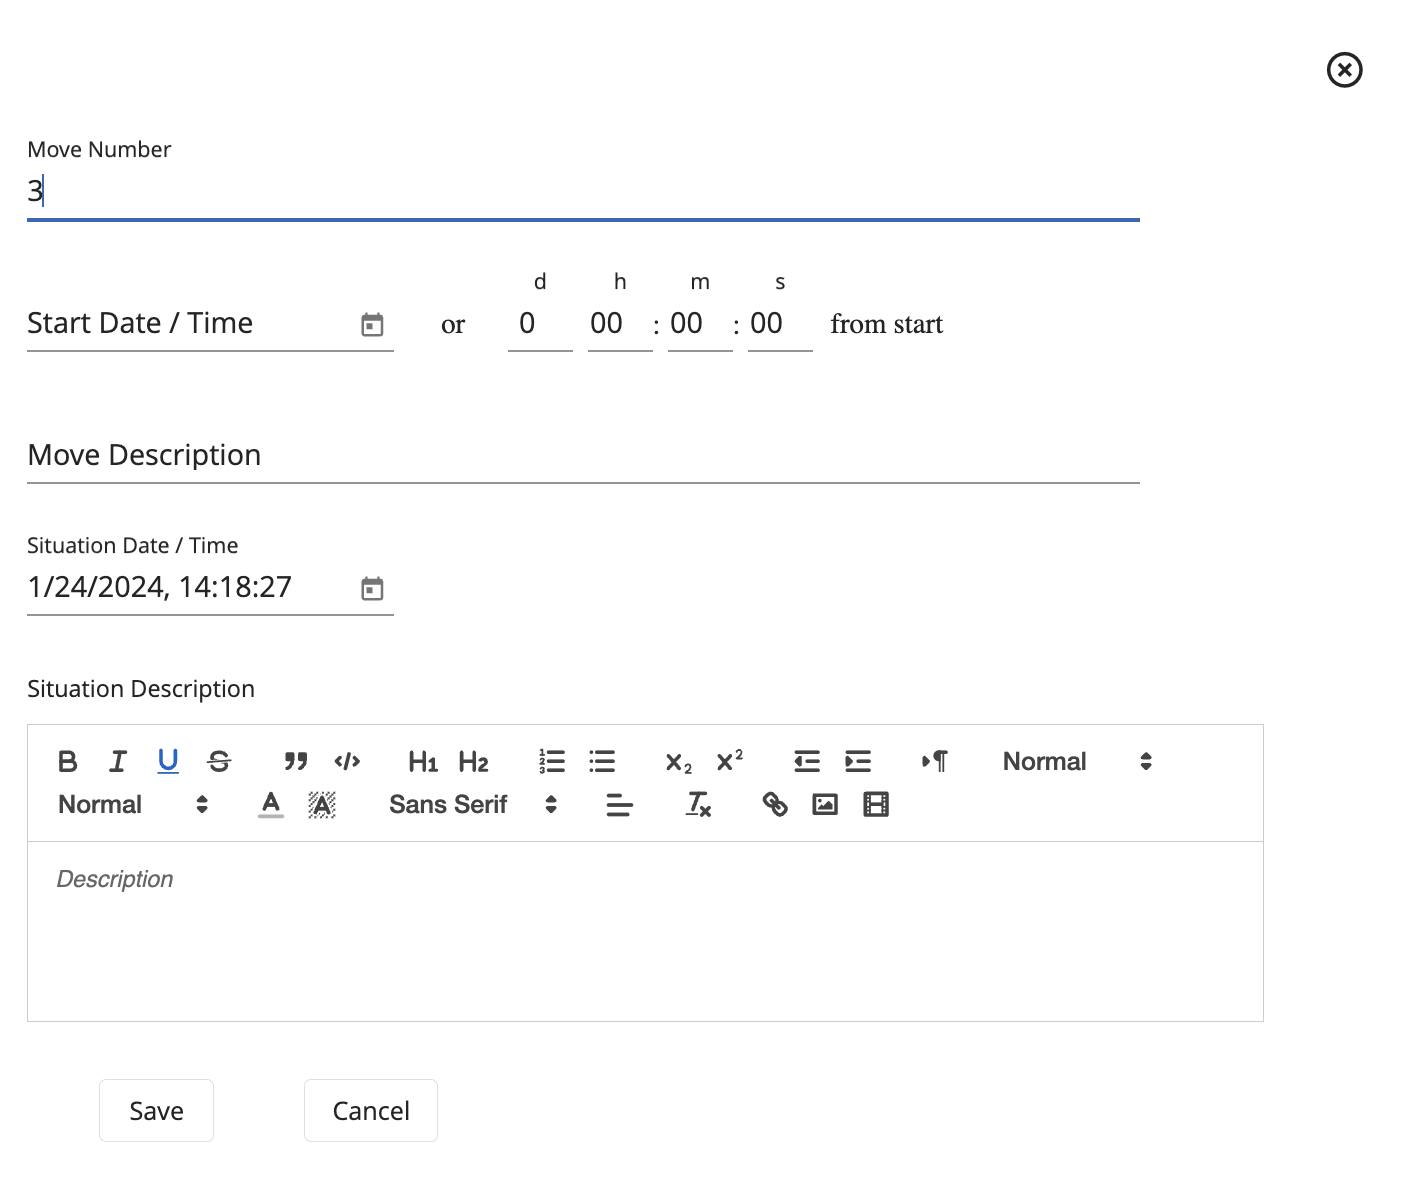
To add a move, follow these steps:
- Navigate to the Moves tab.
- Click the + icon.
- Fill the fields as necessary following the Data Format Table specifications.
Data Format Table
| Field | Data Type | Description | Example |
|---|---|---|---|
| Move Number | Integer | Designated number for the move | 1 |
| Start Date/Time | Datetime | Start date/time of the move real-time | 11/20/2023, 09:00:00 |
| Move Description | String | Information, details, and characteristics of the move | Scene Setter |
| Situation Date/Time | Datetime | Start date/time of the move exercise-time | 1/24/2024, 14:18:27 |
| Situation Description | Rich Text | Information, details, and characteristics of the exercise | Hurricane Delta has landed in Fort Myers |
After you've added all desired configurations, click Save.
Edit a Move
To edit the move's details, follow these steps:
- Navigate to the Moves tab.
- Select the move you want to edit and click Edit for the corresponding move.
- Here, users can edit all desired details.
- Click Save.
Delete a Move
To delete a move from the MSEL, follow these steps:
- Navigate to the Moves tab.
- Select the move you want to delete and click the Trash Can for the corresponding move.
Search for a Move
To search for a specific move, follow these steps:
- Navigate to the Moves tab.
- Click the Search Bar and type the name of the desired move.
Scenario Events
On this tab, users can add all related events to the MSEL.
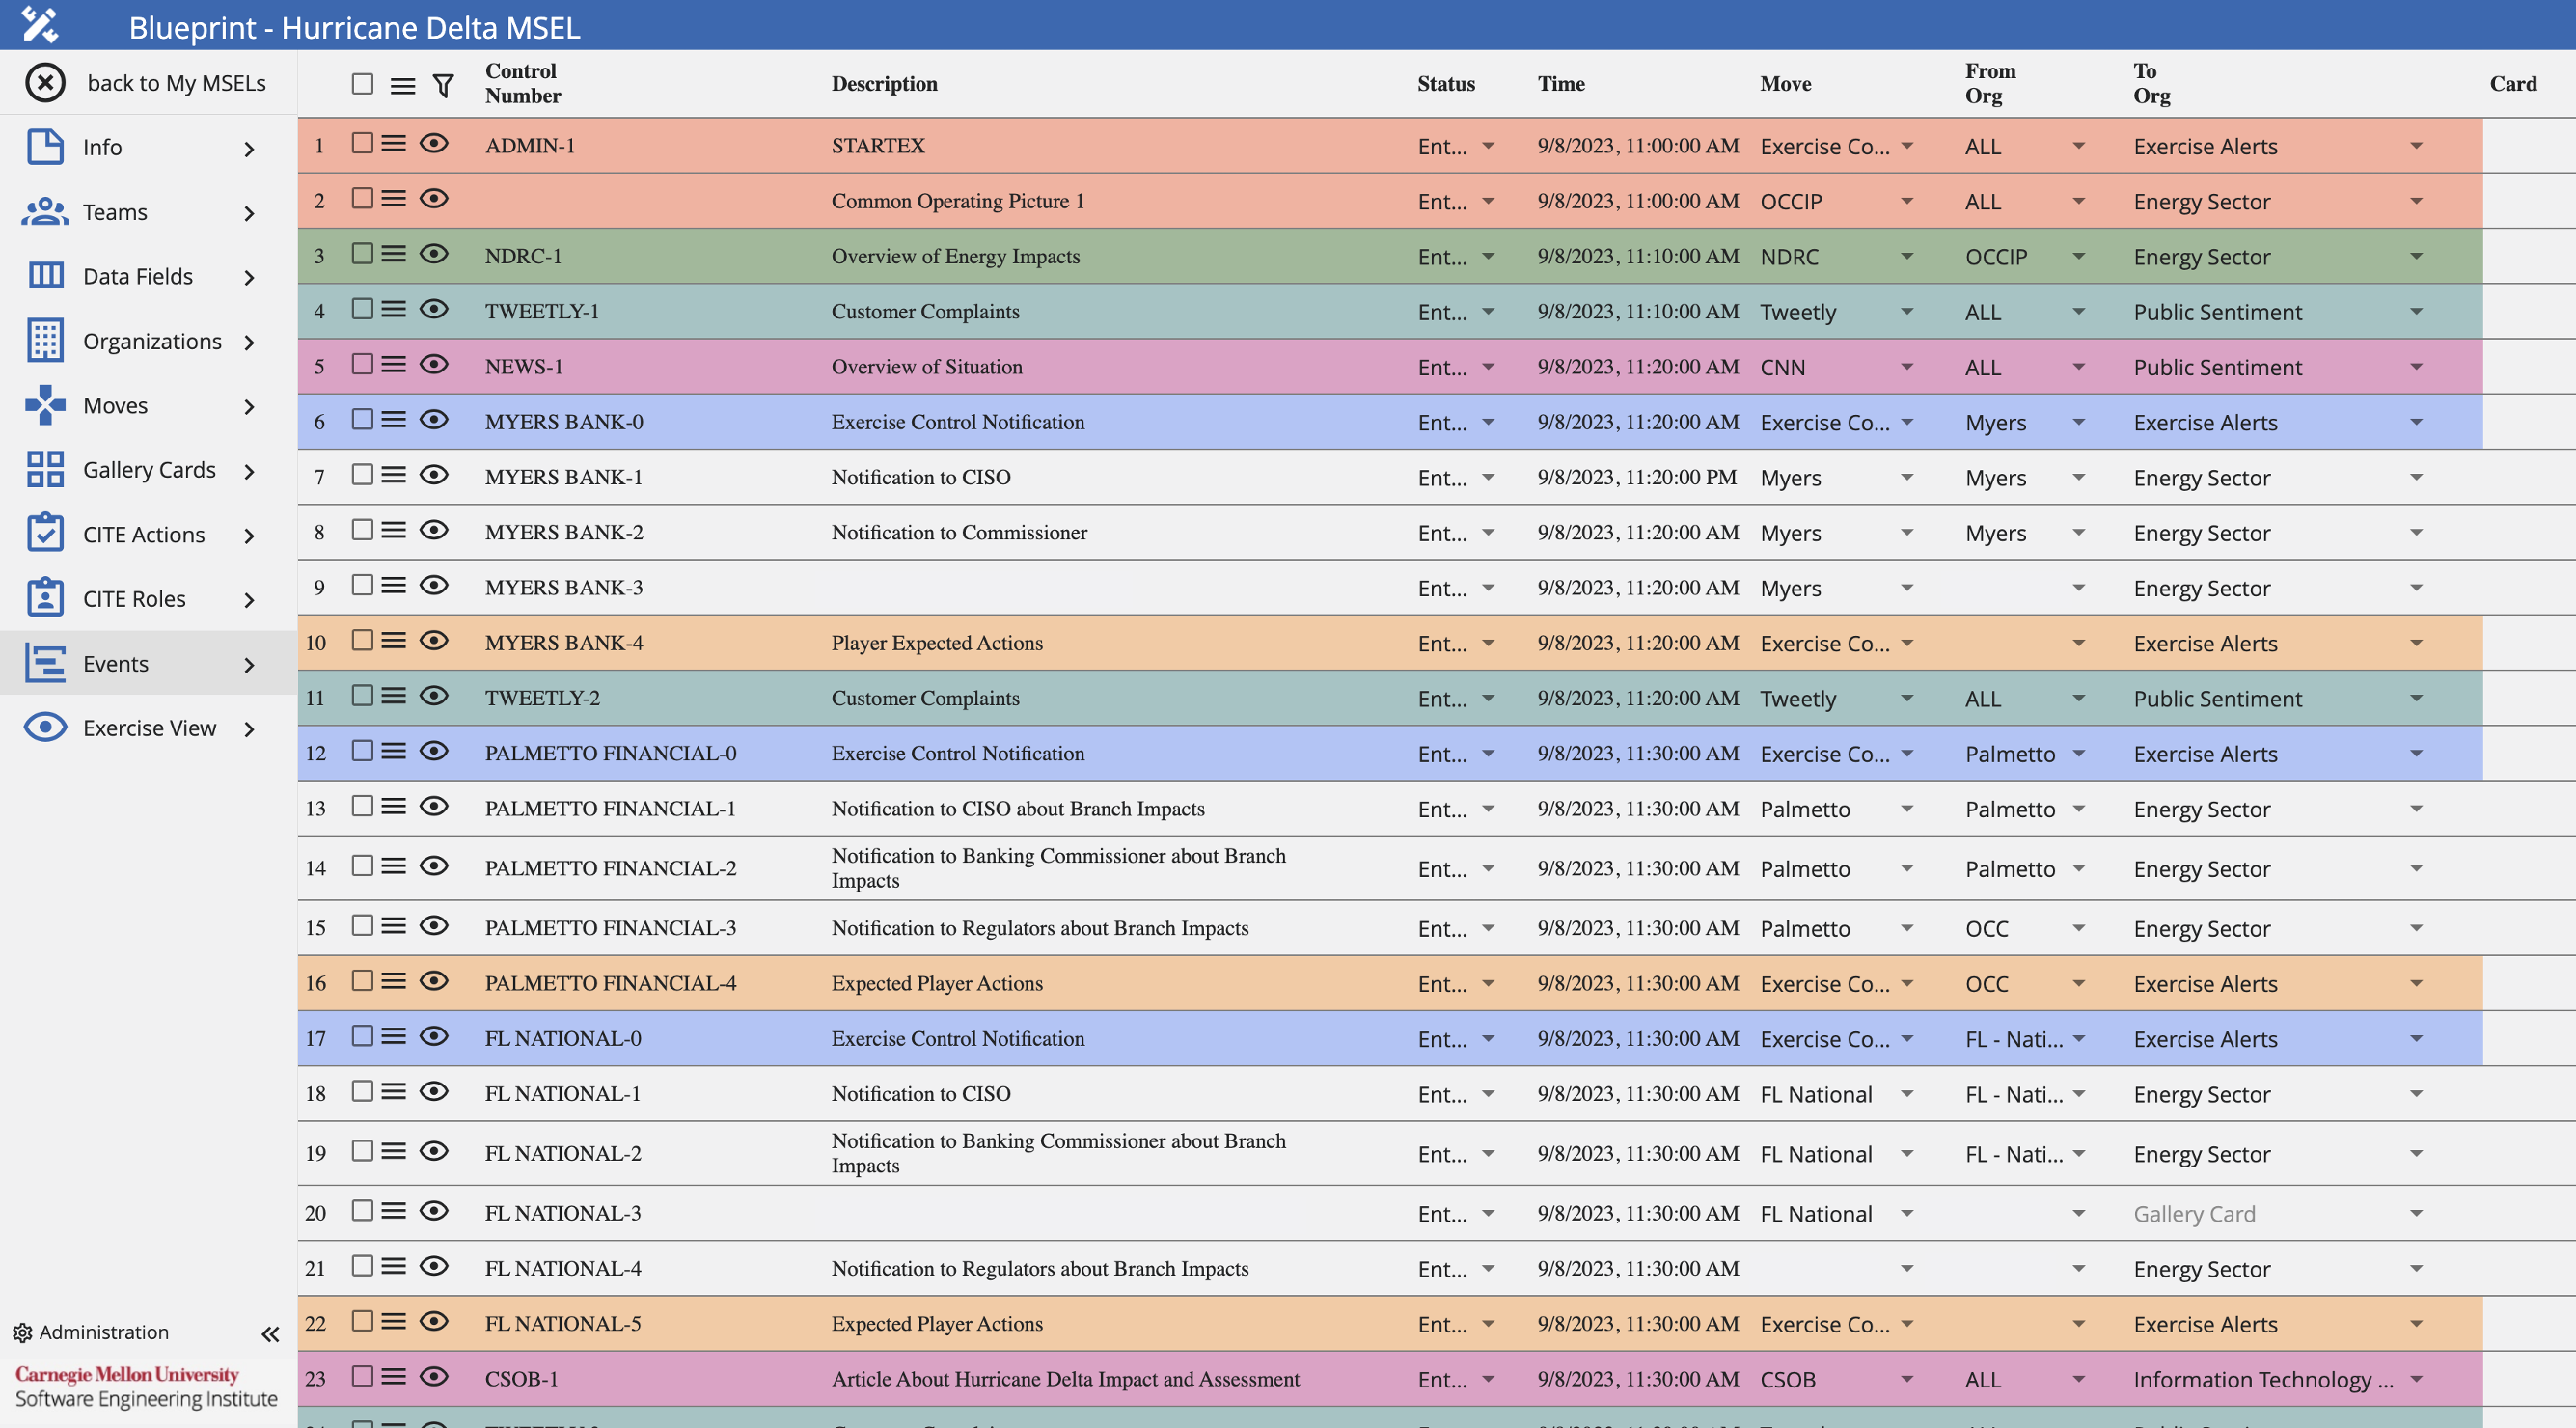
Add an Event
To add a new event, follow these steps:
- Navigate to the Events tab.
- Click the Hamburger icon found on the top left.
- Click Add New Event.
On the Default tab, fill the fields as necessary following the Data Format Table specifications.
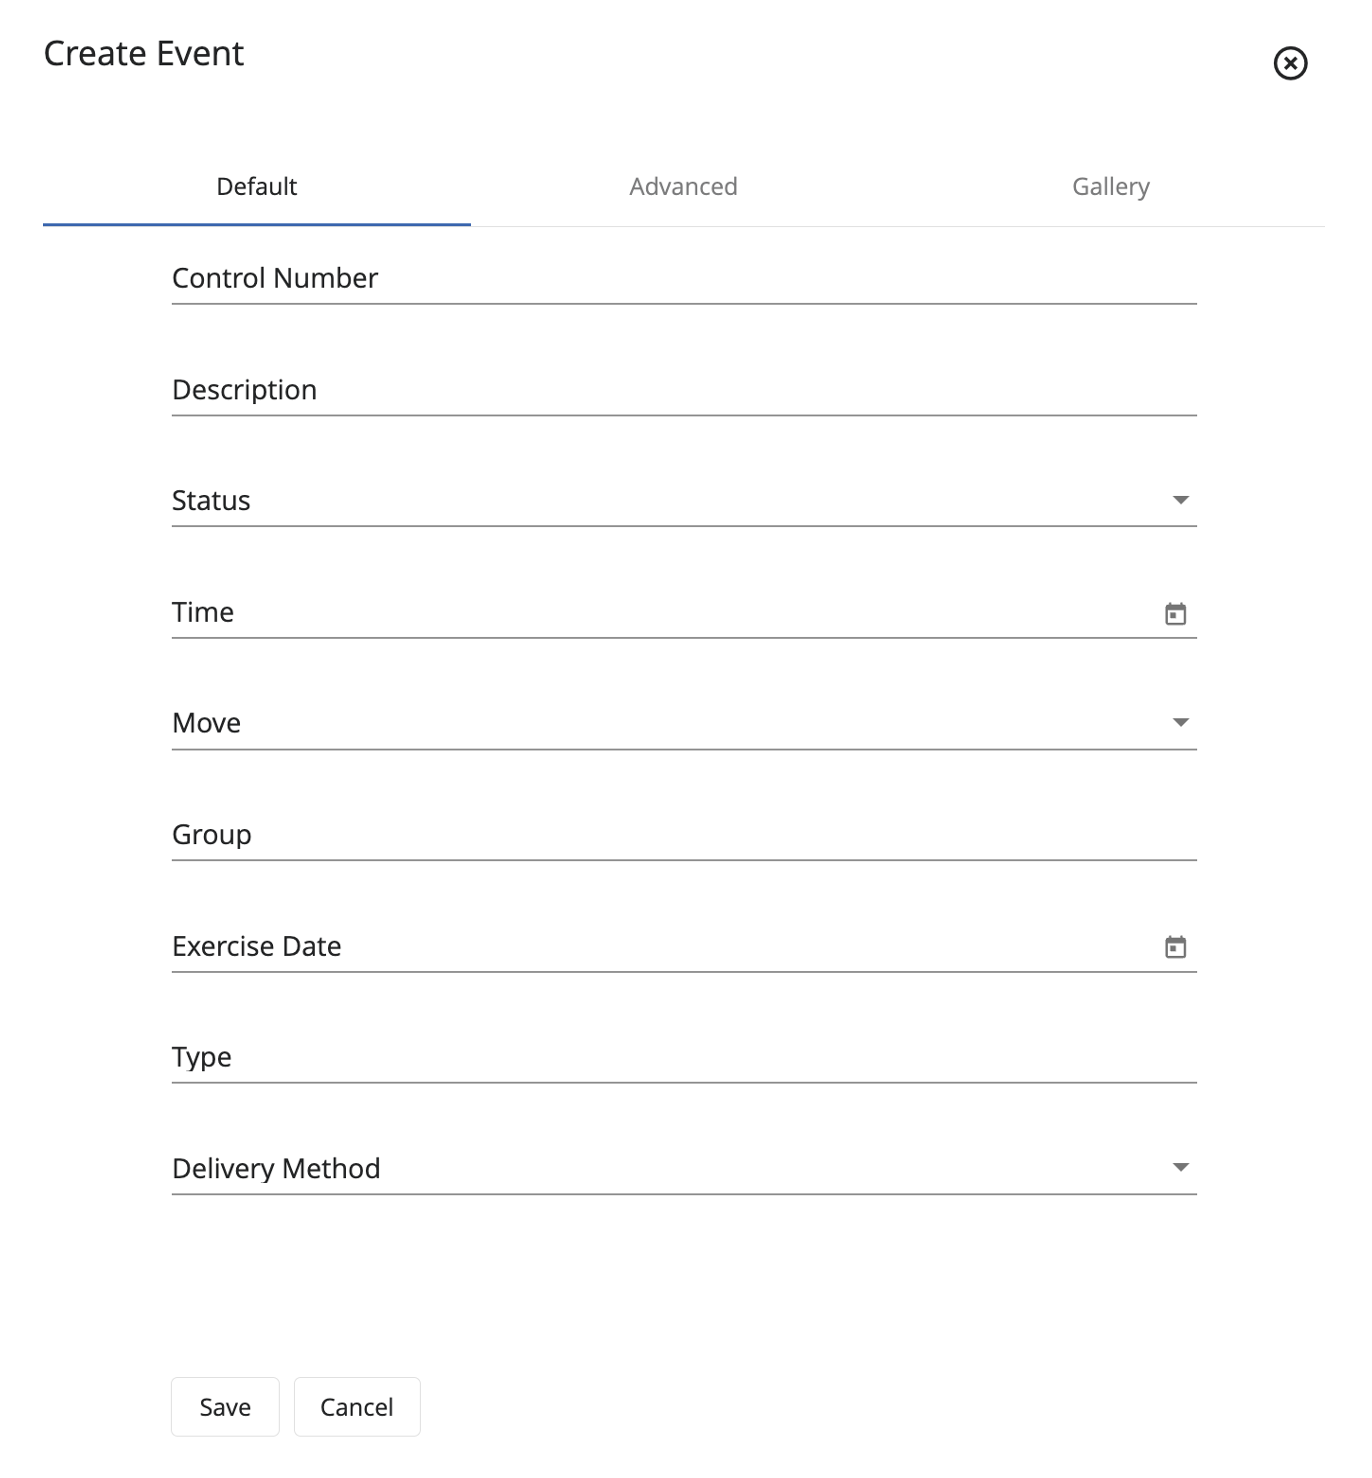
Data Format Table
| Field | Data Type | Description | Example |
|---|---|---|---|
| Control Number | String | Event control number, used to identify and categorize events | ADMIN-1 |
| Description | String | Information, details, and characteristics of the event | STARTEX |
| Status | Dropdown Text | Approval status of the event used on the MSEL | Approved |
| Time | Datetime | Start date/time of the move real-time | 11/20/2023, 09:00:00 |
| Move | Dropdown Text | Move number the event is part of | 1 |
| Group | Integer | Groups events within a move, often times executed within the same time range | 1 |
| Exercise Date | Datetime | Start date/time of the move exercise-time | 1/24/2024, 14:18:27 |
| Type | String | Source type for the event | Email |
| Delivery Method | Dropdown Text | How is the event delivered to participants | Email |
If not already completed on the previous tab, fill the fields from the Advanced tab following the Data Format Table specifications. This tab focuses on the MSEL's metadata and style.
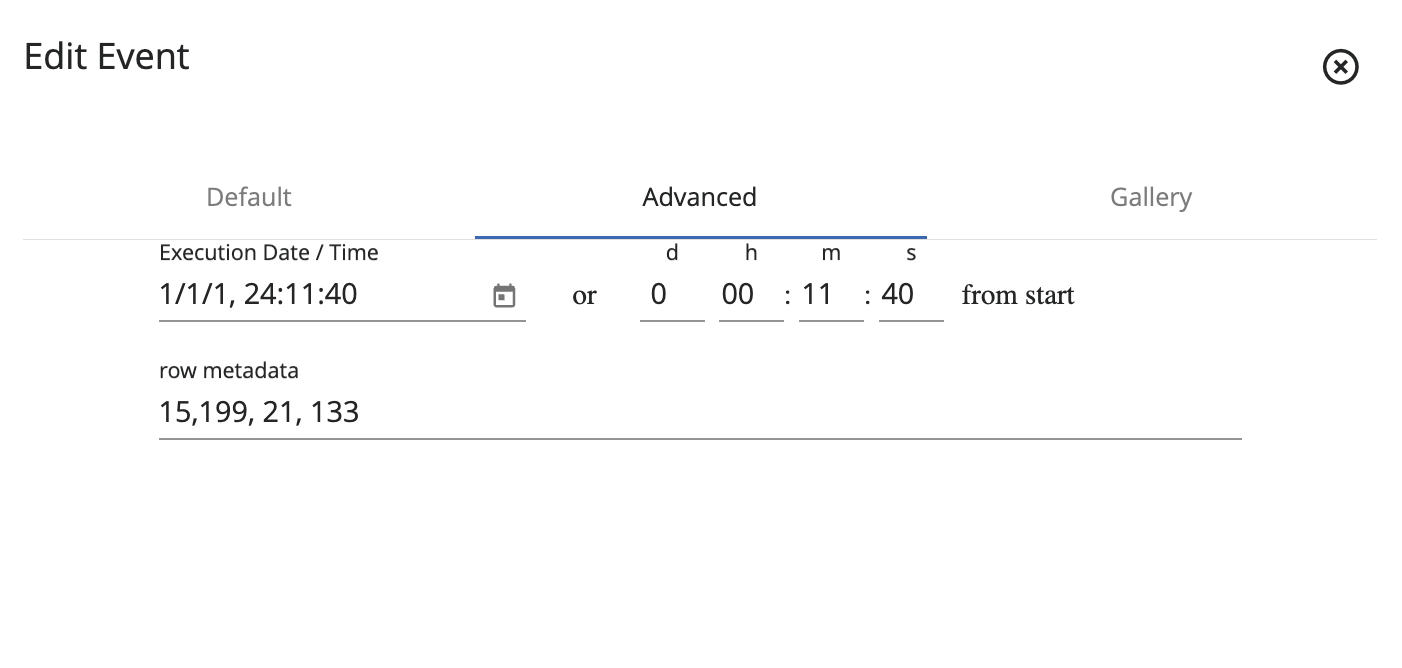
Data Format Table
| Field | Data Type | Description | Example |
|---|---|---|---|
| Exercise Date/Time | Datetime | Start date/time of the move exercise-time | 1/24/2024, 14:18:27 |
| Row Metadata | Integer | Defines the size of this event on the Events and Exercise View tabs | 15,199,21,133 |
If the MSEL owner enabled Gallery integration, the user should verify that all fields on the Gallery tab are complete, following the Data Format Table specifications below. This tab includes the fields required for the Gallery integration to function properly.
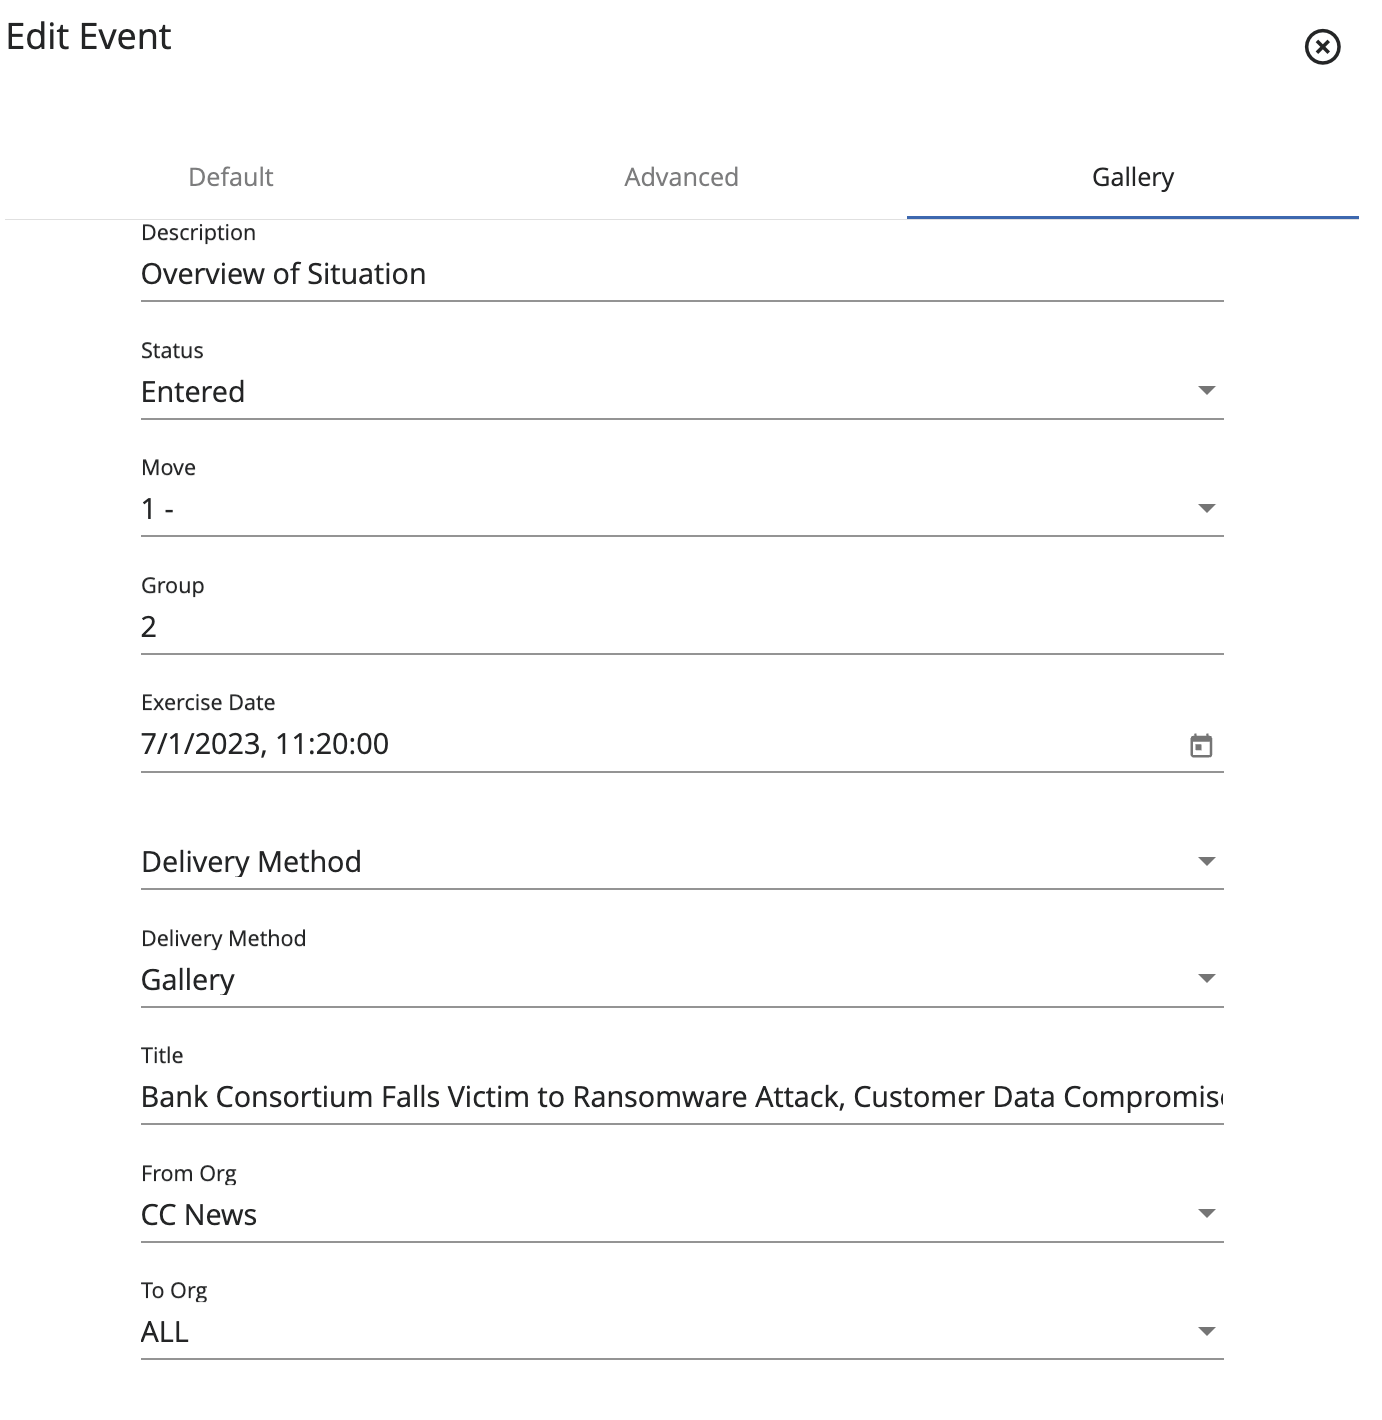
Data Format Table
| Field | Data Type | Description | Example |
|---|---|---|---|
| Description | String | Information, details, and characteristics of the event | STARTEX |
| Status | Dropdown Text | Approval status of the event used on the MSEL | Approved |
| Move | Dropdown Text | Move number that the event is part of | 1 |
| Group | Integer | Groups events within a move, often times executed within the same time range | 1 |
| Exercise Date | Datetime | Start date/time of the move exercise-time | 1/24/2024, 14:18:27 |
| Delivery Method | Dropdown Text | How is the event delivered to participants | Gallery |
| Title | String | Title of the event | Bank Consortium Falls Victim to Ransomware Attack |
| From Org | Dropdown Text | Select the organization that sends this event | CC News |
| To Org | Dropdown Text | Select the organization that receives this event | All |
After you've added all desired configurations, click Save.
Add Color to an Event
To add a color to an existing event, follow these steps:
- Navigate to the Events tab.
- Select the event you want to edit and click the Hamburger icon next to it.
- Hover over Highlight.
- Here, users can select the desired color.
Edit an Event
To edit the event's details, follow these steps:
- Navigate to the Events tab.
- Select the event you want to edit and click the Hamburger icon next to it.
- Click Edit. The system opens the same edit component used when creating a new event.
- Make your changes, then click Save.
Delete an Event
To delete an event, follow these steps:
- Navigate to the Events tab.
- Select the event you want to delete and click the Trash Can icon next to it.
Search for an Event
To search for a specific event, follow these steps:
- Navigate to the Events tab.
- Click the Search Bar and type the name of the desired event.
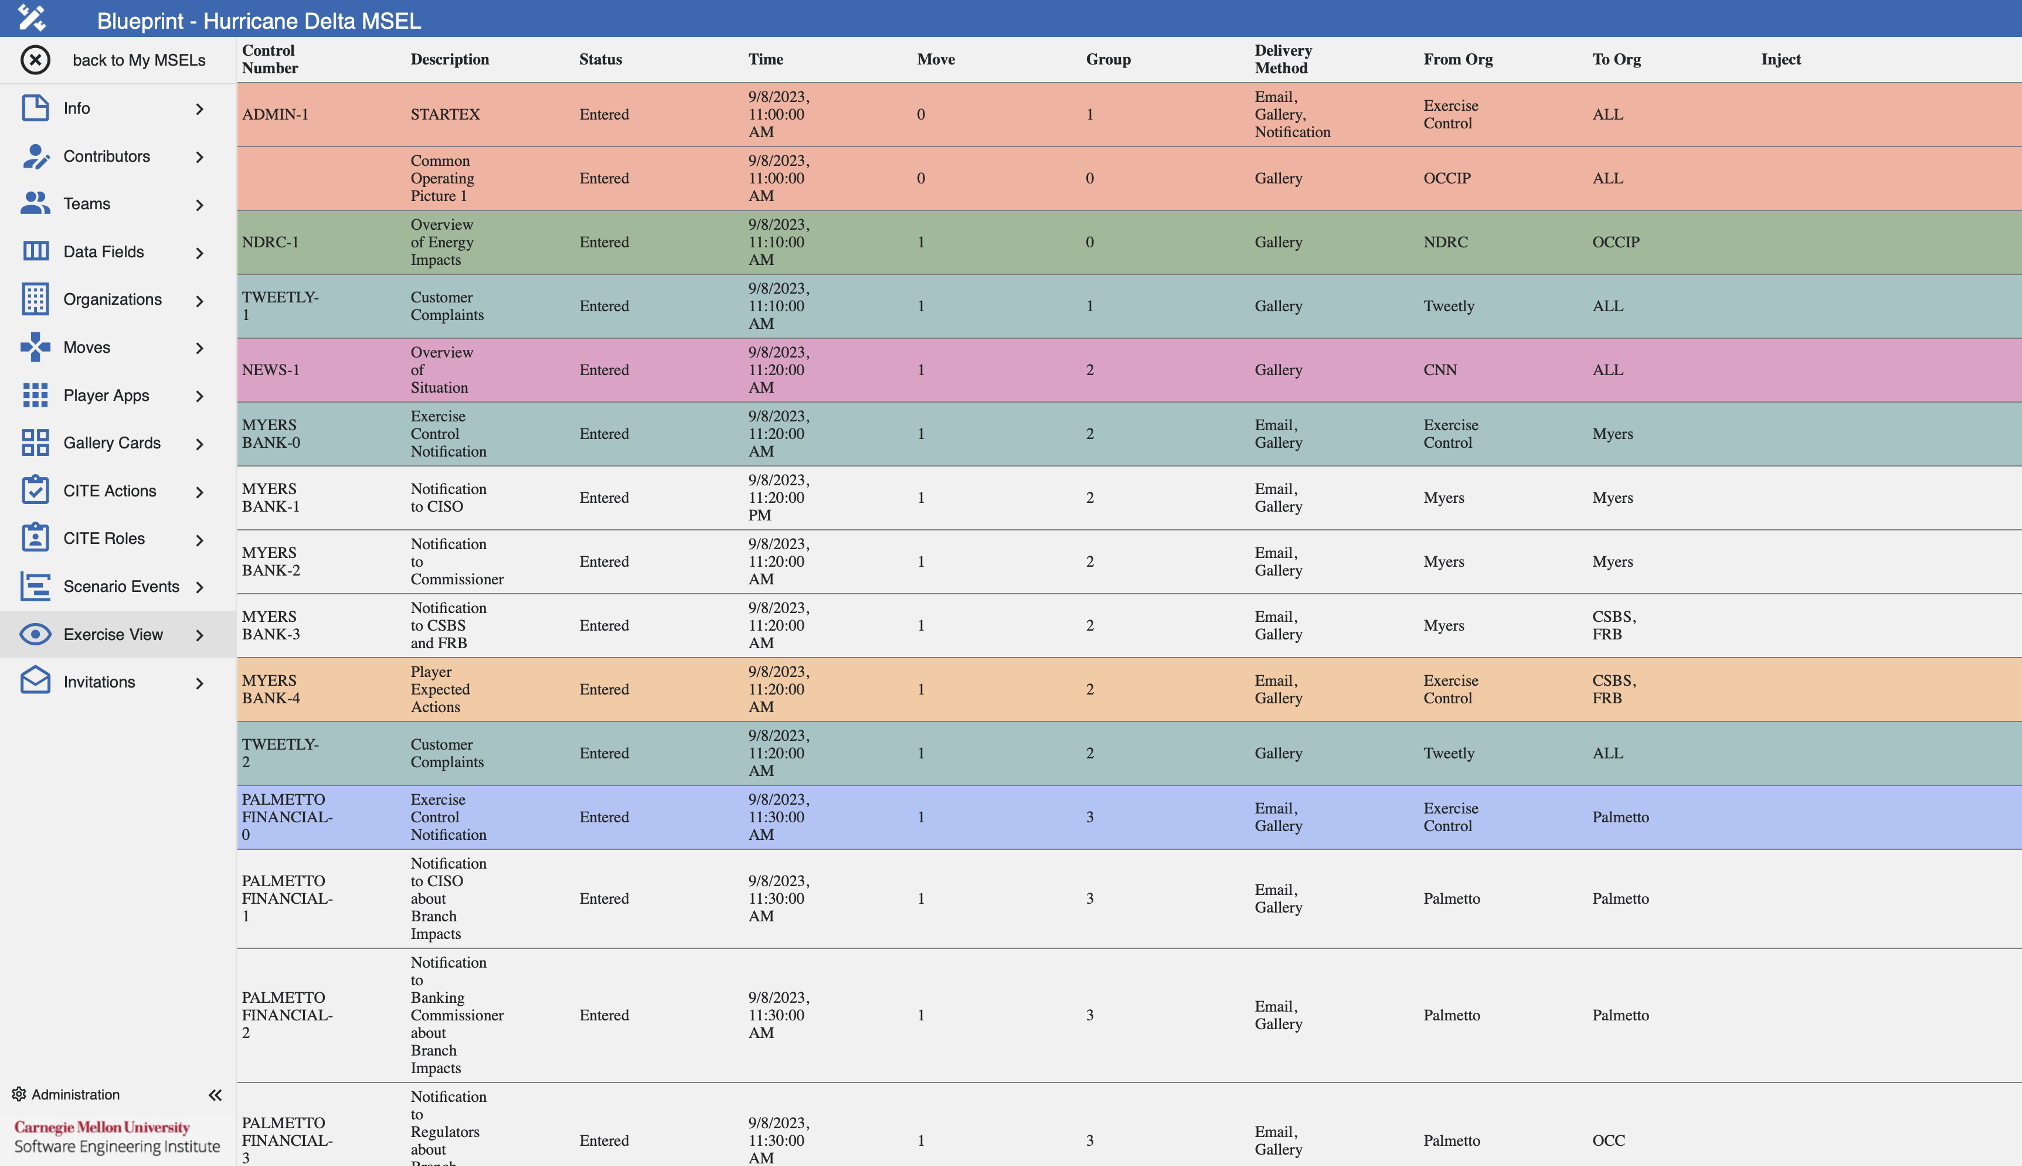
Exercise View
While the Events tab lets MSEL owners and content developers manage events, the Exercise View tab gives participants read-only access to track current and future events during an exercise.
Invitations
Users with Administrator, Content Developer, or designated MSEL contributor roles can create invitations from the Invitations tab. These invitations allow others to join or start the MSEL event.
You can specify email domains and a maximum number of users on the invitations. Invitations link to specific teams added to the MSEL. When users join the event using an invitation, the system assigns them to the corresponding team for the duration of the event.

Add an Invitation
To add a new invitation, follow these steps:
- Navigate to the Invitations tab.
- Click Invite Others.
- Fill the fields as necessary following the Data Format Table specifications.
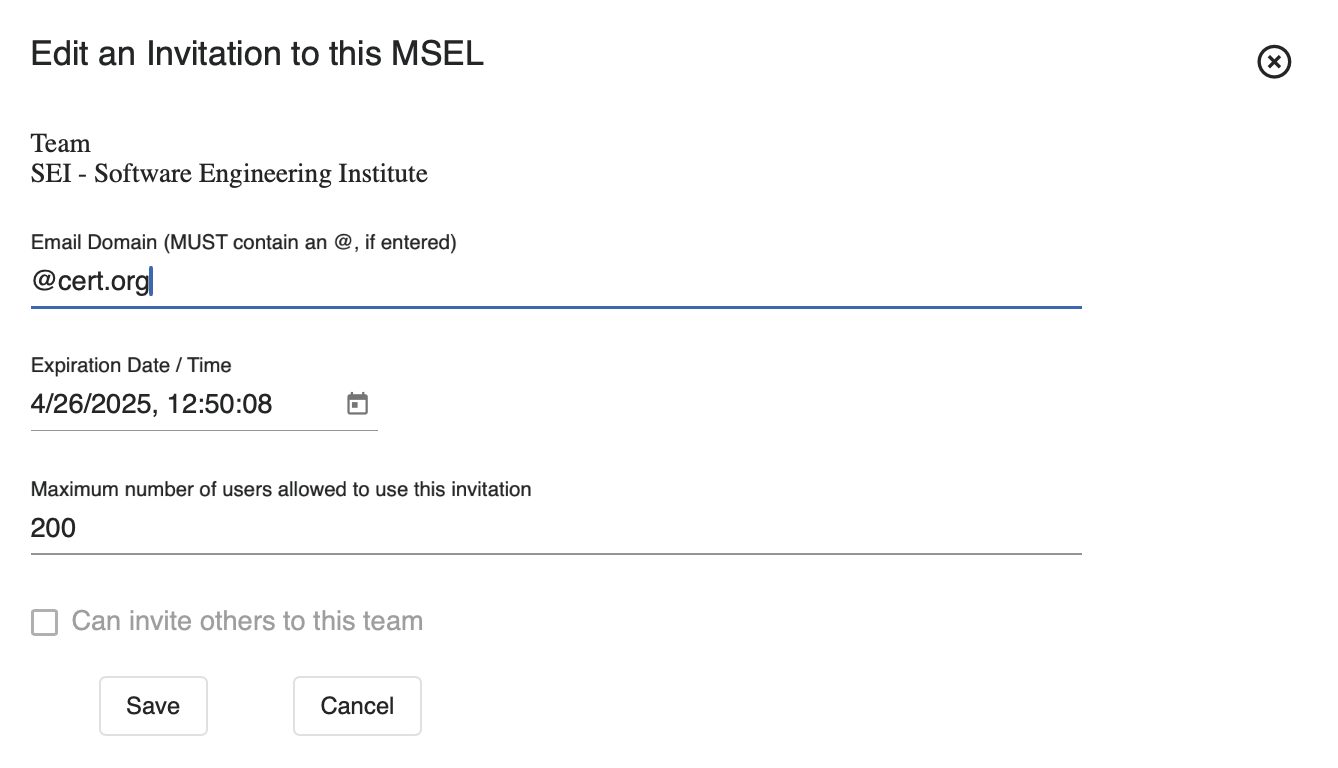
Data Format Table
| Field | Data Type | Description | Example |
|---|---|---|---|
| Team | Dropdown Text | Team tied to the invitation | SEI - Software Engineering Institute |
| Email Domain | String | User's email domain | @sei.cmu.edu |
| Expiration Date/Time | Datetime | Date and time when the invitation should expire | 04/15/2024 15:12:03 |
| Maximum Number of Users Allowed to Use this Invitation | Integer | Number of users that can use the invitation | 5 |
| Can Invite others to this Team | Boolean | Permission to add others to the team | False |
After you've added all desired configurations, click Save.
Edit an Invitation
To edit an invitation, follow these steps:
- Navigate to the Invitations tab.
- Select the invitation you want to edit and click Edit. The system opens the same edit component used when creating a new invitation.
- Make your changes, then click Save.
Delete an Invitation
To delete an invitation, follow these steps:
- Navigate to the Invitations tab.
- Select the invitation you want to delete and click the Trash Can next to it.
Search for an Invitation
To search for a specific invitation, follow these steps:
- Navigate to the Invitations tab.
- Click the Search Bar and type the name of the team tied to the invitation.
Integrations
Integrations with the following applications simplify configuration steps. This functionality eliminates the need to repeat the same steps in multiple applications.
CITE
If enabled, Blueprint can push MSEL information to the CITE application. When the MSEL owner enables CITE integration, additional tabs appear in the Blueprint side panel. The MSEL owner must configure the additional tabs to complete the integration. To enable full CITE integration, the MSEL owner must configure the following tabs:
Teams
Use the Teams tab to configure CITE settings for teams added to the MSEL. To do this, follow these steps.
First, assign a CITE Team Type to each team.
- Navigate to the Teams tab.
- Select the desired team and click Edit.
- Fill the fields as necessary following the Data Format Table specifications.
Data Format Table
| Field | Data Type | Description | Example |
|---|---|---|---|
| Team Email | String | Team's email contact | seicmu@cmu.edu |
| CITE Team Type | Dropdown Text | Classifies the team within a certain type | Individual Organization |
After you've made all desired configurations, click Save.
Next, assign roles to each member of the team. To do this, follow these steps:
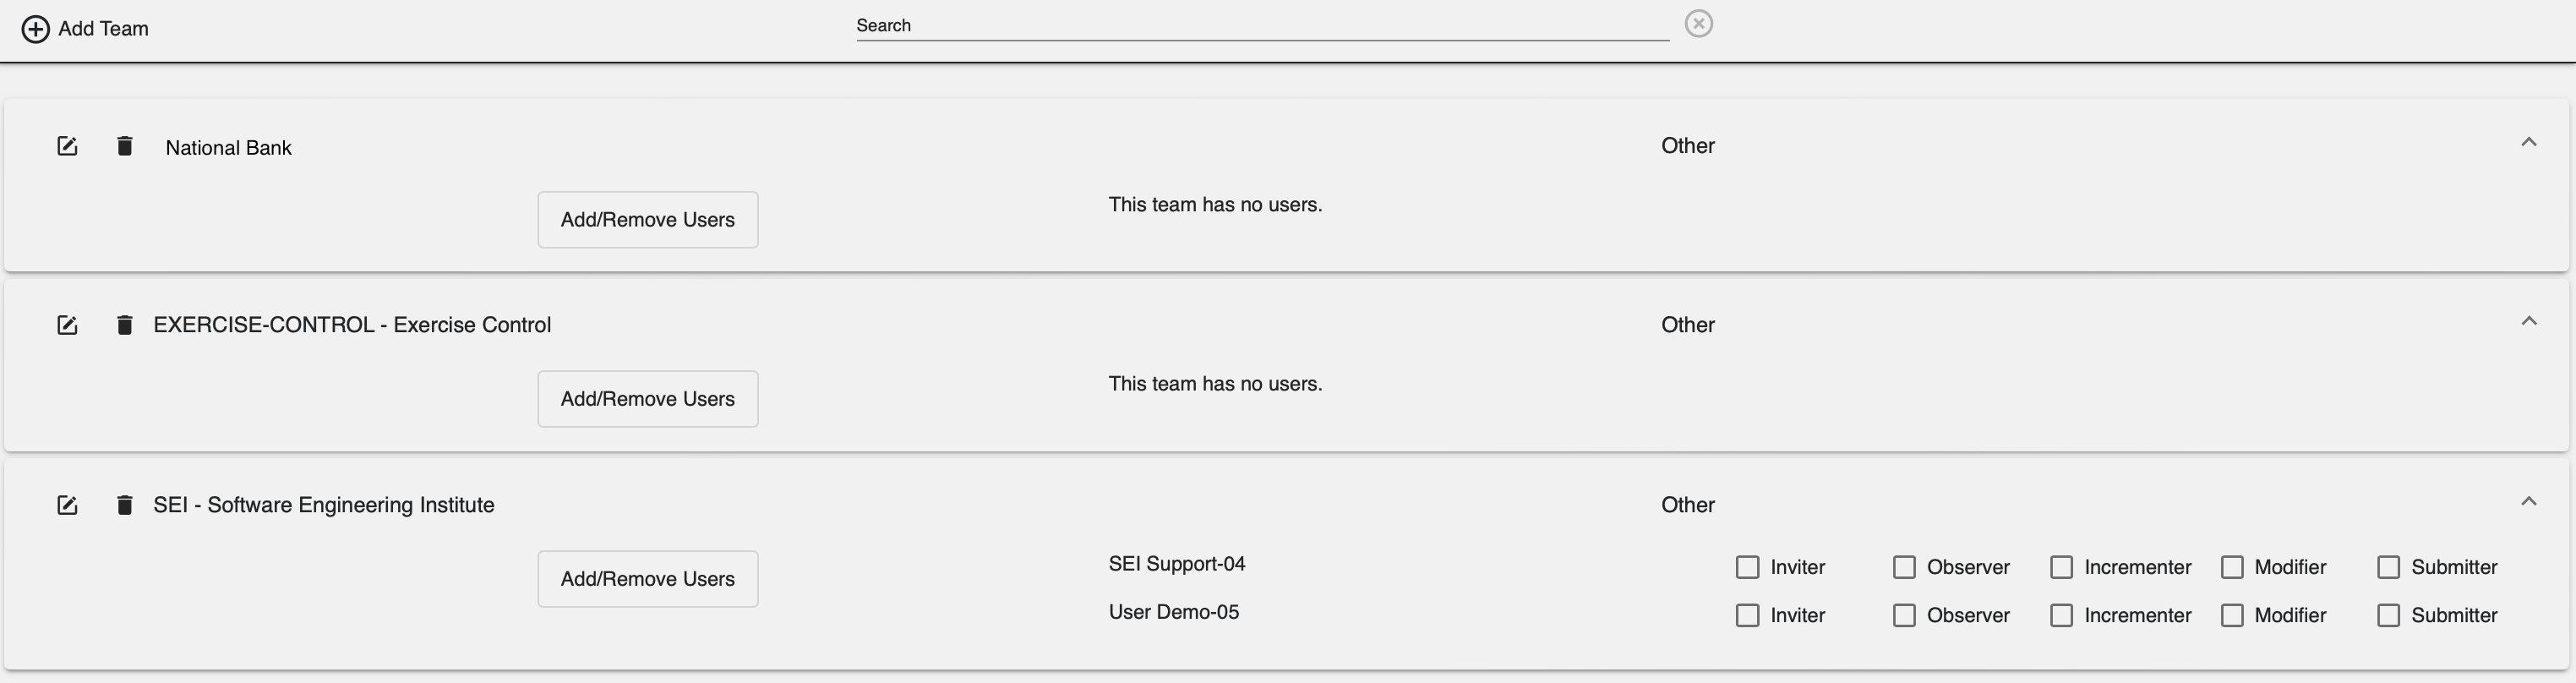
- Navigate to the Teams tab.
- Select the desired team, and click it to expand its configurations.
- Assign the necessary roles to each team member.
CITE Actions
On this tab, the MSEL owner can add CITE Actions to push from Blueprint. These actions allow team members to customize their response by tracking tasks during the exercise.
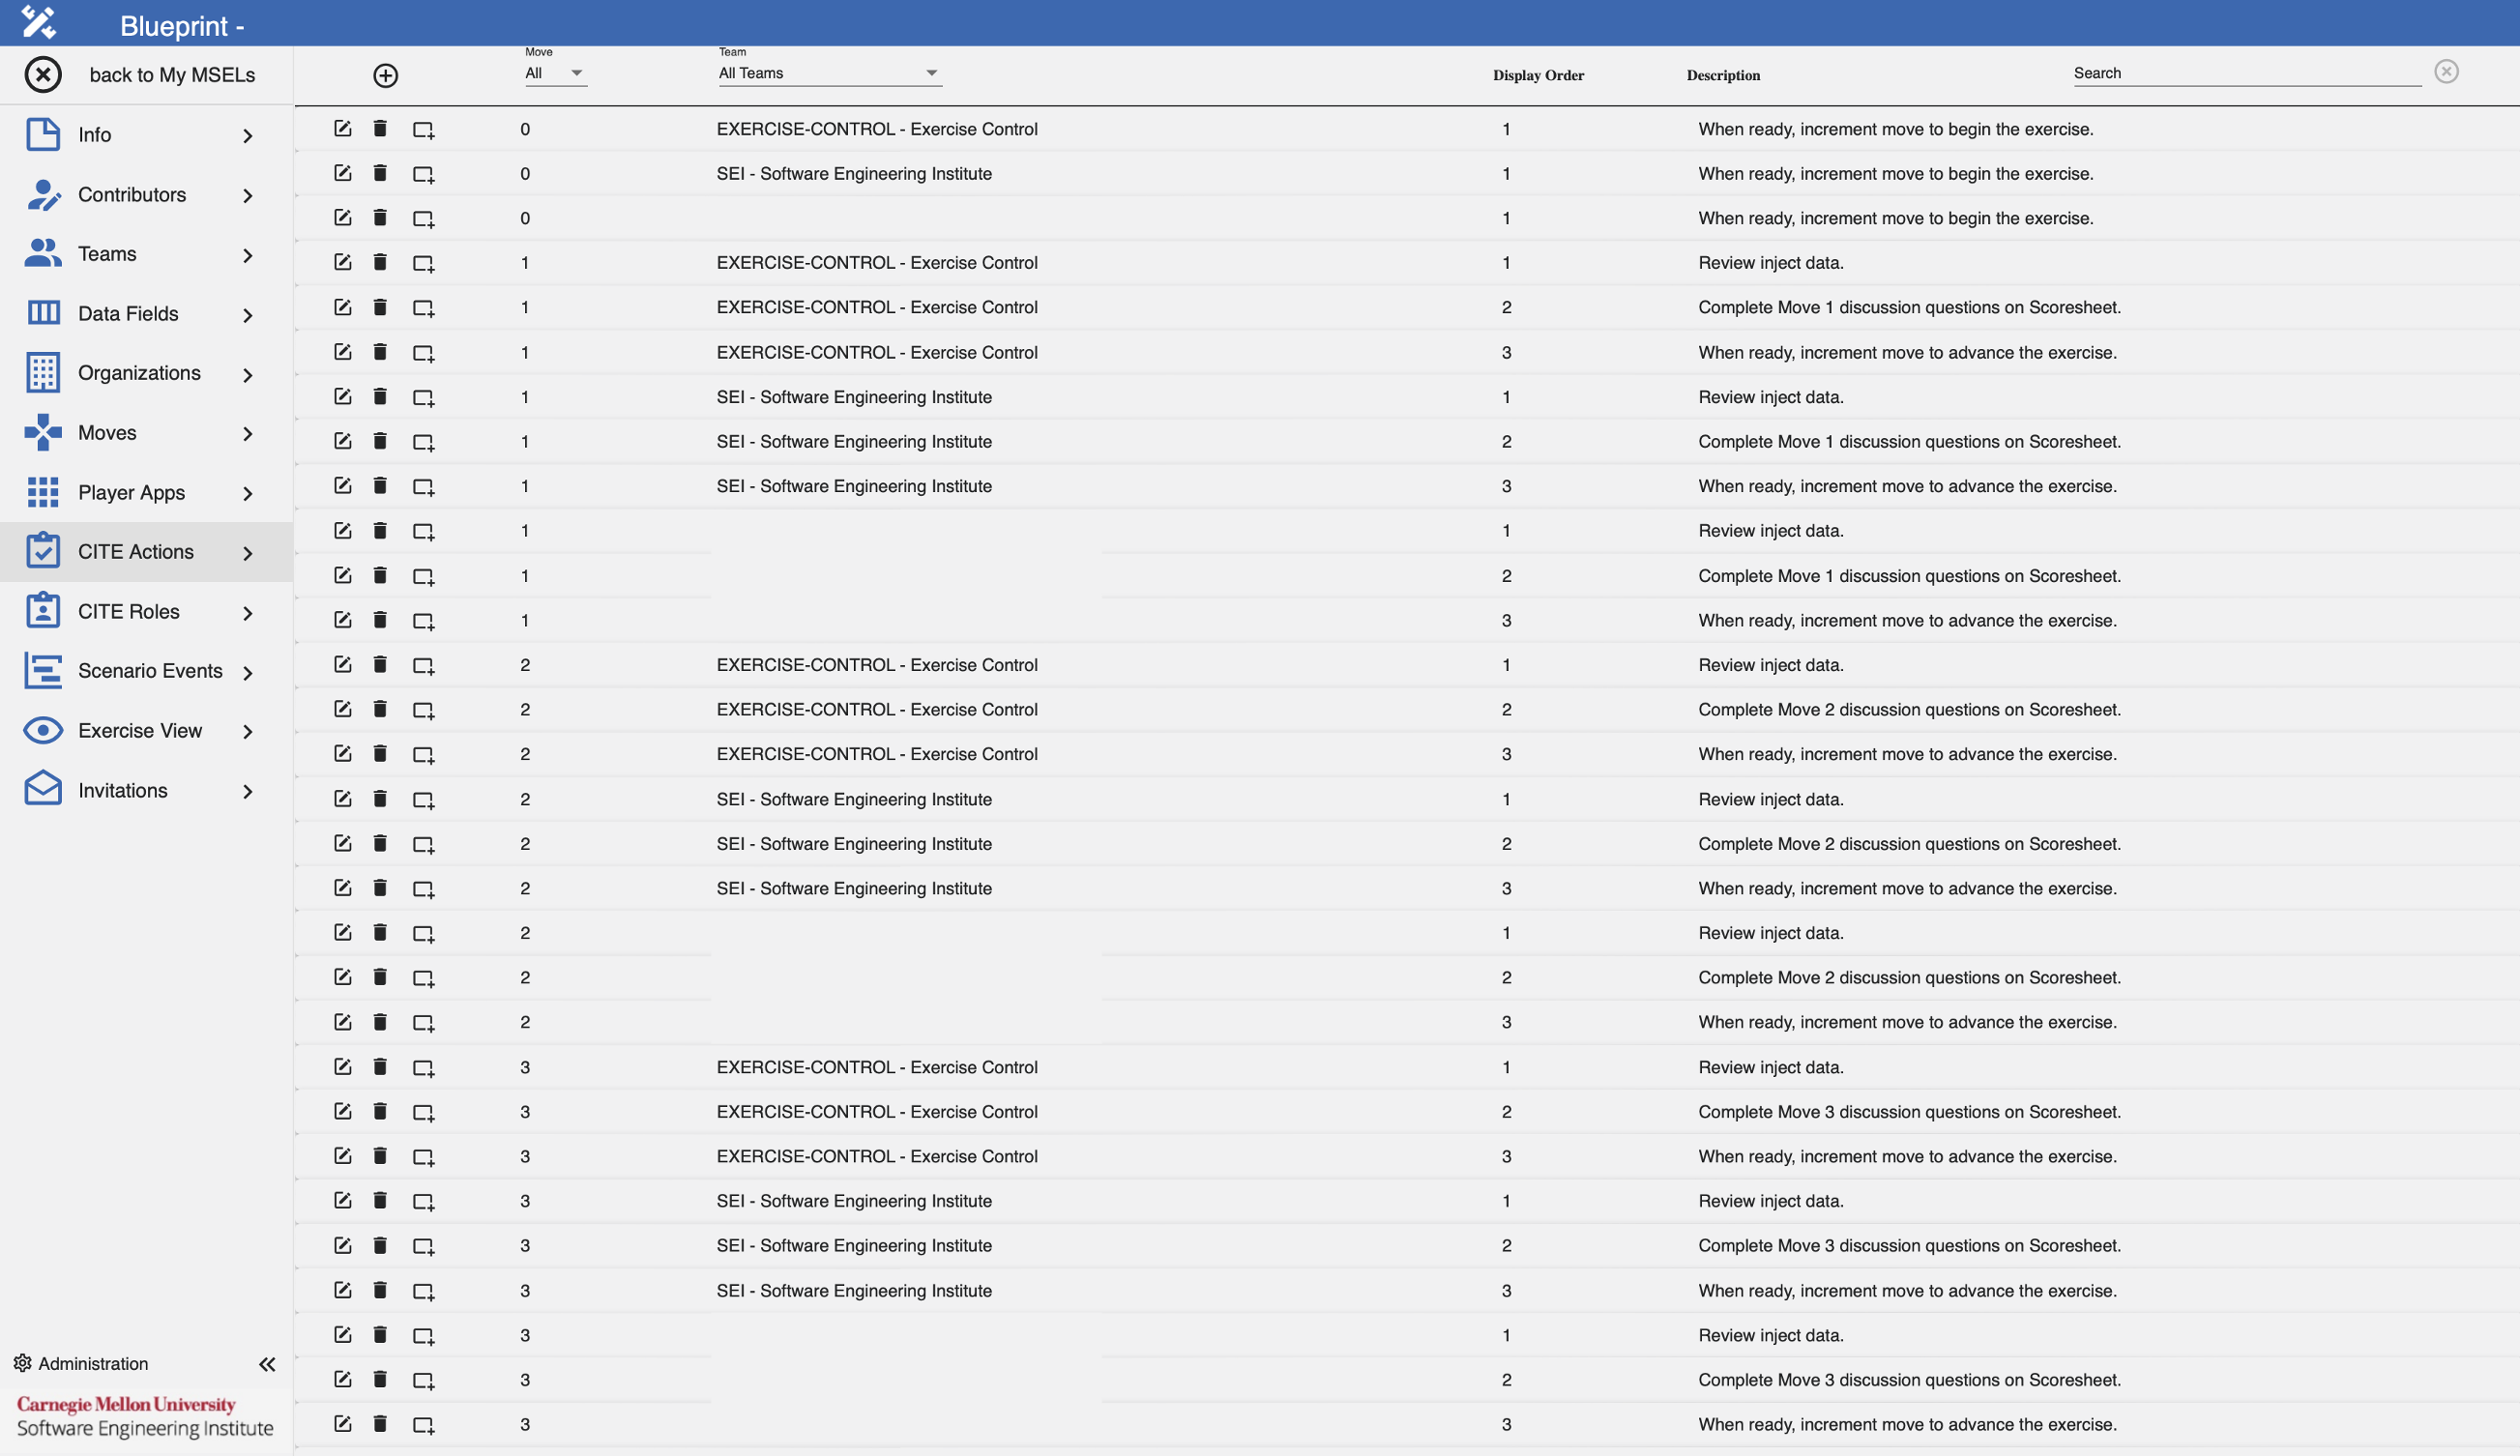
Add a CITE Action
To add a CITE Action, follow these steps:
- Navigate to the CITE Actions tab.
- Click the + icon.
- Fill the fields as necessary following the Data Format Table specifications.
Data Format Table
| Field | Data Type | Description | Example |
|---|---|---|---|
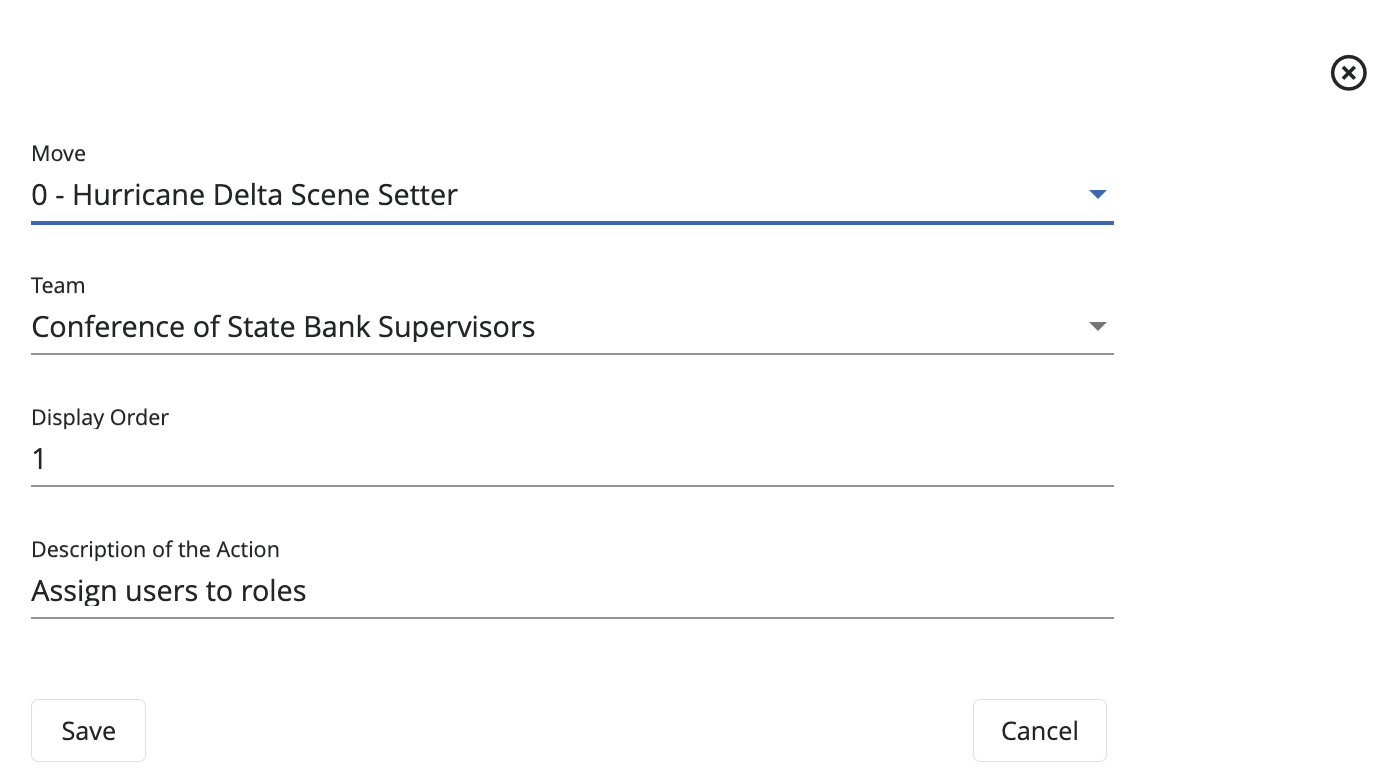
| Move | Dropdown Text | Select the move to display this action | 0 - Hurricane Delta Scene Setter |
| Team | Dropdown Text | Select the team this action applies to | Conference of State Bank Supervisors |
| Display Order | Integer | Indicates the order to display this action on the CITE Dashboard | 1 |
| Description of the Action | String | Information, details, and characteristics of the action | Assign users to roles |
After you've added all desired configurations, click Save.
Edit a CITE Action
To edit the CITE Action's details, follow these steps:
- Navigate to the CITE Actions tab.
- Select the action you want to edit and click Edit next to it. The system opens the same edit component used when creating a new action.
- Make your changes, then click Save.
Delete a CITE Action
To delete a CITE Action, follow these steps:
- Navigate to the CITE Actions tab.
- Select the action you want to delete and click the Trash Can next to it.
Filter Actions by Team
To filter CITE Actions by teams, follow these steps:
- Navigate to the CITE Actions tab.
- On the Team dropdown, select the desired team to filter by.
Search for an Action
To search for a specific action, follow these steps:
- Navigate to the CITE Actions tab.
- Click the Search Bar and type the name of the desired action.
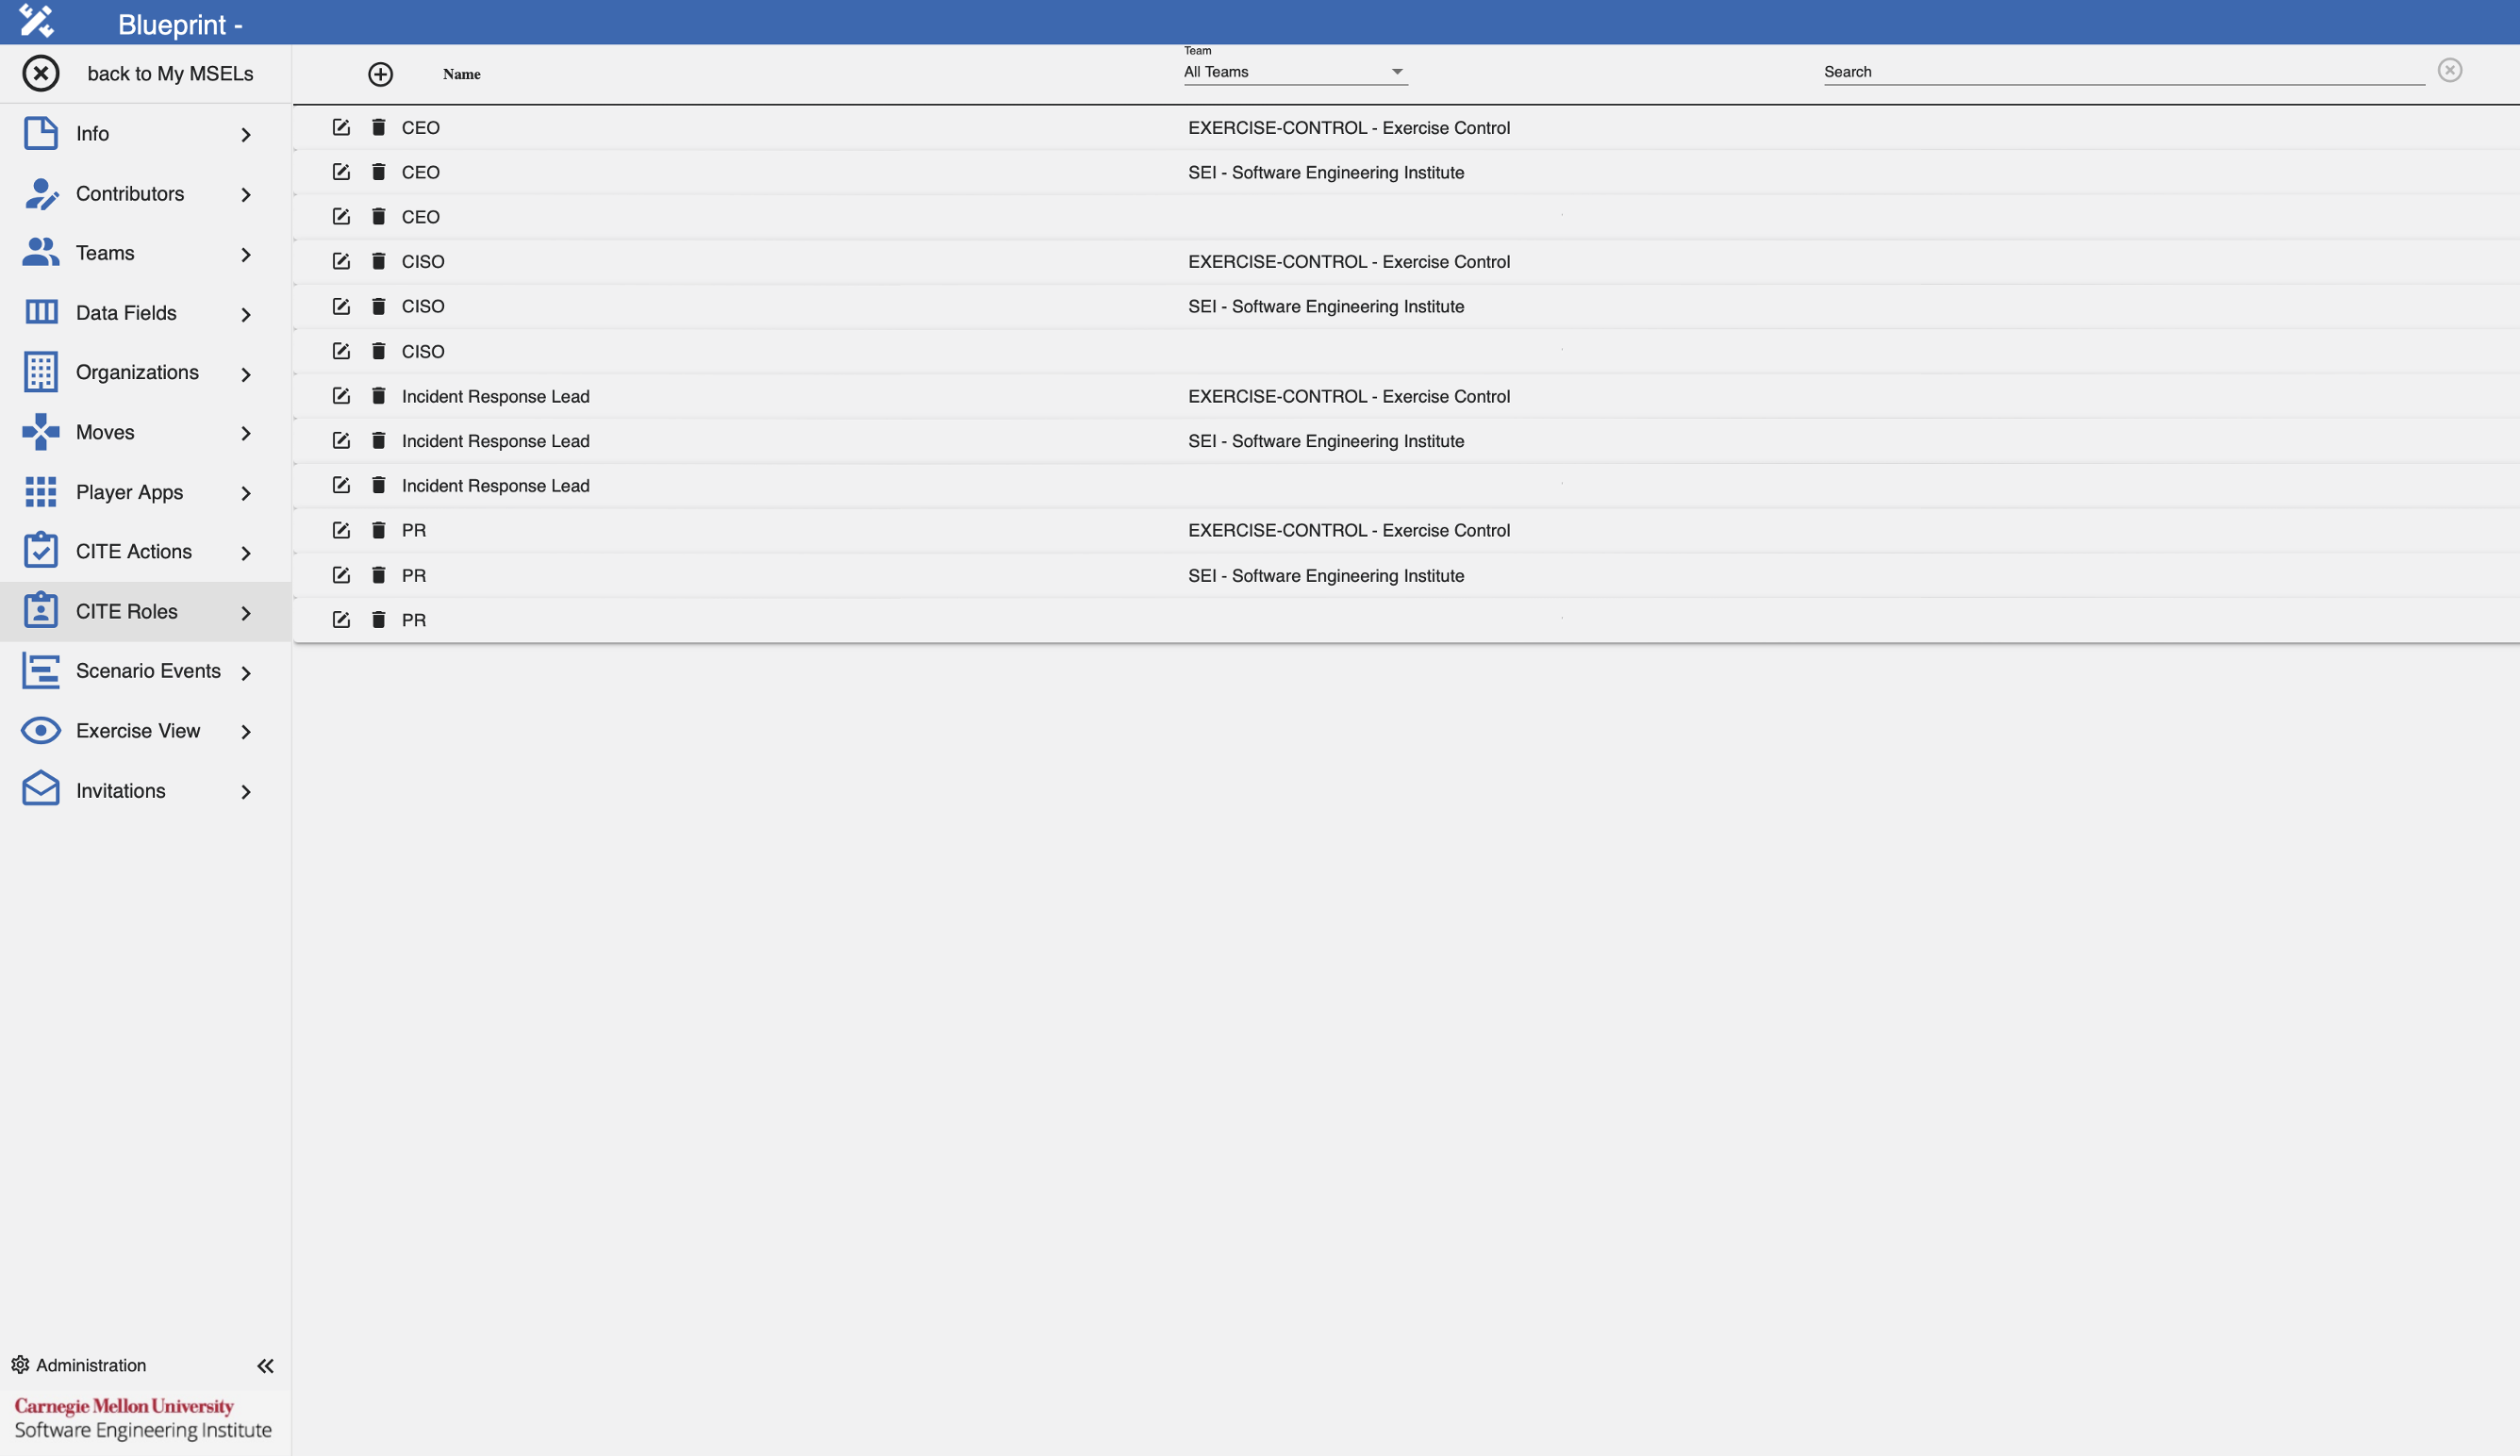
CITE Roles
On this tab, the MSEL owner can add CITE Roles to push from Blueprint. These roles allow team members to customize their response by tracking their responsibilities during an exercise.
Add a CITE Role

To add a CITE role, follow these steps:
- Navigate to the CITE Roles tab.
- Click the + icon.
- Fill the fields as necessary following the Data Format Table specifications.
Data Format Table
| Field | Data Type | Description | Example |
|---|---|---|---|
| Name | String | Name of the role | Team Leader |
| Team | Dropdown Text | Select the team this role applies to | Conference of State Bank Supervisors |
After you've added all desired configurations, click Save.
Edit a CITE Role
To edit the CITE Role's details, follow these steps:
- Navigate to the CITE Roles tab.
- Select the role you want to edit and click Edit next to it. The system opens the same edit component used when creating a new role.
- Make your changes, then click Save.
Delete a CITE Role
To delete a CITE Role, follow these steps:
- Navigate to the CITE Roles tab.
- Select the role you want to delete and click the Trash Can next to it.
Filter Roles by Team
To filter Roles by team, follow these steps:
- Navigate to the CITE Roles tab.
- On the Team dropdown, select the desired team to filter by.
Search for a Role
To search for a specific role, follow these steps:
- Navigate to the CITE Roles tab.
- Click the Search Bar and type the name of the desired role.
Gallery
If enabled, Blueprint can push MSEL information to the Gallery application. When the MSEL owner enables Gallery integration, additional tabs appear in the Blueprint side panel. The MSEL owner must configure the additional tabs to complete the integration.
To enable full Gallery integration, the MSEL owner should configure the following tabs.
Gallery Data Fields
On the Data Fields tab, configure additional data fields to push MSEL information to Gallery.
The MSEL owner should add these fields:
Data Format Table
| Field | Data Type | Description | Example |
|---|---|---|---|
| Description | String | Information, details, and characteristics of the event | STARTEX |
| Date Posted | Datetime | Posted date of the event | 1/24/2024, 14:18:27 |
| Delivery Method | Dropdown Text | How is the event delivered to participants | Gallery |
| Name | String | Name of the event | Common Operating Picture 1 |
| From Org | Dropdown Text | Select the organization that sends this event | CC News |
| To Org | Dropdown Text | Select the organization that receives this event | All |
| Summary | Rich Text | Complete information and details of the event | A ransomware attack affected Bank XYZ... |
| Card | Dropdown Text | Select the Gallery Card to categorize this event | Information Technology Sector |
| Status | Dropdown Text | Approval status of the event used on the MSEL | Approved |
| Source Type | Dropdown Text | Select where the event's details come from | News |
| Source Name | String | Add the author of the event | BBC News |
| Move | Dropdown Text | Move number that the event is part of | 1 |
| Group | Integer | Groups events within a move, often executed within the same time range | 1 |
| Url | String | Provide a URL if more information is necessary for participants to access | www.bbcnews.com/ransomware-attack-xyzbank |
| Open in a New Tab | Boolean | Use this option to open the URL in a new tab | True |
After adding data fields, map each one to the appropriate Gallery field by selecting an option from the Gallery Article Parameter dropdown when adding or editing the field.
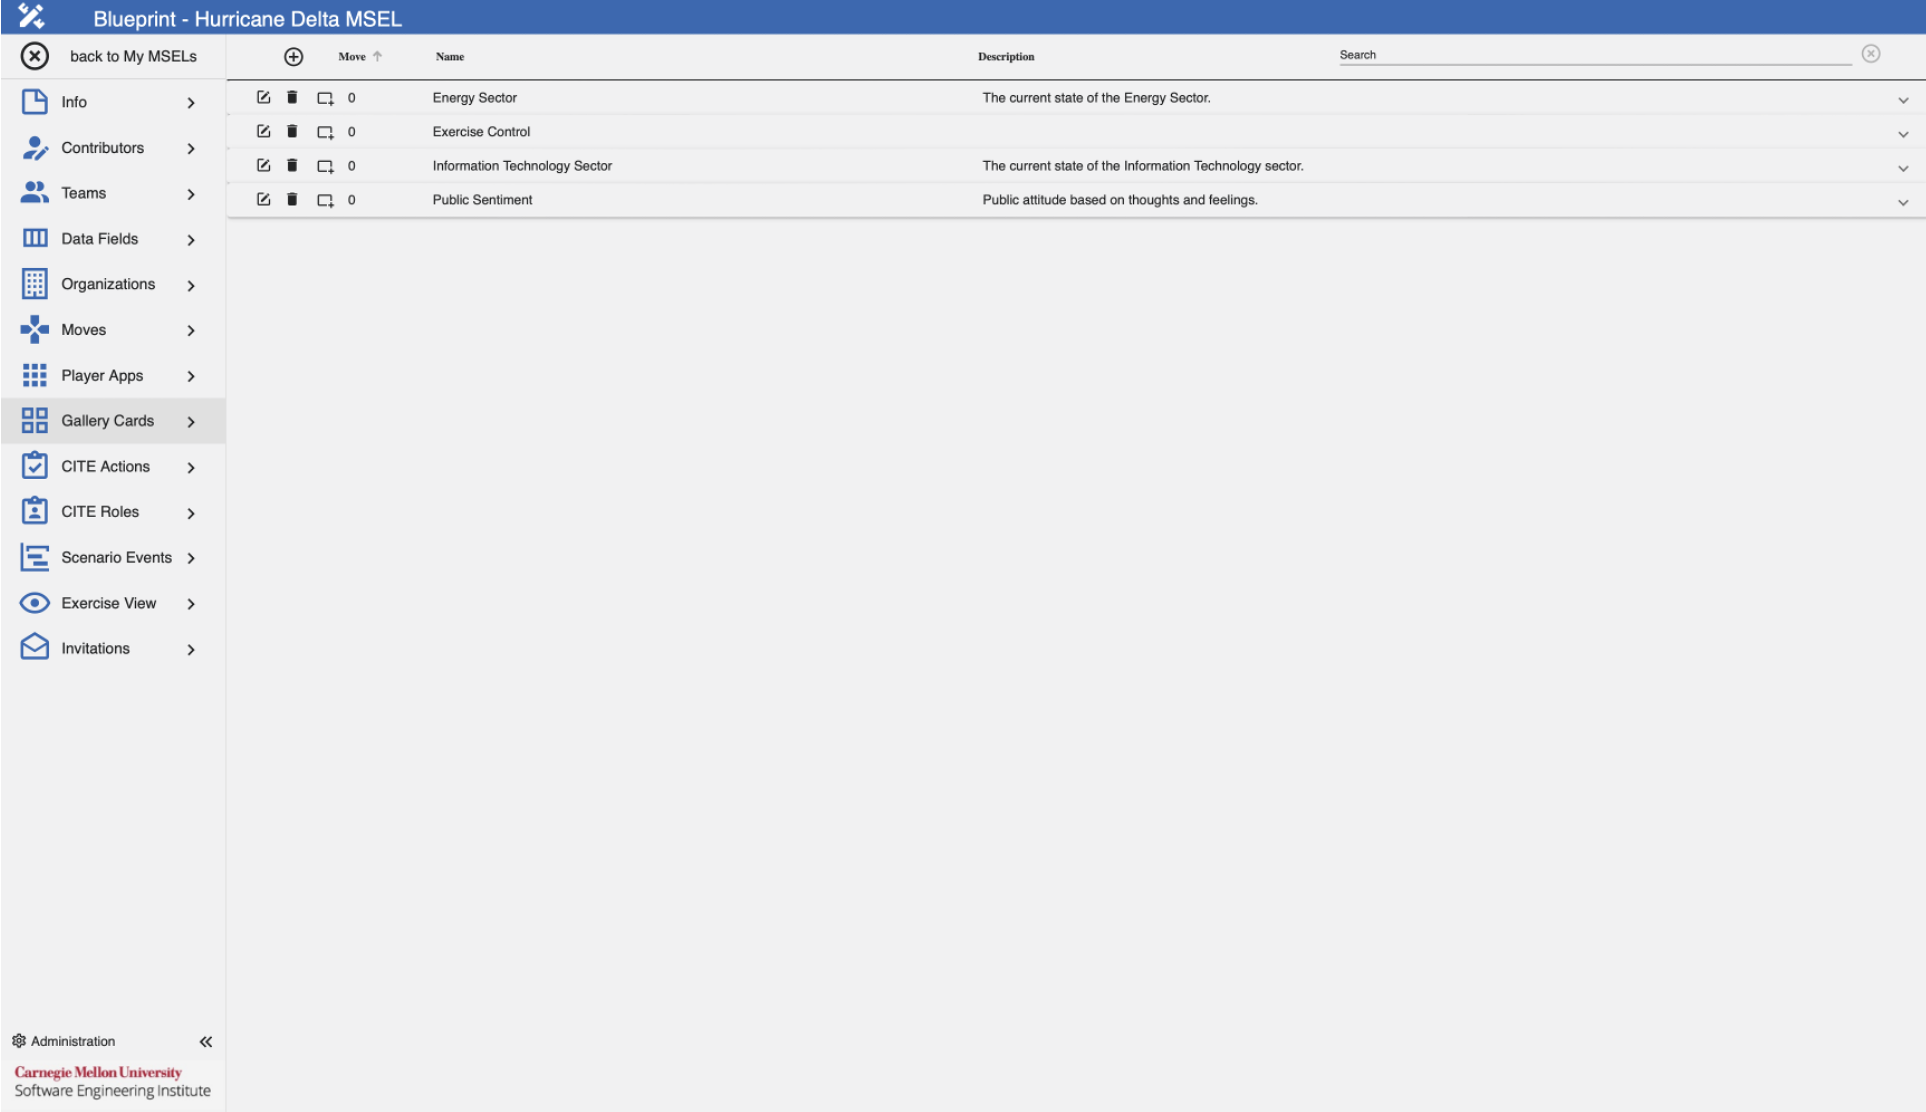
Gallery Cards
On this tab, the MSEL owner can add Gallery Cards to push from Blueprint. These are the different cards in the Gallery Wall. You can also find articles related to that card here.
Add a Gallery Card
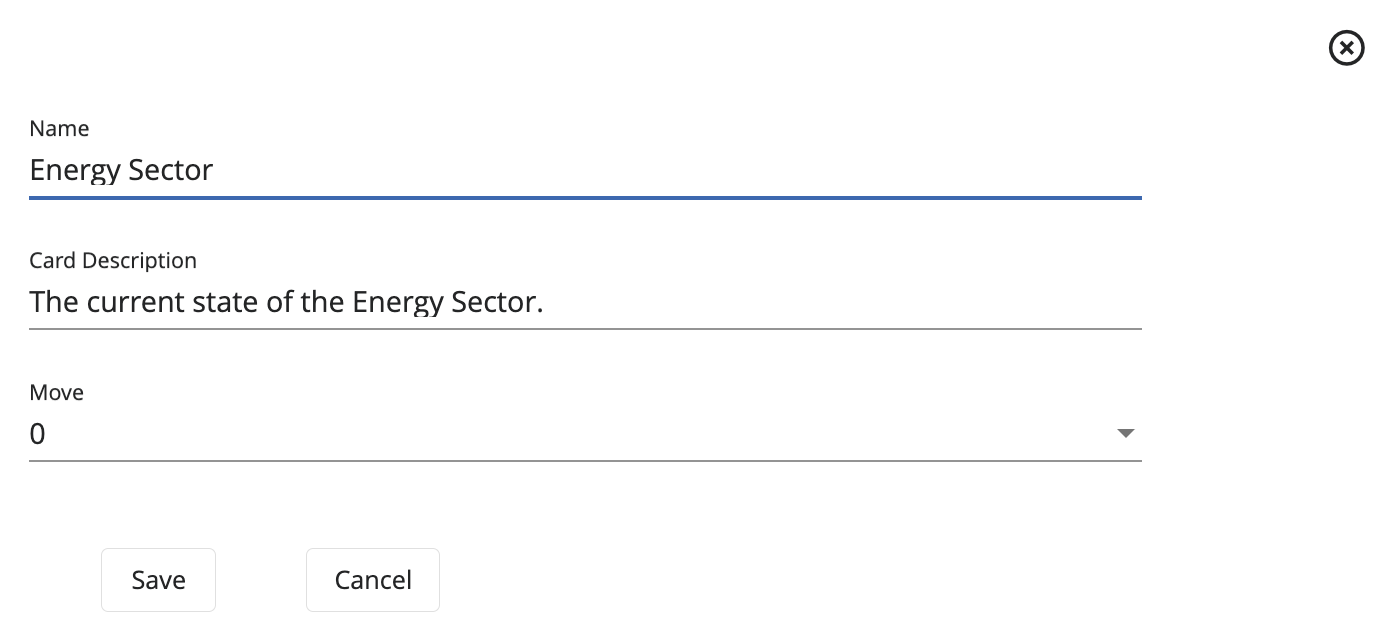
To add a Gallery card, follow these steps:
- Navigate to the Gallery Cards tab.
- Click the + icon.
- Fill the fields as necessary following the Data Format Table specifications.
Data Format Table
| Field | Data Type | Description | Example |
|---|---|---|---|
| Name | String | Name of the Gallery card | Energy Sector |
| Card Description | String | Information, details, and characteristics of the Gallery card | The current state of the Energy Sector |
| Move | Dropdown Text | Select the move to display this Gallery card | 0 |
After you've added all desired configurations, click Save.
Edit a Gallery Card
To edit a Gallery card, follow these steps:
- Navigate to the Gallery Cards tab.
- Select the card you want to edit and click Edit next to it. The system opens the same edit component used when creating a new card.
- Make your changes, then click Save.
Delete a Gallery Card
To delete a Gallery card, follow these steps:
- Navigate to the Gallery Cards tab.
- Select the card you want to delete and click the Trash Can next to it.
Search for a Gallery Card
To search for a specific card, follow these steps:
- Navigate to the Gallery Cards tab.
- Click the Search Bar and type the name of the desired card.
Player
If enabled, Blueprint pushes MSEL information to the Player application. The system adds additional tabs to the Blueprint side panel, which the MSEL owner will need to configure.
To enable the full Player integration, configure the following tabs.
Player Apps
On the Player Apps tab, the MSEL owner can add configurations to push from Blueprint. These are the different applications accessible from the Player View.
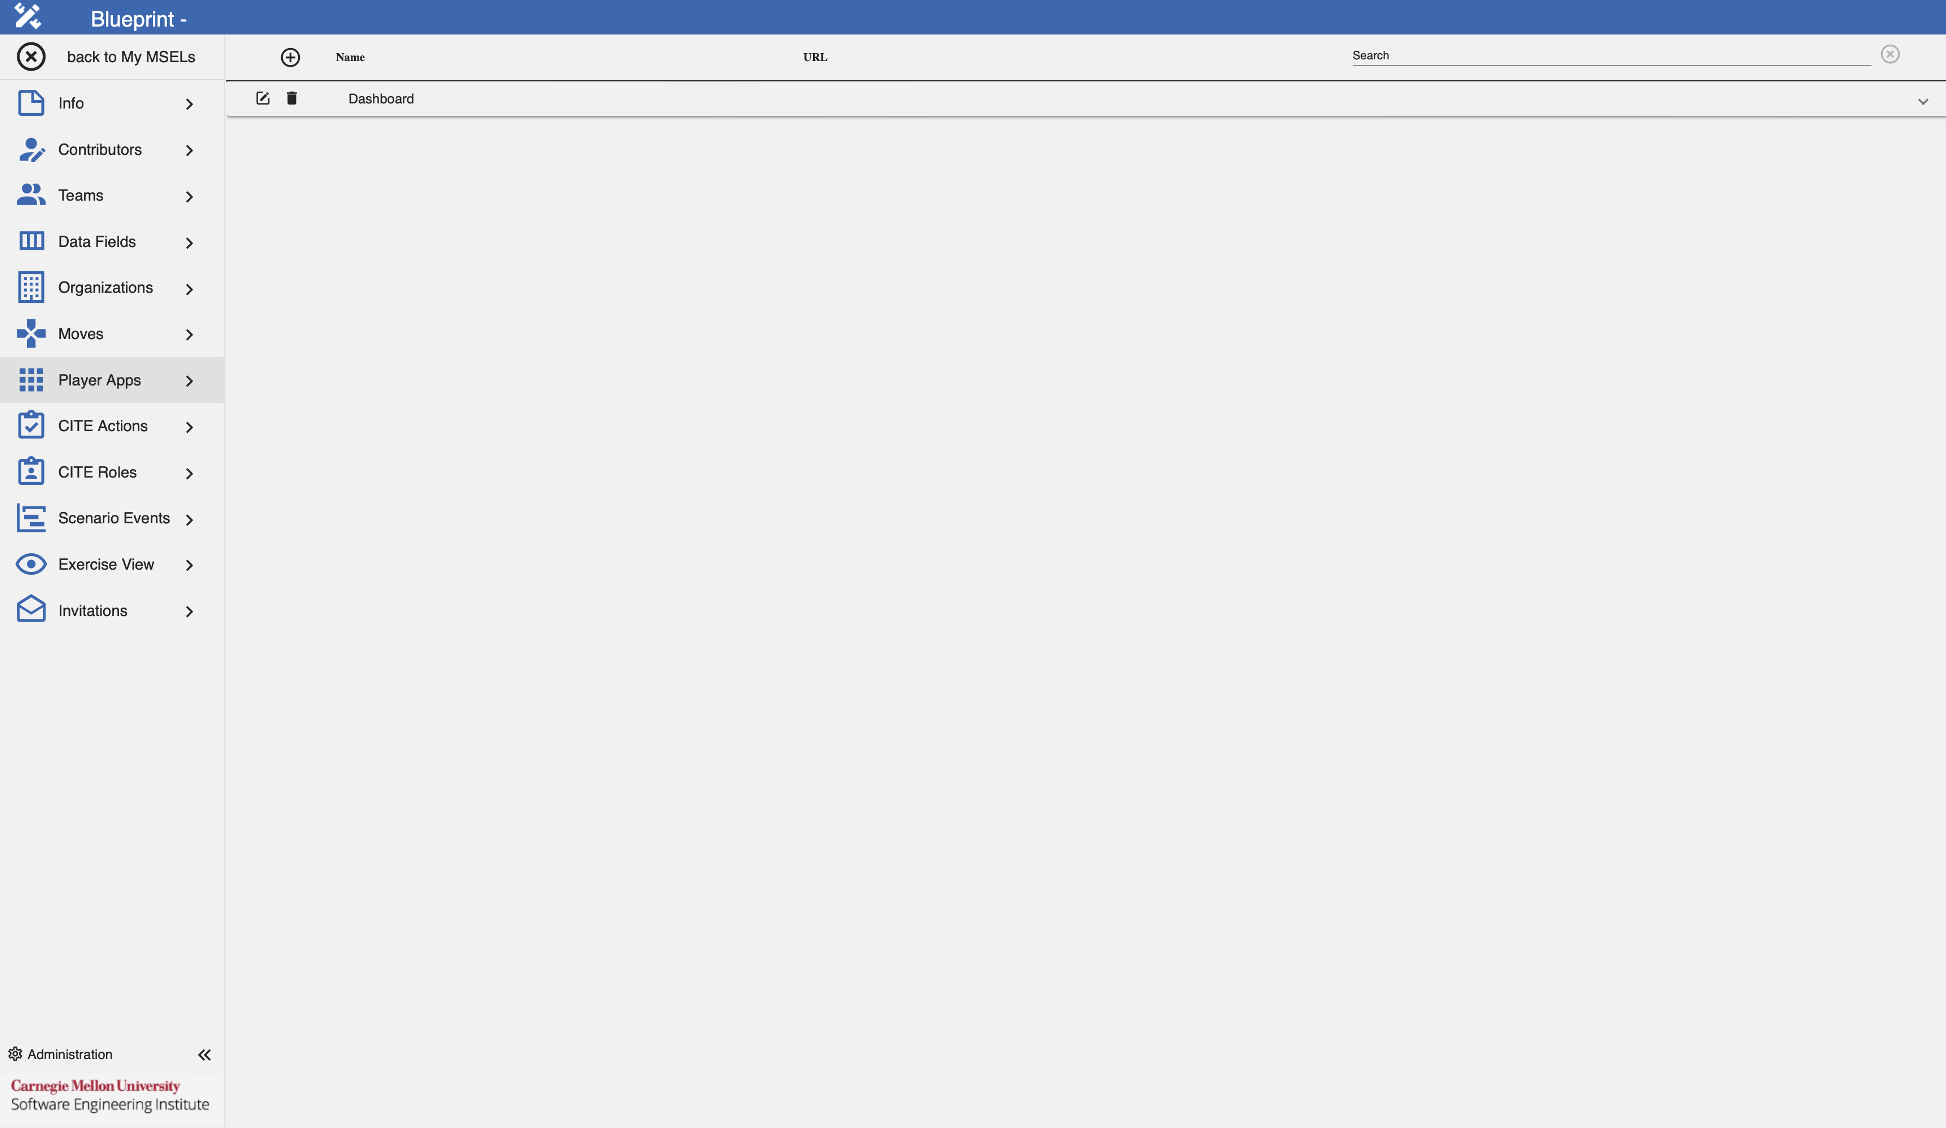
Add a Player App
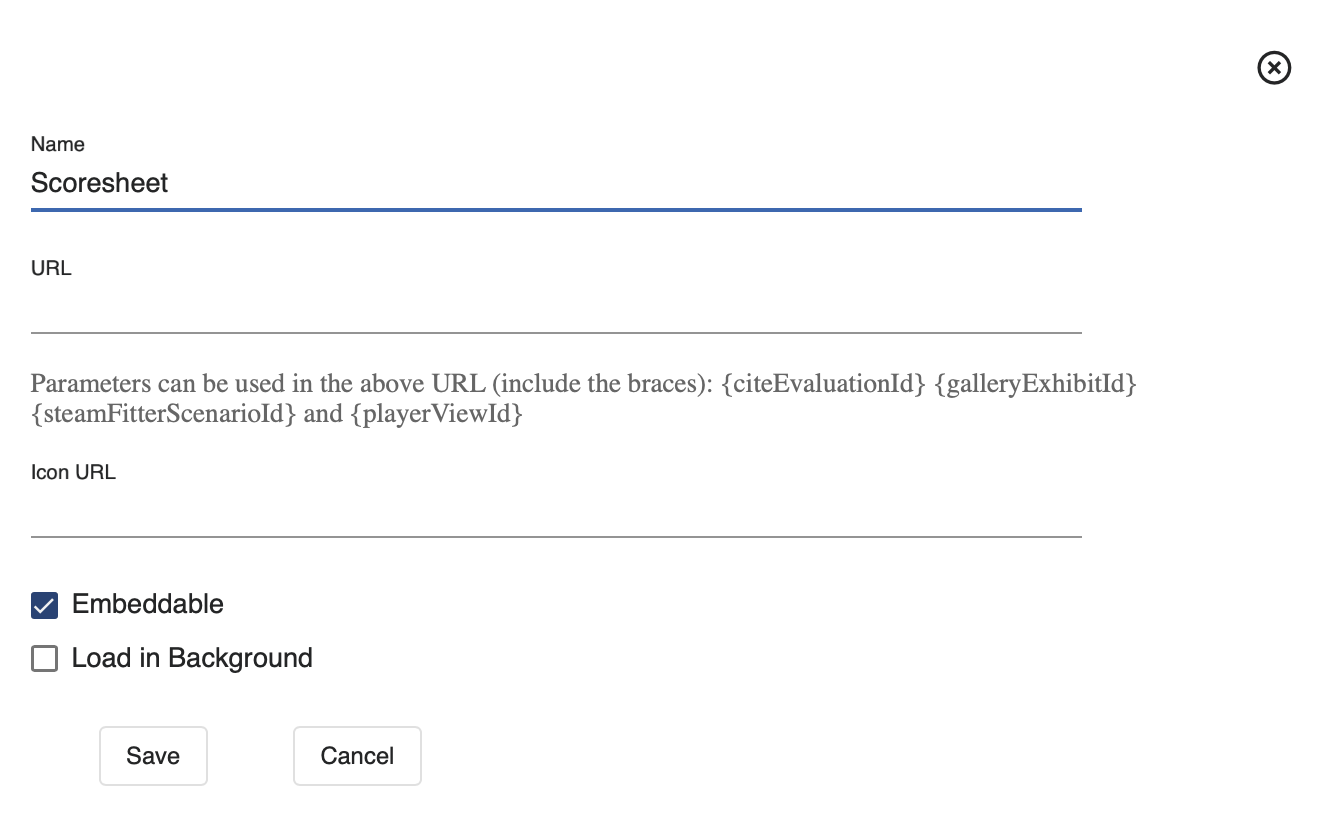
To add a Player app, follow these steps:
- Navigate to the Player Apps tab.
- Click the + icon.
- Select an app template from the provided list.
- Fill the fields as necessary following the Data Format Table specifications.
Data Format Table
| Field | Data Type | Description | Example |
|---|---|---|---|
| Name | String | Name of the application | Chat |
| Url | String | URL of the application | roundcube.hamilton.treasury.gov |
| Icon Url | String | URL of the application's icon | roundcube.hamilton.treasury.gov/roundcube.png |
| Embeddable | Boolean | Select whether to embed the app in Player's iframe | True |
| Load in Background | Boolean | Select whether the app should load in the background | True |
URL Parameters
You can add URL parameters to point to a specific CITE evaluation, Gallery exhibit, Player view, or other content. To do this, include the variables in braces when adding a new application. Consider using the following variables:
- {citeEvaluationId}: Add this variable to the URL to point to a specific CITE evaluation.
- {galleryExhibitId}: Add this variable to the URL to point to a specific Gallery exhibit.
- {steamFitterScenarioId}: Add this variable to the URL to point to a specific Steamfitter scenario.
- {playerViewId}: Add this variable to the URL to point to a specific Player view.
After you've added all desired configurations, click Save.
Edit a Player App
To edit a Player app, follow these steps:
- Navigate to the Player Apps tab.
- Select the app you want to edit and click Edit next to it. The system opens the same edit component used when creating a new app.
- Make your changes, then click Save.
Delete a Player App
To delete a Player app, follow these steps:
- Navigate to the Player Apps tab.
- Select the app you want to delete and click the Trash Can next to it.
Search for a Player App
To search for a specific app, follow these steps:
- Navigate to the Player Apps tab.
- Click the Search Bar and type the name of the desired app.
Push Integrations
After adding all of the MSEL information and performing all necessary configurations, you can push information from enabled integrations to their respective applications.

To push MSEL information to their respective applications, follow these steps:
- Navigate to the Info tab.
- Click Push Integrations.
Remove Integrations
If desired, the MSEL owner can remove MSEL information after the enabled integrations have pushed it to their respective applications.

To remove MSEL information from the applications, follow these steps:
- Navigate to the Info tab.
- Click Remove Integrations.
Glossary
This glossary defines key terms and concepts used in the Blueprint application.
Approver Role: Can view and edit the MSEL, but will have the added feature of approving a MSEL.
Blueprint: Web application created to make the development of a MSEL and events easier.
CITE: Web application that allows multiple participants from different organizations to evaluate, score, and comment on cyber incidents.
CITE Action: Series of steps to guide users on an appropriate course of action during an exercise.
CITE Role: Provide a set of responsibilities assigned to a user during an exercise.
Content Developer Permission: Can view, edit, create, and approve events on the MSEL.
Data Fields: Structured components containing essential information about the event's characteristics, context, and implications.
Editor Role: Can edit the events assigned to them by the MSEL owner, but not other events. They cannot delete events or create new events.
Events: Specific scenario events or messages within the scenario that prompt users to implement designated actions.
Exercises: Structured and simulated activity designed to assess, train, or evaluate the capabilities, preparedness, and responses of individuals, teams, or organizations in dealing with various scenarios, especially emergencies or crises.
Evaluator Permission: Manages the exercise, can advance moves, execute events, and check events as completed.
Gallery: Web application where participants receive incident information.
Gallery Card: The Gallery wall displays Gallery cards. Each Gallery card represents an article category. Cards show a background color based on the most recent article's status and the number of unread articles. Content developers define cards within each Gallery collection.
Incrementer Role: When the MSEL owner has enabled CITE integration, this role allows a user to advance the current move.
Inviter Role: This role will allow a user to invite others to the MSEL event.
Modifier Role: When the MSEL owner has enabled CITE integration, this role allows a user to modify the team's score.
Move Editor: Can edit moves on the MSEL, as well as increment them during an exercise.
Moves: A defined period of time during an exercise, where exercise organizers distribute a series of events for users to discuss and assess current incident severity.
MSEL: (Master Scenario Events List) provides a timeline for all expected events, affiliated users and organizations during an exercise.
Observer Role: When the MSEL owner has enabled Gallery or CITE integrations, this role allows a user to observe other team's progress on CITE and Gallery applications.
Organizations: Entities within an exercise with defined roles, responsibilities, and functions.
Owner Role: Owner of the MSEL, can view and edit as well as perform all functionality that the MSEL provides (e.g., Add Teams, Add Integrations, Events).
Player: Centralized web interface where participants, teams, and administrators go to engage in a cyber event.
Player Apps: List of applications accessible from the same Player view.
Player View: These are the settings associated with building a view. You can edit, clone, and delete a view.
Steamfitter: Gives content developers the ability to create scenarios consisting of a series of scheduled tasks, manual tasks, and events which run against virtual machines during an event.
Submitter Role: When the MSEL owner has enabled CITE integration, this role allows a user to submit the team's score.
System Admin Permission: Can add users to a team, as well as assign the required permissions.
System Defined Data Fields: Added by default in MSEL creation, since data fields under this category are essential for MSEL features to work.
User Defined Data Fields: The user adds on an as-needed basis.
Viewer Role: Can view the MSEL, but can't do any edits to it.