 CITE: Evaluating Threats
Overview
CITE integrates with the Crucible Framework and allows multiple participants from different organizations to evaluate, score, and comment on cyber incidents. CITE compares a user's score to their organization's score, group average scores, and the official exercise score. Participants submit a score for each move as the exercise progresses, and they can recall each historical score for reference at any time.
In the CITE User Interface, there are two major functional sections:
- CITE Dashboard: The dashboard shows exercise details like date and time, incident summary, a suggested list of actions for participants to consider taking, and suggested participant roles.
- CITE Scoresheet: The scoresheet compares participant scores to organization scores, group average scores, and the official score.
For installation, refer to these GitHub repositories.
Configuration
Configure and deploy CITE using the CITE Helm Chart. The Helm Chart README provides detailed instructions for all deployment settings.
Classification Banner
CITE UI supports an optional, customizable classification banner that displays persistently at the top of the application. The banner can show classification labels (such as "UNCLASSIFIED" or "SECRET"), maintenance messages, or any other persistent notification. Configure the banner through HeaderBarSettings in the Helm chart. See the Classification Banner section of the CITE Helm Chart README for configuration details.

Permissions and Roles
To use CITE, an administrator assigns each user a scoring permission.
There are three levels of permissions in CITE that shape how a team collaborates on and edits a score.
- Basic: Can only view the team score.
- Modify: Can view and edit the team score.
- Submit: Can view, edit, and submit the team score.
Most users hold modify-level permission; however, one or two users per team hold submit-level permission, enabling them to edit and submit the team score.
Additionally, participants who can submit scores on behalf of their team can also add suggested actions and participant roles to the CITE Dashboard.
Refer to the Actions to Consider section for more information.
Administrator Guide
CITE administrators use the Administration View to manage users and configure evaluations, scoring models, scoring categories, actions, roles, and team types.
Administration View
Across the Crucible exercise applications, the Administration View is where privileged users configure the platform and control access. It includes user and team management, role and permission assignment, and setup and maintenance of app-specific templates and content. The Administration View is where admins prepare and manage the environment so events run smoothly for participants.
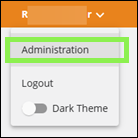
Accessing the Administration View is the same in all Crucible exercise applications: expand the dropdown next to your username in the top-right corner and select Administration.
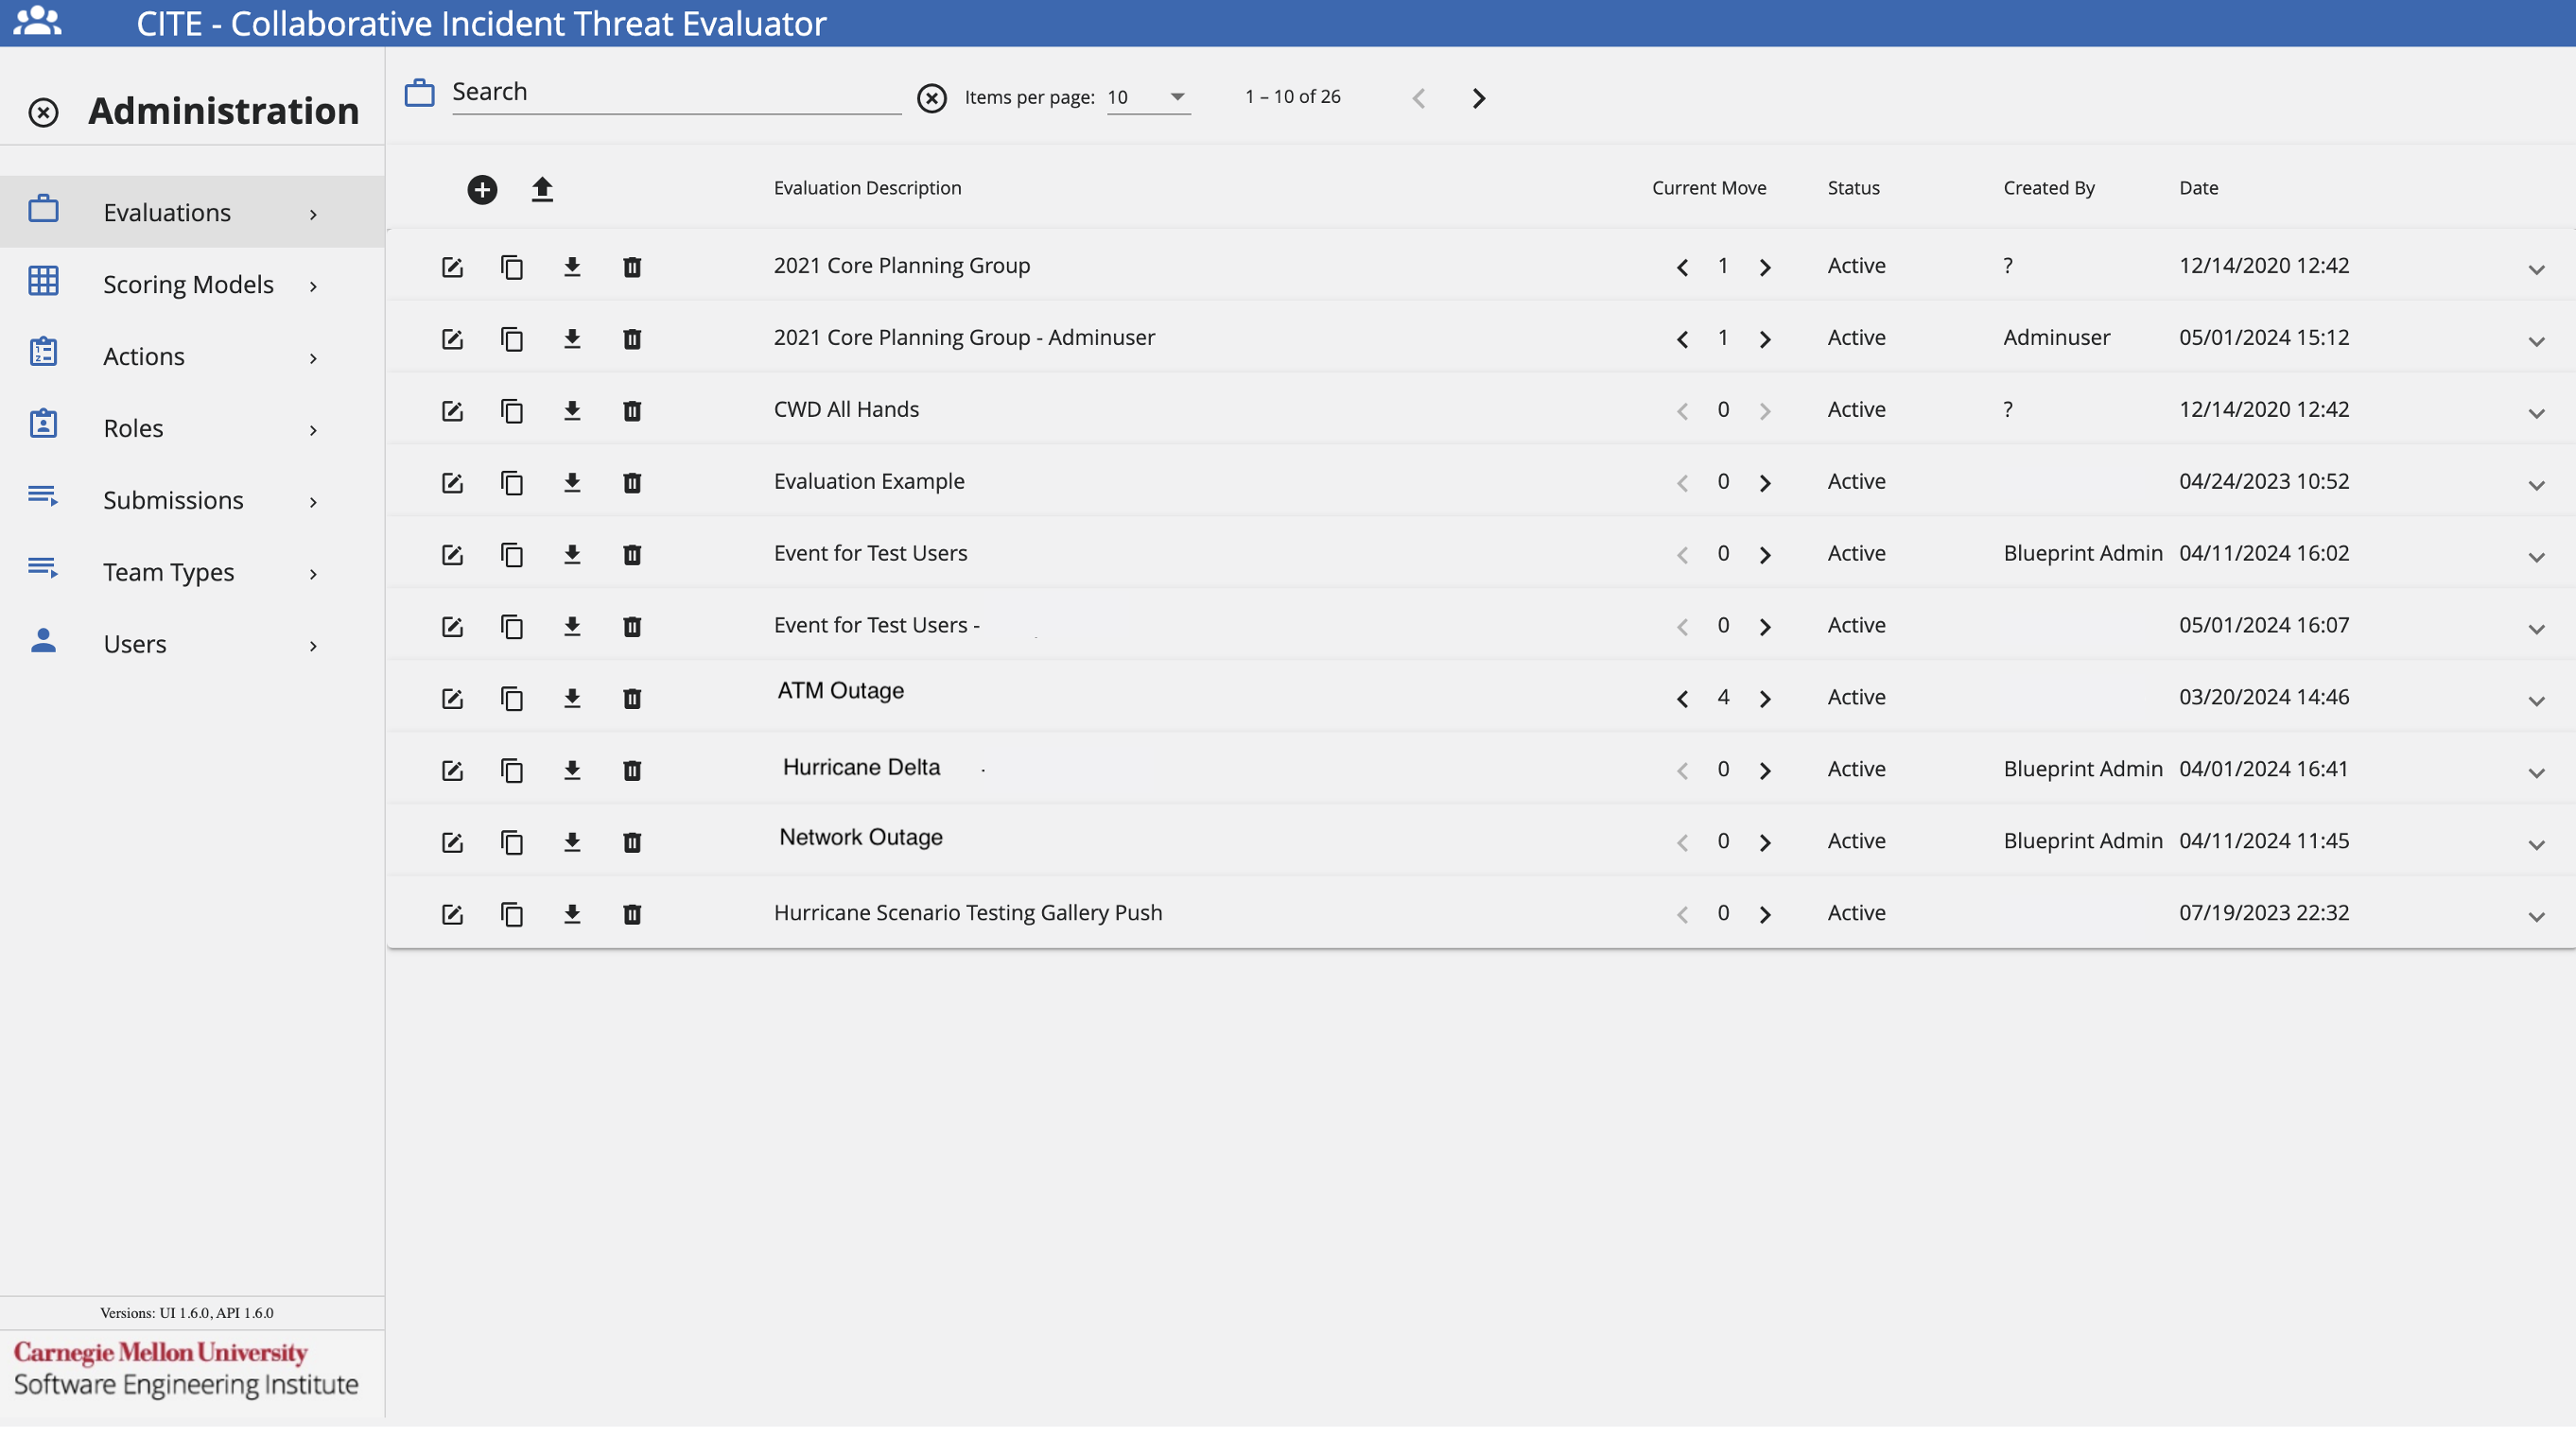
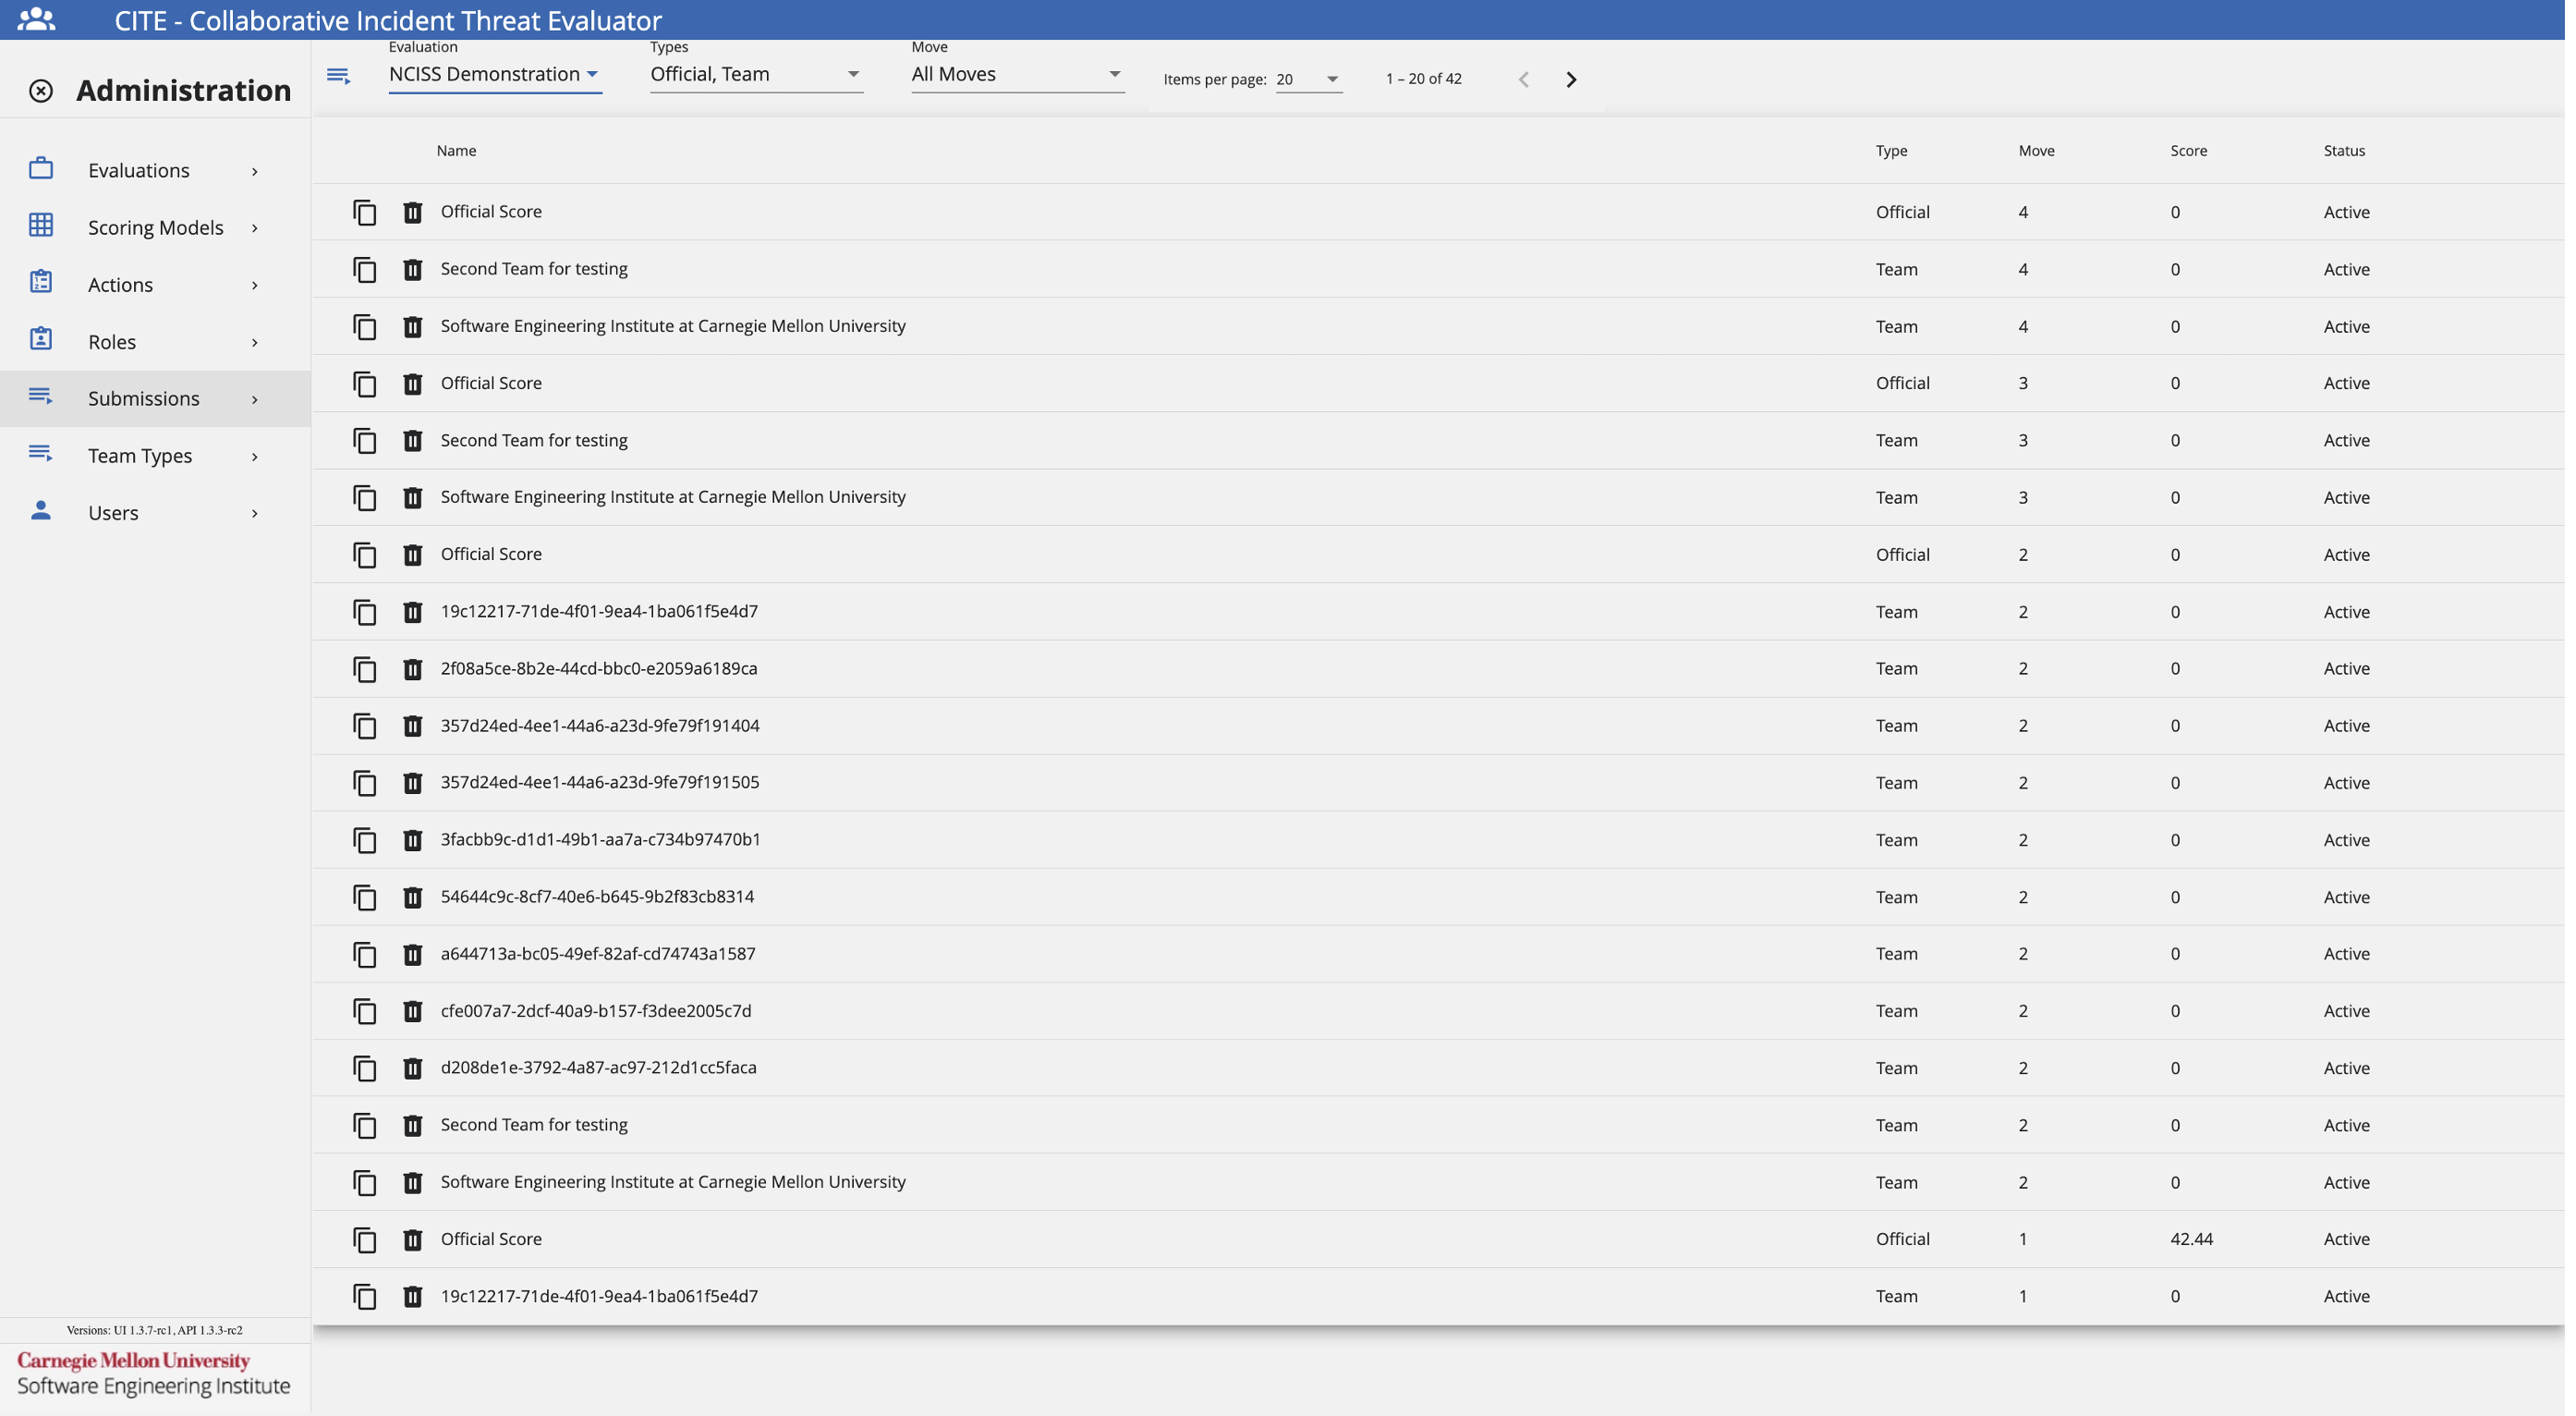
Evaluations
The following image shows the Evaluations Administration Page. Here, administrators can add, edit, upload, download, copy, and delete evaluations.
Add an Evaluation
If the exercise administrator grants the appropriate permissions, follow these steps to add an Evaluation.
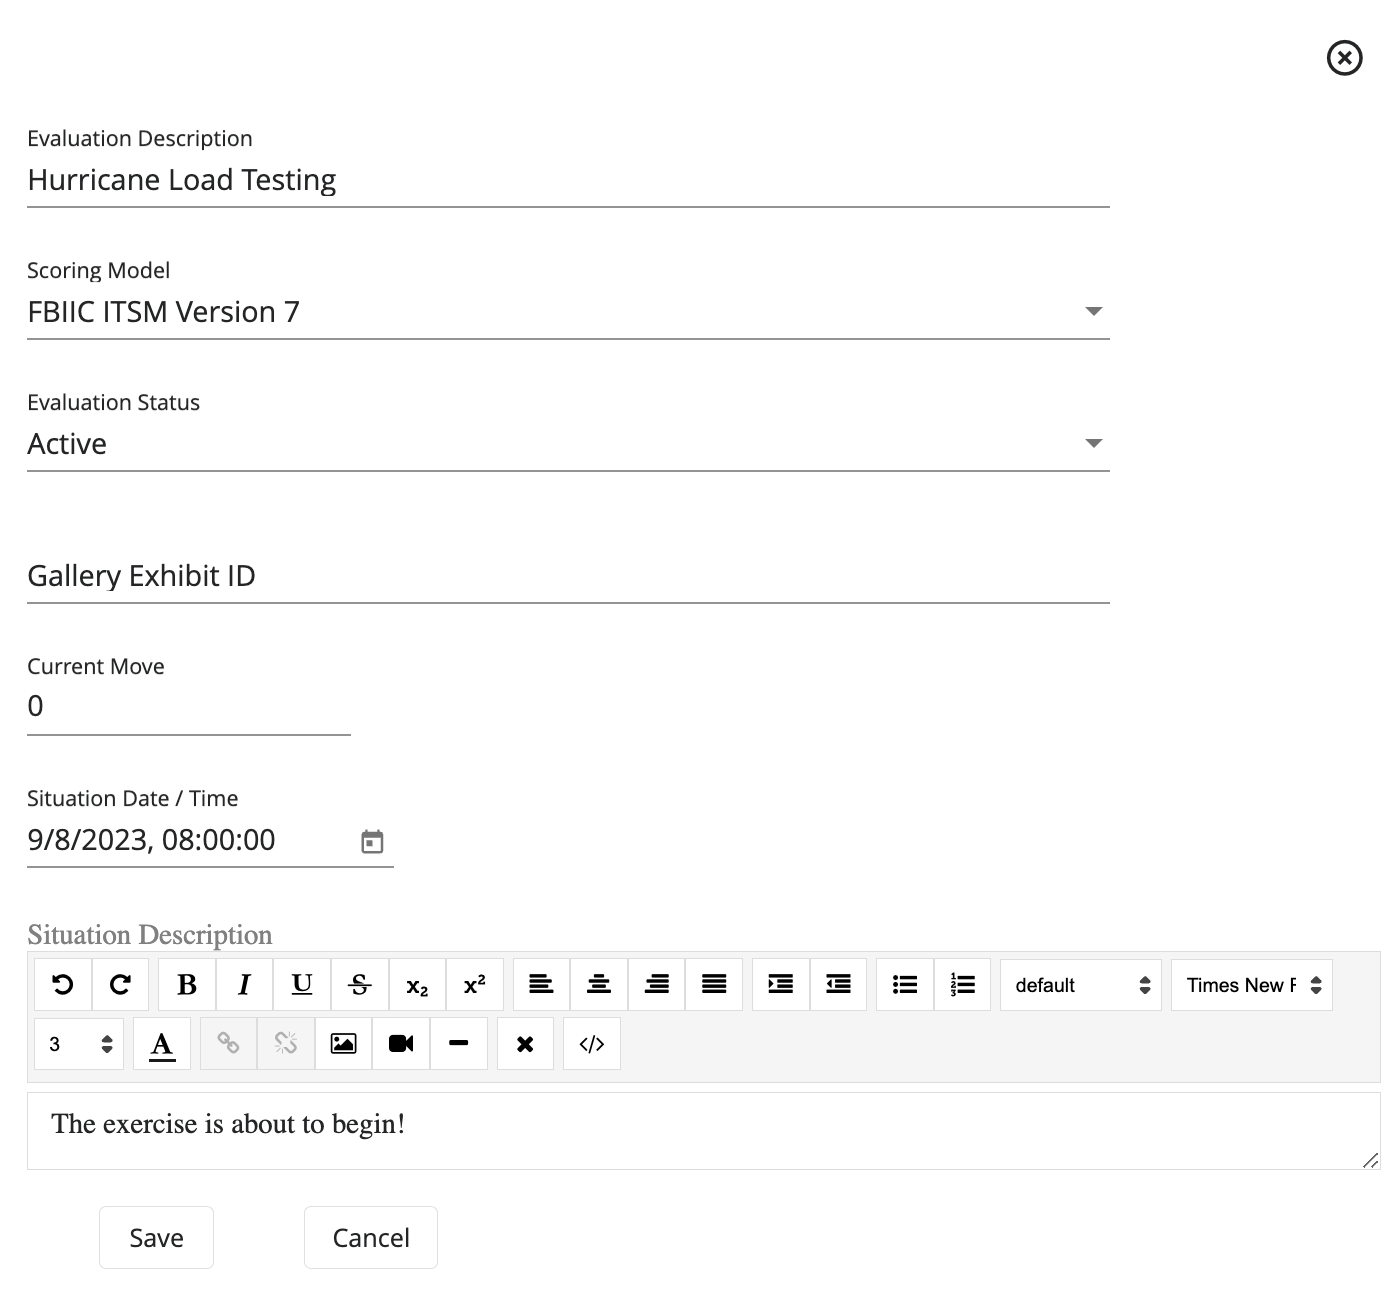
- Under the Evaluation Administration View, click +.
- Fill the fields as necessary following the Data Format Table specifications.
Data Format Table
| Field | Data Type | Description | Example |
|---|---|---|---|
| Evaluation Description | String | Details, characteristics and information of the evaluation | NCISS Demonstration |
| Scoring Model | Dropdown Text | Scoring model to use in the evaluation | CISA NCISS |
| Evaluation Status | Dropdown Text | Status of the evaluation after configuration | Active |
| Gallery Exhibit ID | GUID | ID of the Gallery exhibit, if using Gallery during an exercise | 81a623e3-faeb-4a56-8b4d-0d42f90b6829 |
| Current Move | Integer | Current move of the evaluation | 0 |
| Situation Date/Time | Datetime | Evaluation situation date/time | 1/23/2024, 14:22:40 |
| Situation Description | Rich Text | Additional details, characteristics and information of the evaluation | Ransomware attackers compromised the agency's network... |
To save these settings, click Save.
Edit an Evaluation
To edit an evaluation, follow these steps:
- Click the Gear icon.
- Navigate to the Evaluations tab.
- Select the evaluation to edit and click Edit next to it. The system opens the same edit component used when creating a new evaluation.
- After making all necessary edits, click Save.
Delete an Evaluation
To delete an evaluation, follow these steps:
- Click the Gear icon.
- Navigate to the Evaluations tab.
- Select the evaluation to delete and click the Trash Can next to the evaluation.
Upload an Evaluation
To upload an evaluation, follow these steps:
- Click the Gear icon.
- Navigate to the Evaluations tab.
- Click the Up Arrow next to the +.
- Select the evaluation JSON file to upload.
Download an Evaluation
To download an evaluation, follow these steps:
- Click the Gear icon.
- Navigate to the Evaluations tab.
- Click the Down Arrow next to the evaluation to download.
- Look for the JSON file in your Downloads folder.
Copy an Evaluation
To copy an evaluation, follow these steps:
- Click the Gear icon.
- Navigate to the Evaluations tab.
- Click Copy next to the evaluation to copy.
- Look for the evaluation name with the user's name.
Configure an Evaluation
To configure an evaluation to use for an exercise, administrators will need to add moves and teams to the evaluation. To do this, follow these steps:

Moves
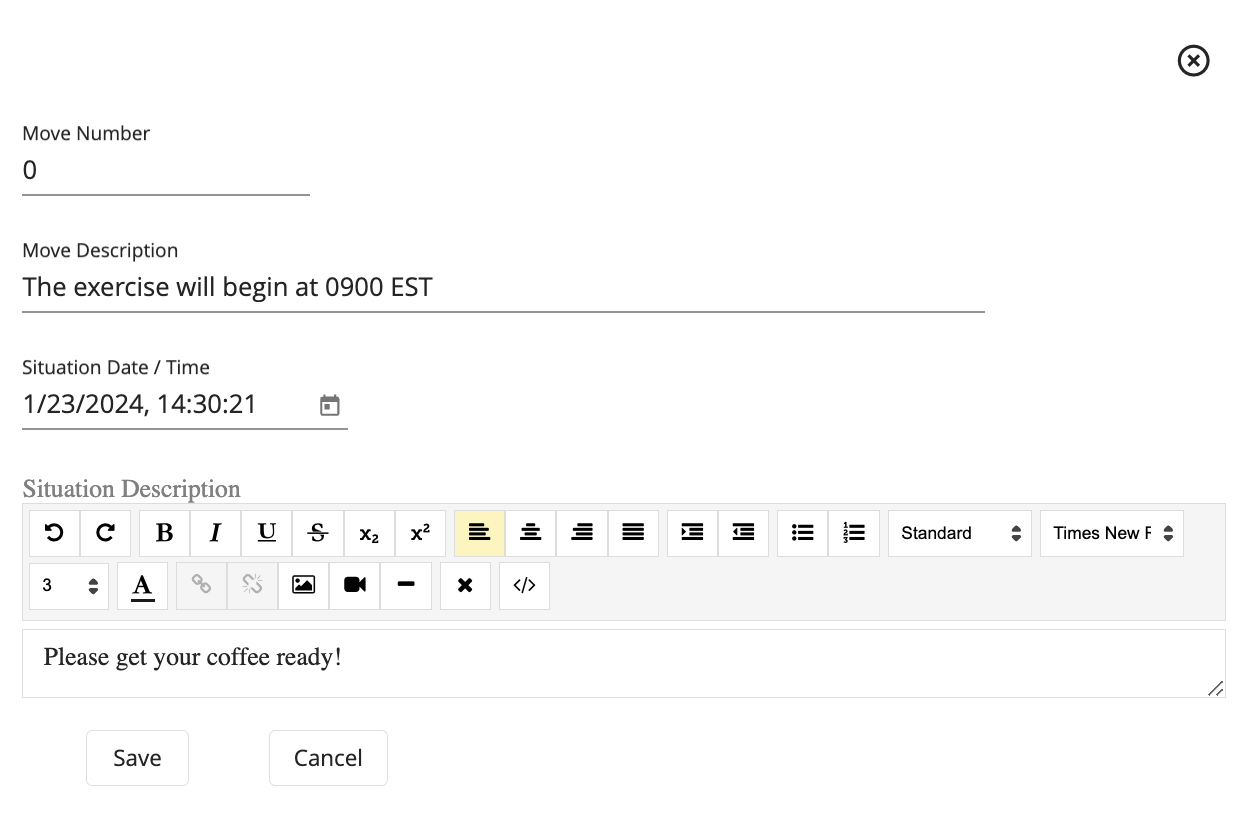
- Click + on the Moves section.
- Fill the fields as necessary following the Data Format Table specifications.
Data Format Table
| Field | Data Type | Description | Example |
|---|---|---|---|
| Move Number | Integer | Move number to add | 0 |
| Move Description | String | Details, characteristics and information of the move | The exercise will begin at 0900 EST |
| Situation Date/Time | Datetime | Situation date/time for the move | 1/23/2024, 14:30:21 |
| Situation Description | Rich Text | Additional details, characteristics and information of the move | The objectives of the exercise are... |
To save these settings, click Save.
Edit a Move
To edit a move, follow these steps:
- Click the Gear icon.
- Navigate to the Evaluations tab.
- Select the evaluation to edit and click the Moves tab.
- Select the move to edit and click Edit next to it. The system opens the same edit component used when creating a new move.
- After making all necessary edits, click Save.
Delete a Move
To delete a move, follow these steps:
- Click the Gear icon.
- Navigate to the Evaluations tab.
- Select the evaluation to edit and click the Moves tab.
- Select the move to delete and click the Trash Can next to the move.
Teams
- Click + on the Teams section.
- Fill the fields as necessary following the Data Format Table specifications.
Data Format Table
| Field | Data Type | Description | Example |
|---|---|---|---|
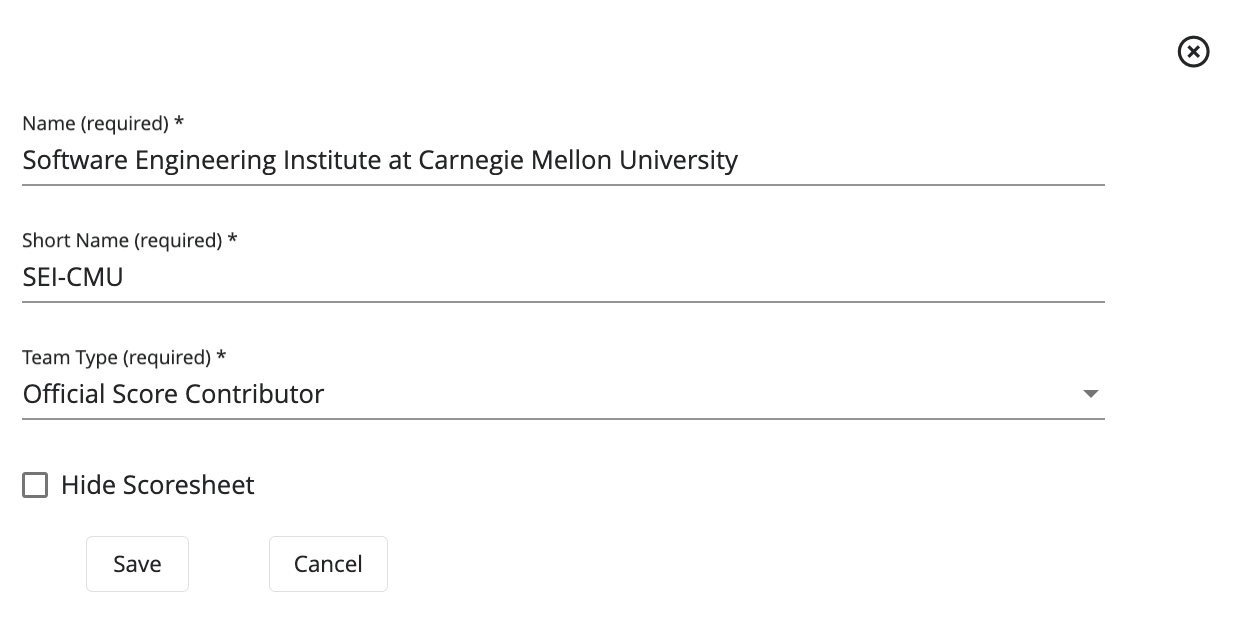
| Name | String | Name for the team | Carnegie Mellon University |
| Short Name | String | Short name for the team, such as an acronym | CMU |
| Team Type | Dropdown Text | Select the type that applies to the team | Individual Organization |
| Hide Scoresheet | Boolean | Select whether to hide CITE Scoresheet from that specific team | False |
To save these settings, click Save.
Edit a Team
To edit a team, follow these steps:
- Click the Gear icon.
- Navigate to the Evaluations tab.
- Select the evaluation to edit and click the Teams tab.
- Select the team to edit and click Edit next to it. The system opens the same edit component used when creating a new team.
- After making all necessary edits, click Save.
Delete a Team
To delete a team, follow these steps:
- Click the Gear icon.
- Navigate to the Evaluations tab.
- Select the evaluation to edit and click the Teams tab.
- Select the team to delete and click the Trash Can next to the team.
Observers
To assign the Observer Role to a user:
- Under Evaluation Users, search for the desired user.
- After you find the user, click Add.
To remove the Observer Role from a user:
- Under Observers, search for the desired user.
- After you find the user, click Remove.
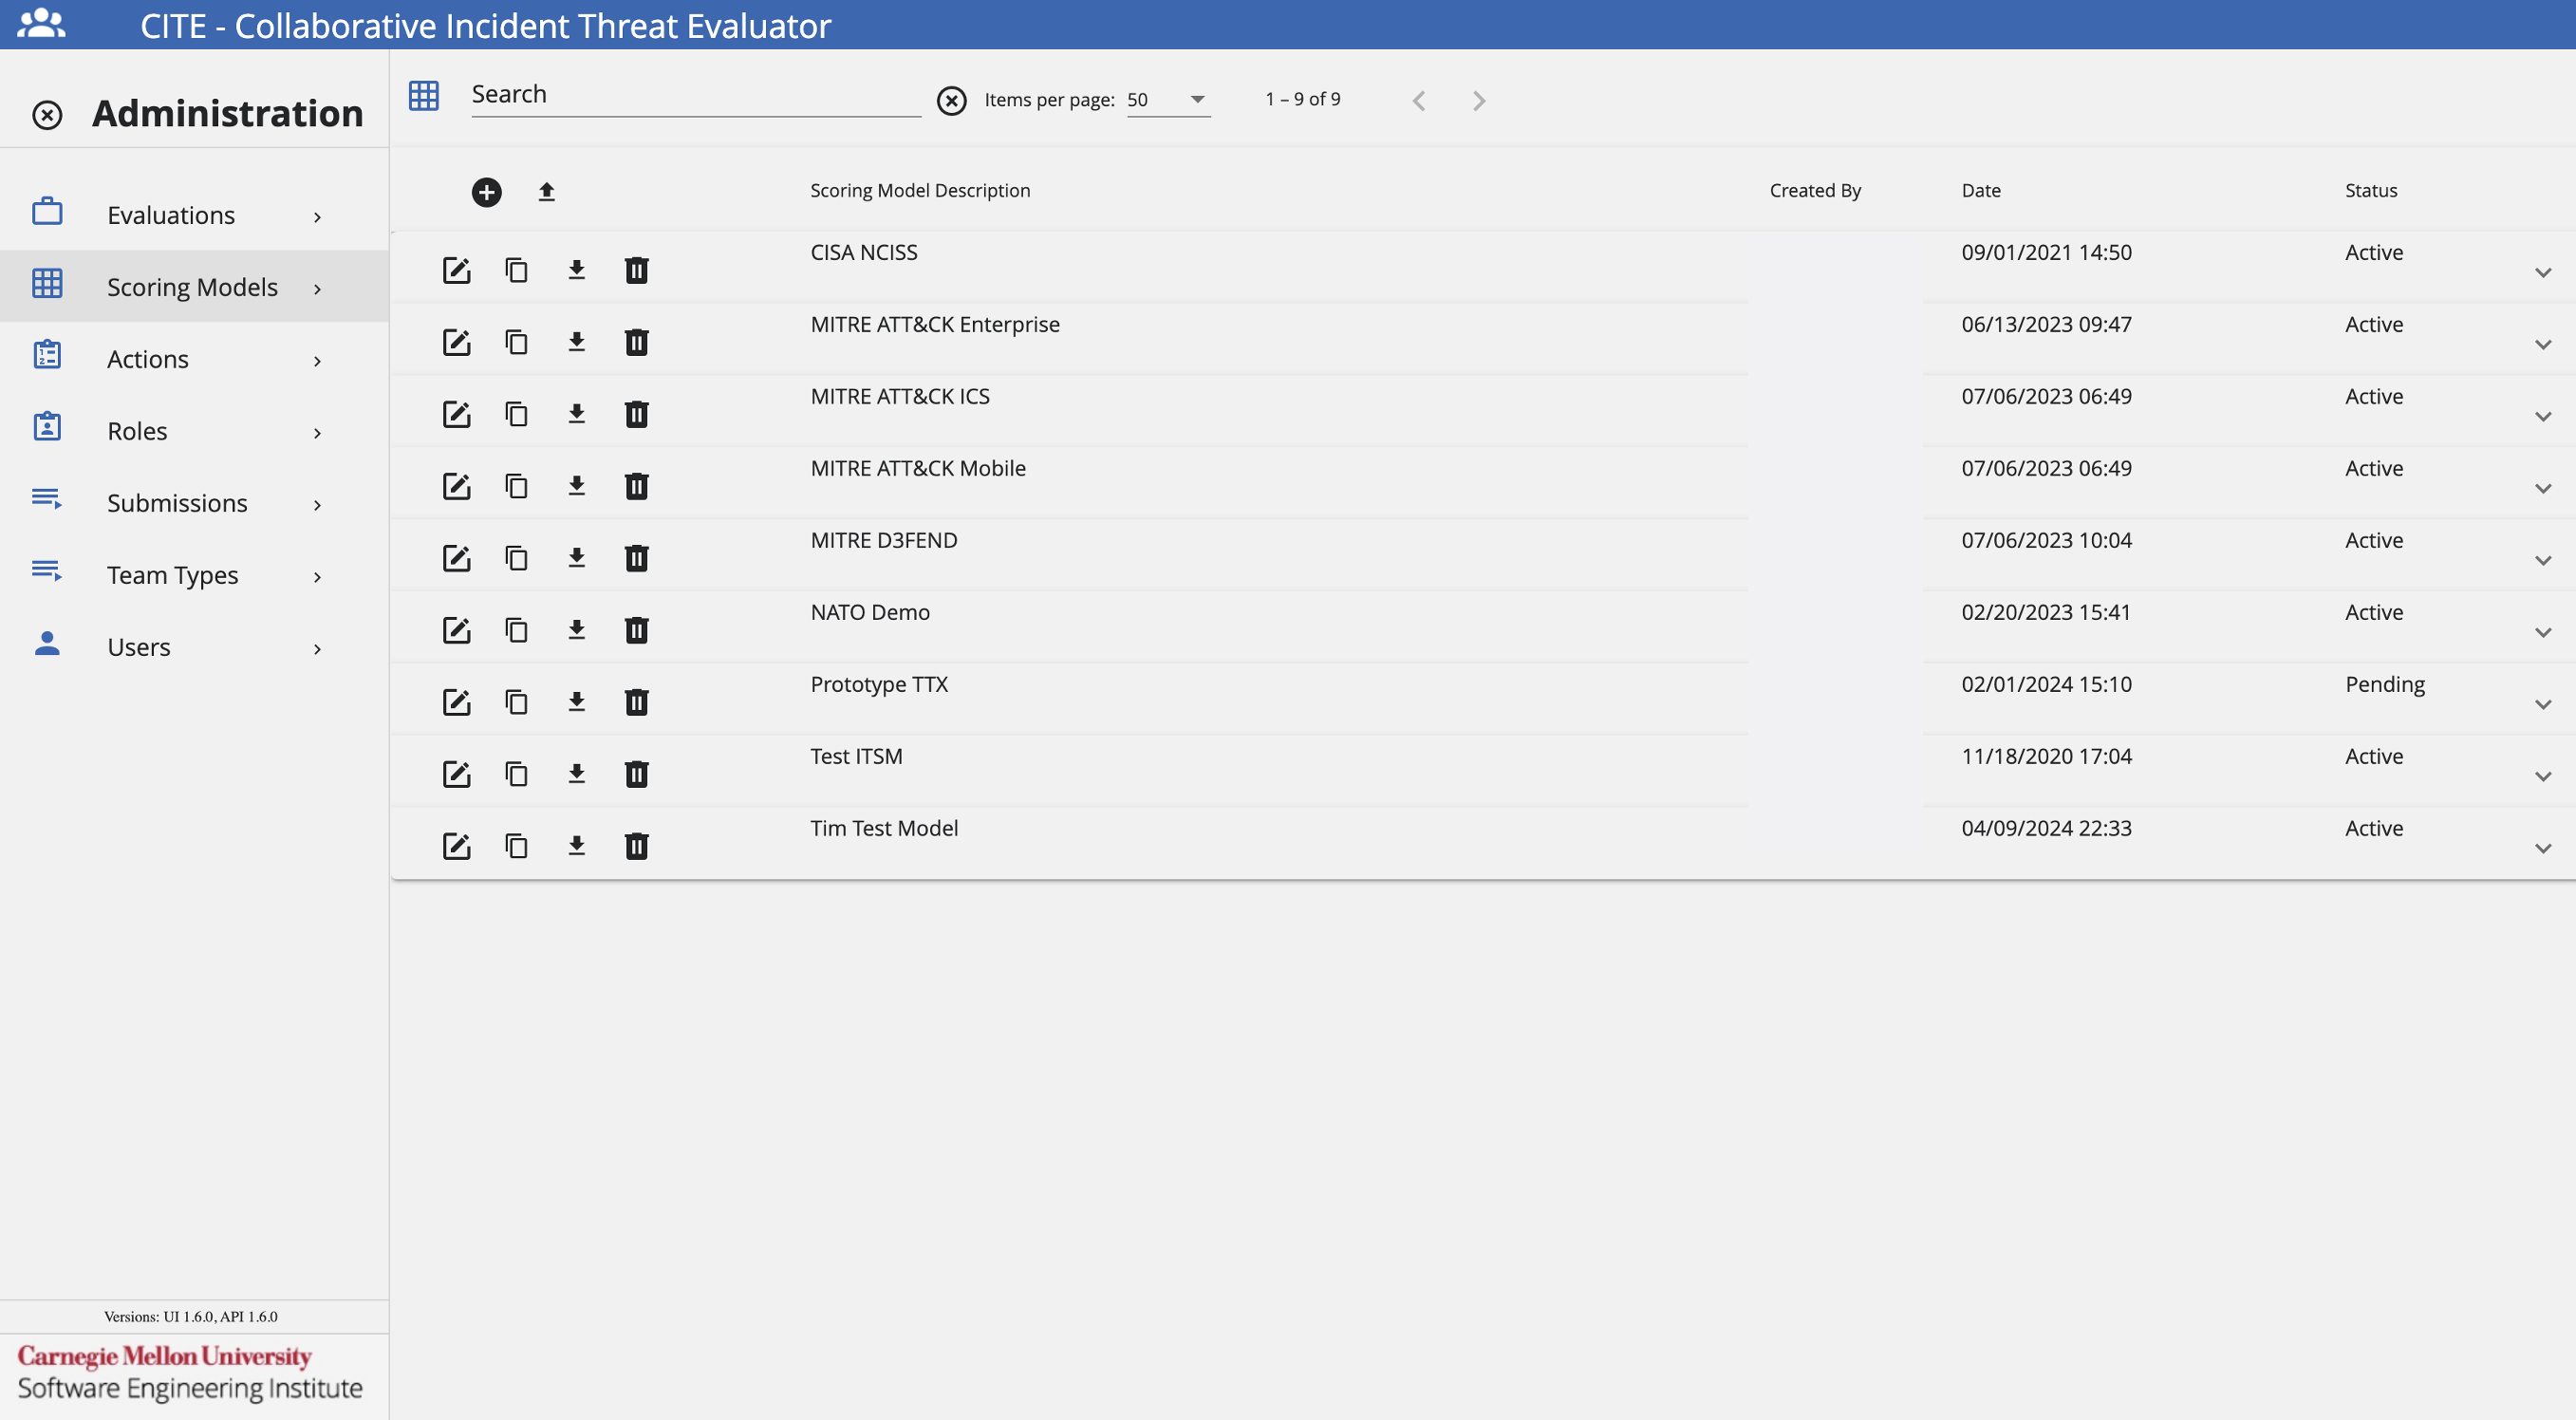
Scoring Models
The following image shows the Scoring Models Administration Page. Here, administrators can add, edit, copy, download, upload, and delete scoring models.
Add a Scoring Model
If the exercise administrator grants the appropriate permissions, follow these steps to add a Scoring Model.

- Under the Scoring Model Administration View, click +.
- Fill the fields as necessary following the Data Format Table specifications.
Data Format Table
| Field | Data Type | Description | Example |
|---|---|---|---|
| Scoring Model Description | String | Details, characteristics and information of the scoring model | NCISS Scoring Model |
| Scoring Model Status | Dropdown Text | Status of the scoring model after configuration | Active |
| Calculation Equation | Varchar | Equation used to evaluate participant scores | {sum} |
| Use Individual User Scoring | Boolean | Select this option to display the User score | False |
| Use Team Scoring | Boolean | Select this option to display the Team score | True |
| Use Official Scoring | Boolean | Select this option to display the Official score | False |
| Use Team Average Scoring | Boolean | Select this option to display the Team Average score | False |
| Use Type Average Scoring | Boolean | Select this option to display the Type Average score | False |
| Use Submit | Boolean | Setting to add Submit button to CITE Scoresheet | False |
| Hide Scores on Scoresheet | Boolean | Don't show scores on Scoresheet | True |
| Display Comments as Textboxes | Boolean | Provide a larger textbox on Scoresheet for lengthy responses | True |
| Display Scoring Categories by Move Number | Boolean | Display different sets of scoring categories per move, instead of all at once | True |
| Show Past Situation Descriptions | Boolean | Display situation descriptions from past moves in a list format | True |
| Right Side Display | Dropdown Text | Select what to display (Score Summary, Scoresheet, HTML Block, Embedded Url, None) | Scoresheet |
To save these settings, click Save.
When adding a Scoring Model, an administrator adds a defined equation to calculate the submission score from the category scores, which can contain the following variables:
- {average}: The average value of the Scoring Categories.
- {sum}: The sum of the Scoring Categories.
- {count}: The count of the Scoring Categories.
- {minPossible}: The minimum possible value of the submission.
- {maxPossible}: The maximum possible value of the submission.
Aside from these variables, use > to set clipping values for the equation.
- Example: 100 > equation > 20 will constrain the value of the submission between 100 and 20.
Edit a Scoring Model
To edit a scoring model, follow these steps:
- Click the Gear icon.
- Navigate to the Scoring Models tab.
- Select the scoring model to edit and click Edit next to it. The system opens the same edit component used when creating a new scoring model.
- After making all necessary edits, click Save.
Upload a Scoring Model
To upload a scoring model, follow these steps:
- Click the Gear icon.
- Navigate to the Scoring Models tab.
- Click the Up Arrow next to the +.
- Select the scoring model JSON file to upload.
Download a Scoring Model
To download a scoring model, follow these steps:
- Click the Gear icon.
- Navigate to the Scoring Models tab.
- Click the Down Arrow next to the scoring model to download.
- Look for the JSON file in your Downloads folder.
Copy a Scoring Model
To copy a scoring model, follow these steps:
- Click the Gear icon.
- Navigate to the Scoring Models tab.
- Click Copy next to the scoring model to copy.
- Look for the scoring model name with the user's name.
Delete a Scoring Model
To delete a scoring model, follow these steps:
- Click the Gear icon.
- Navigate to the Scoring Models tab.
- Select the scoring model to delete and click the Trash Can next to the scoring model.
Scoring Categories
To configure a Scoring Model to use for an exercise, administrators will need to add Scoring Categories.
Within a Scoring Model, an administrator can add one or more Scoring Categories. To do this, follow these steps:
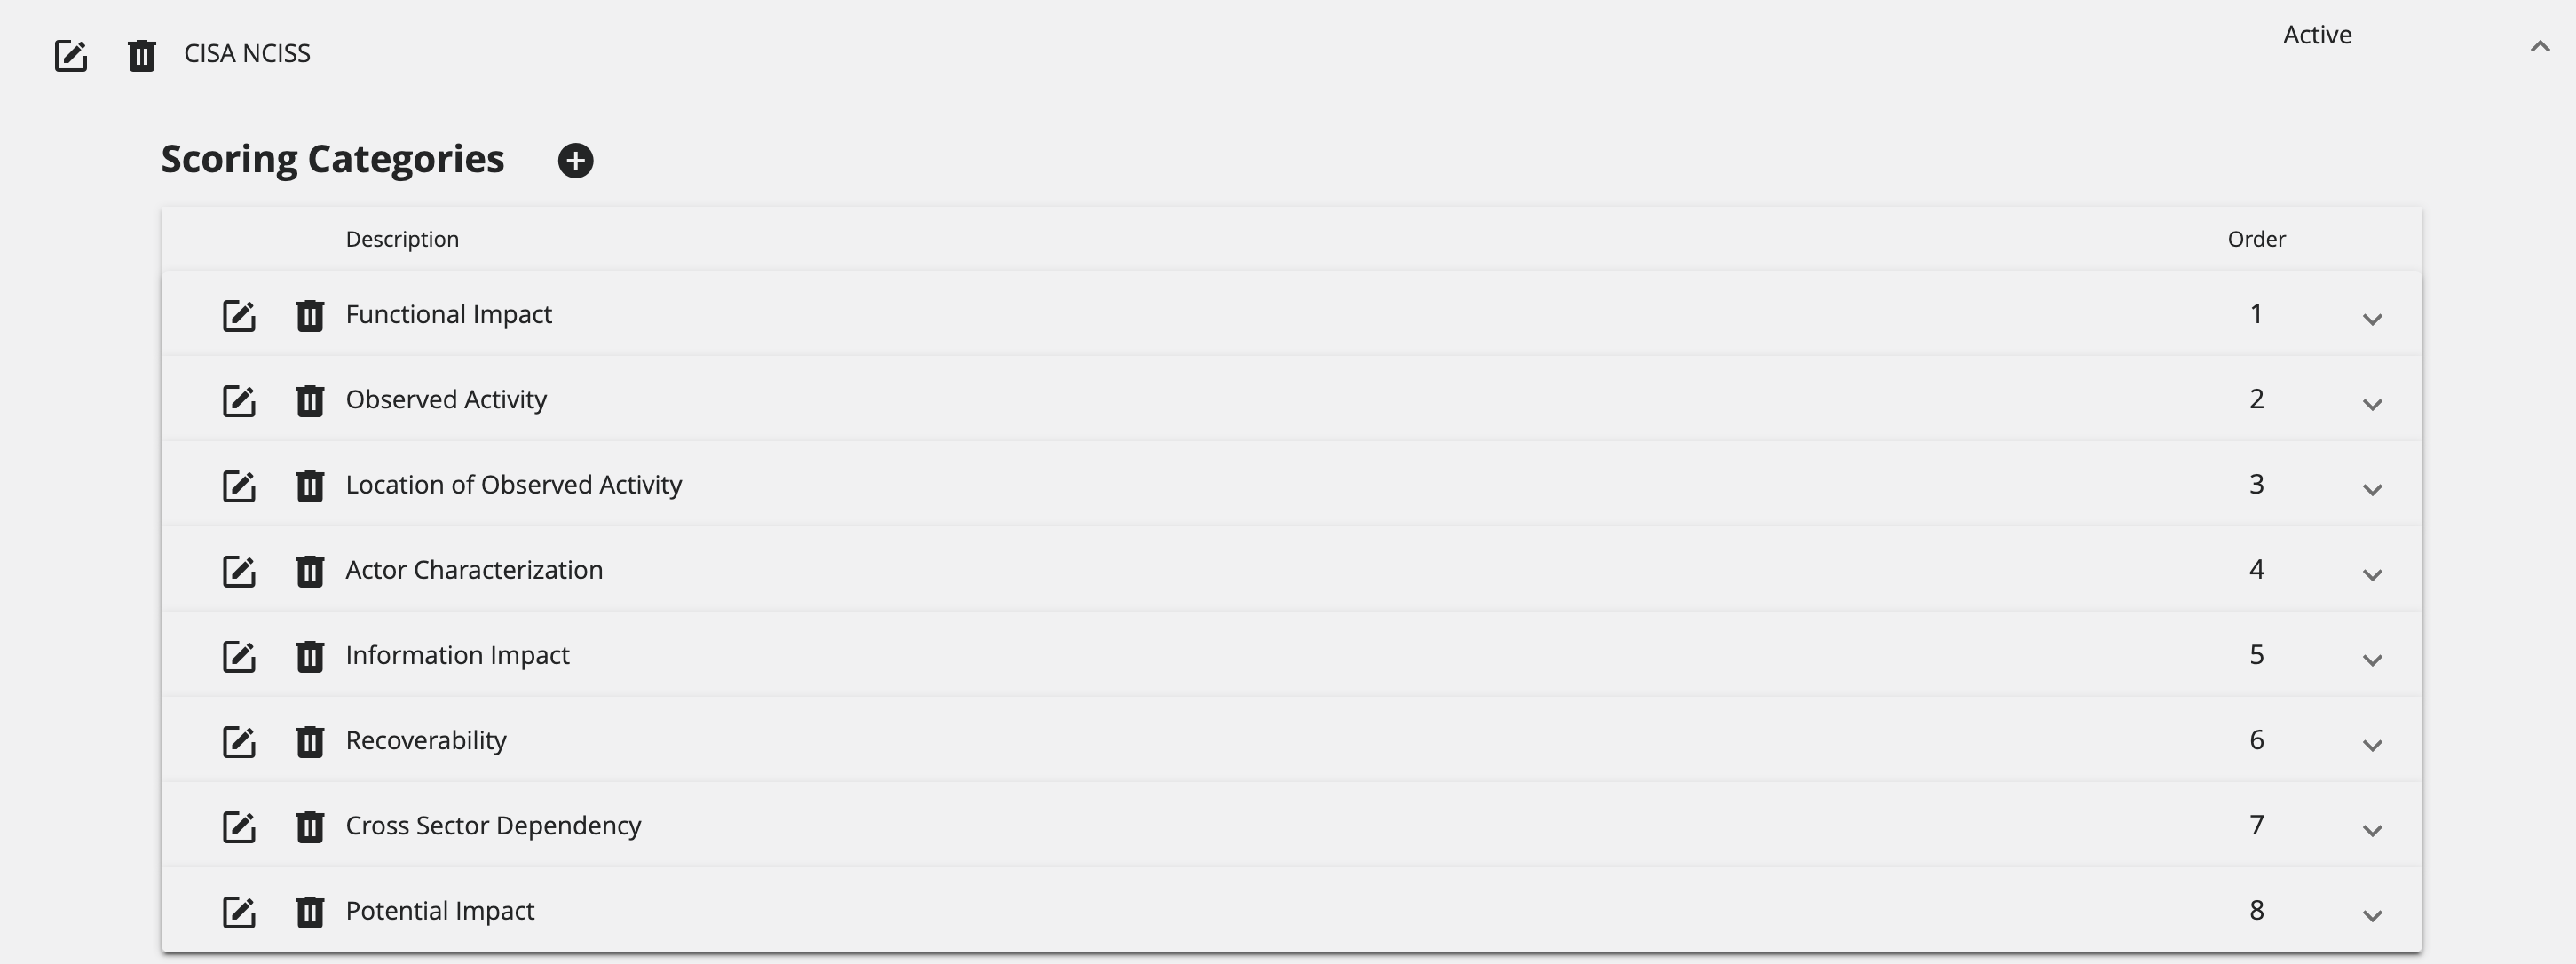
Add Scoring Category
- Click + on the Scoring Categories section.
- Fill the fields as necessary following the Data Format Table specifications.
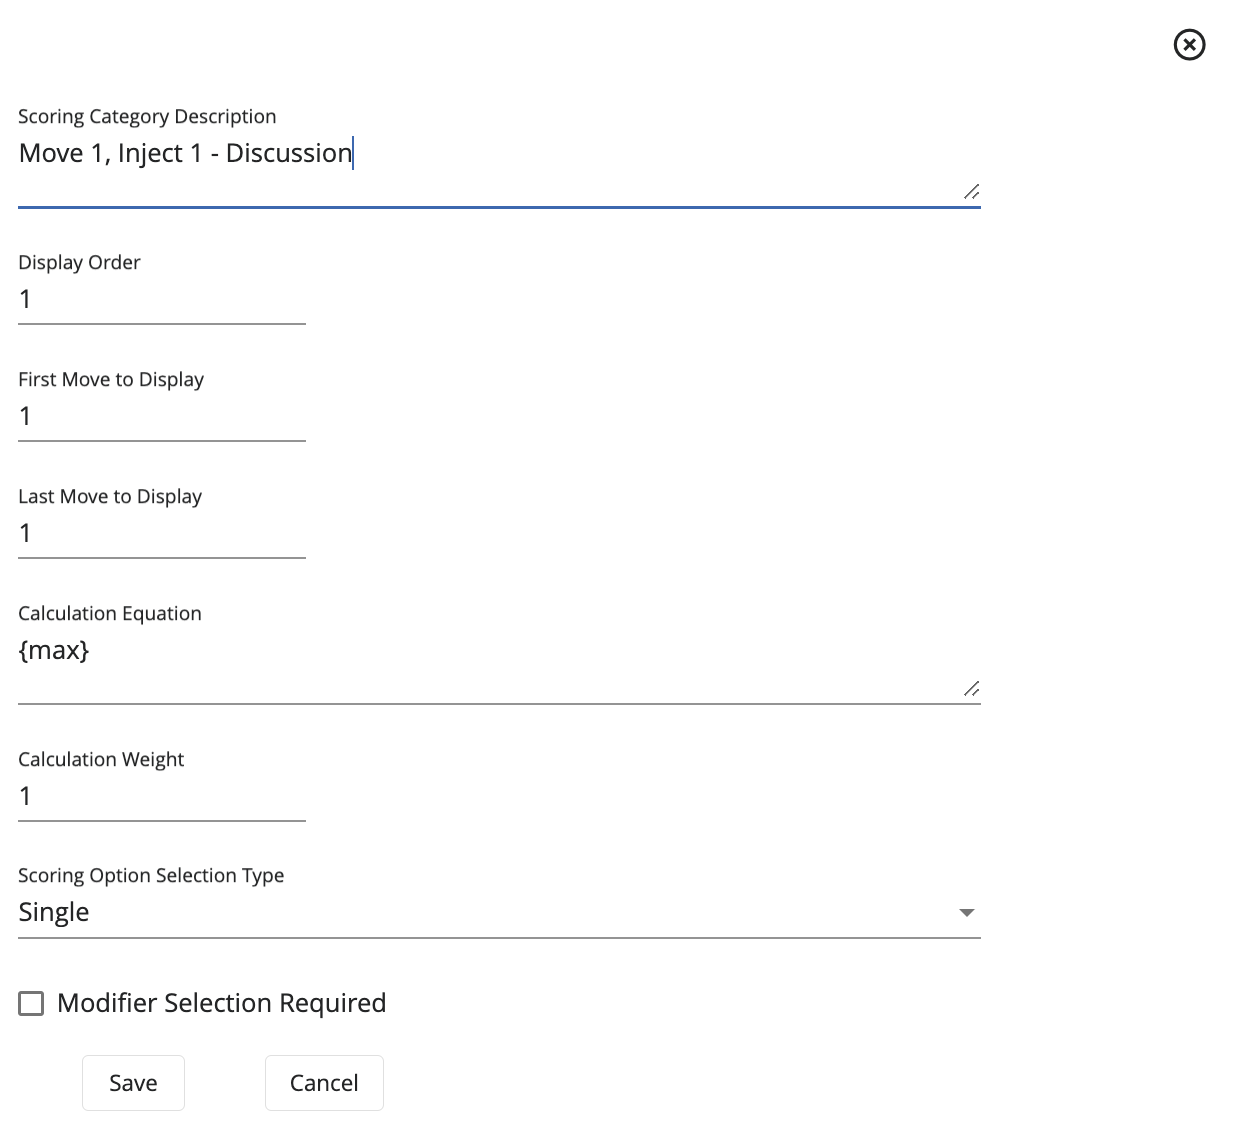
Data Format Table
| Field | Data Type | Description | Example |
|---|---|---|---|
| Scoring Category Description | String | Details, characteristics and information of the scoring category | Information Impact |
| Display Order | Integer | Scoring category display order on CITE Scoresheet | 1 |
| First Move to Display | Integer | Move number where the scoring category first appears | 1 |
| Last Move to Display | Integer | Move number where the scoring category appears for the final time | 1 |
| Calculation Equation | Varchar | Equation used to evaluate participant's scores | {sum} |
| Calculation Weight | Integer | Weight of the score compared to other categories | 1 |
| Scoring Option Selection Type | Dropdown Text | Determine whether the scoring checkboxes show Single, Multiple, or None options | Single |
| Modifier Selection Required | Boolean | Select this option to require modifiers that supply alternate values | True |
To save these settings, click Save.
A Scoring Category may have zero or more required or optional Modifiers. If there is no optional Modifier, the Scoring Category calculation uses a default value of 1.0.
Additionally, a Scoring Category has an admin defined equation to calculate the submission score from the category scores and can contain the following variables:
- {sum}: The sum of the selected Scoring Option values.
- {count}: The count of the selected Scoring Option values.
- {min}: The minimum of the selected Scoring Option values.
- {max}: The maximum of the selected Scoring Option values.
- {modifier}: The selected modifier value, which defaults to 1.
Last but not least, a Scoring Category has a weight by which to multiply the score obtained from the entered equation.
Edit a Scoring Category
To edit a scoring category, follow these steps:
- Click the Gear icon.
- Navigate to the Scoring Models tab.
- Select the scoring model to edit and click the Scoring Categories tab.
- Select the scoring category to edit and click Edit next to it. The system opens the same edit component used when creating a new scoring category.
- After making all necessary edits, click Save.
Delete a Scoring Category
To delete a scoring category, follow these steps:
- Click the Gear icon.
- Navigate to the Scoring Models tab.
- Select the scoring model to edit and click the Scoring Categories tab.
- Select the scoring category to delete and click the Trash Can next to the scoring category.
Scoring Options
Within a Scoring Category, an administrator can add one or more Scoring Options. To do this, follow these steps:
Add Scoring Options
- Click + on the Scoring Options section.
- Fill the fields as necessary following the Data Format Table specifications.
Data Format Table
| Field | Data Type | Description | Example |
|---|---|---|---|
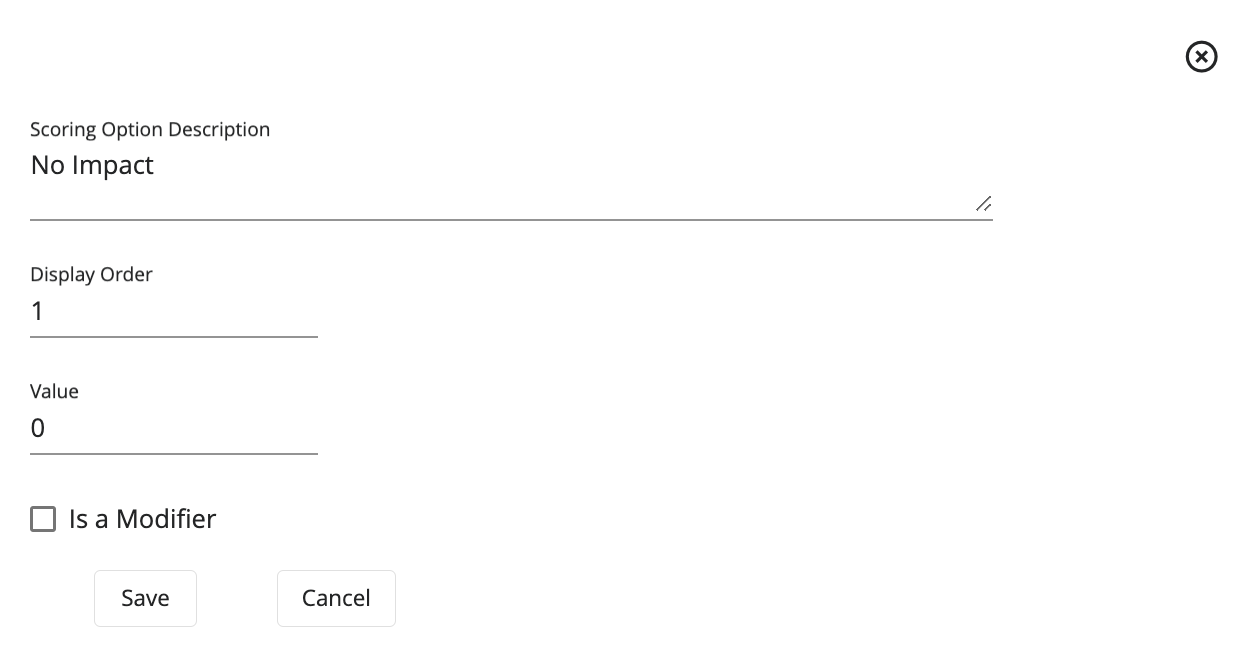
| Scoring Option Description | String | Details, characteristics and information of the scoring option | No Impact |
| Display Order | Integer | Scoring option display order on CITE Scoresheet | 1 |
| Value | Integer | The scoring option's value for participant score | 0 |
| Is a Modifier | Boolean | Select this option to treat the scoring option as a modifier | True |
To save these settings, click Save.
Edit a Scoring Option
To edit a scoring option, follow these steps:
- Click the Gear icon.
- Navigate to the Scoring Models tab.
- Select the scoring model to edit and click the Scoring Categories tab.
- Select the scoring category to edit and click the Scoring Options tab.
- Select the scoring option to edit and click Edit next to it. The system opens the same edit component used when creating a new scoring option.
- After making all necessary edits, click Save.
Delete a Scoring Option
To delete a scoring option, follow these steps:
- Click the Gear icon.
- Navigate to the Scoring Models tab.
- Select the scoring model to edit and click the Scoring Categories tab.
- Select the scoring category to edit and click the Scoring Options tab.
- Select the scoring option to delete and click the Trash Can next to the scoring option.
Actions
The following image shows the Actions Administration Page. Here, administrators can add, edit, and delete actions.
However, users who can submit scores on behalf of their team can also add suggested actions to the CITE Dashboard. The use of actions allows team members to customize their response by tracking tasks during the exercise. The system keeps these actions internal to the team and hides them from other participants.

Add an Action
If the exercise administrator grants the appropriate permissions, follow these steps to add an Action.
- Under the Actions Administration View, click the Move dropdown and select the desired move.
- Click the Team dropdown and select the desired team.
- Click + to add an Action.
- Fill the fields as necessary following the Data Format Table specifications.
Data Format Table
| Field | Data Type | Description | Example |
|---|---|---|---|
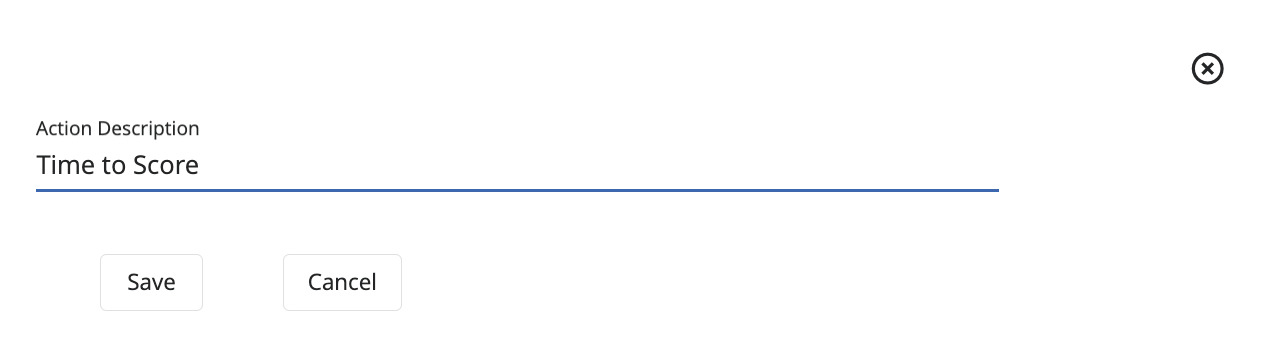
| Action Description | String | Details, characteristics and information of the action | Time to Score |
To save these settings, click Save.
Edit an Action
To edit an action, follow these steps:
- Click the Gear icon.
- Navigate to the Actions tab.
- Select the action to edit and click Edit next to it. The system opens the same edit component used when creating a new action.
- After making all necessary edits, click Save.
Delete an Action
To delete an action, follow these steps:
- Click the Gear icon.
- Navigate to the Action tab.
- Select the action to delete and click the Trash Can next to the action.
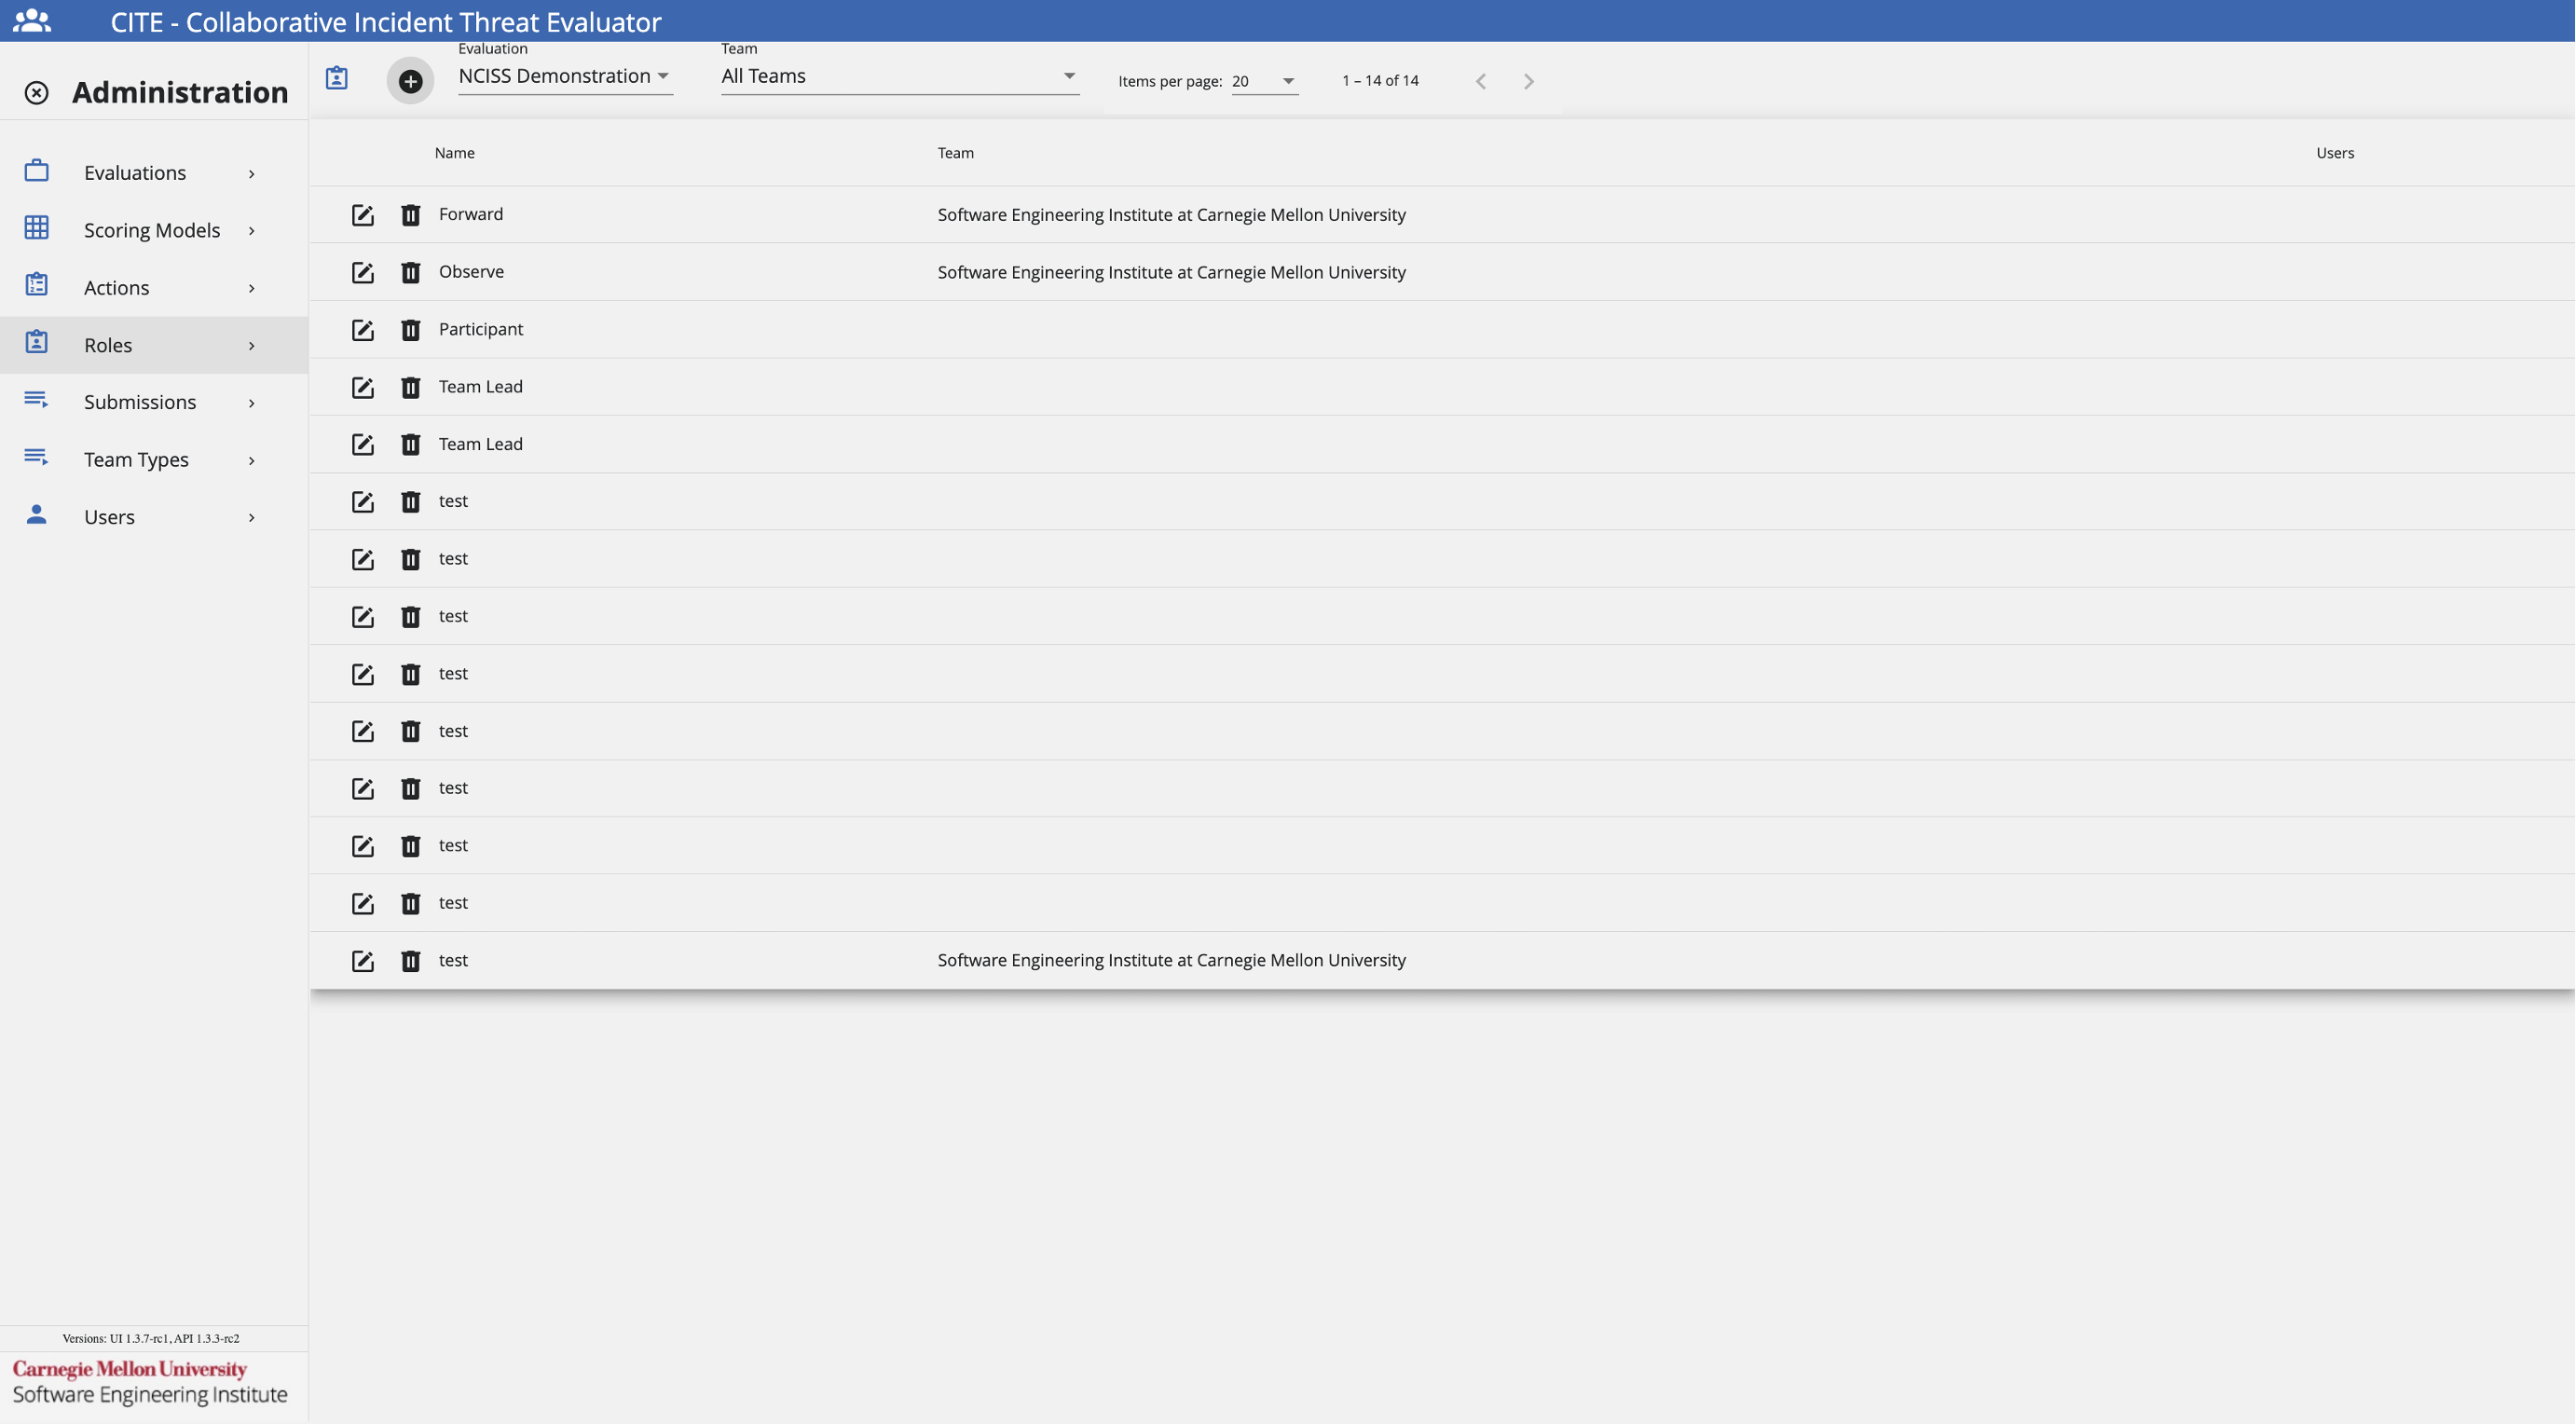
Roles
The following image shows the Roles Administration Page. Here, administrators can add, edit, and delete roles.
However, users who can submit scores on behalf of their team can also add participant roles to the CITE Dashboard. The use of roles allows team members to customize their response by tracking their responsibilities during an exercise. These roles remain internal to the team and stay hidden from other participants.
Add a Role
If the exercise administrator grants the appropriate permissions, follow these steps to add a Role:
- Under the Roles Administration View, click the Team dropdown and select the desired team.
- Click + to add a Role.
- Fill the fields as necessary following the Data Format Table specifications.
Data Format Table
| Field | Data Type | Description | Example |
|---|---|---|---|
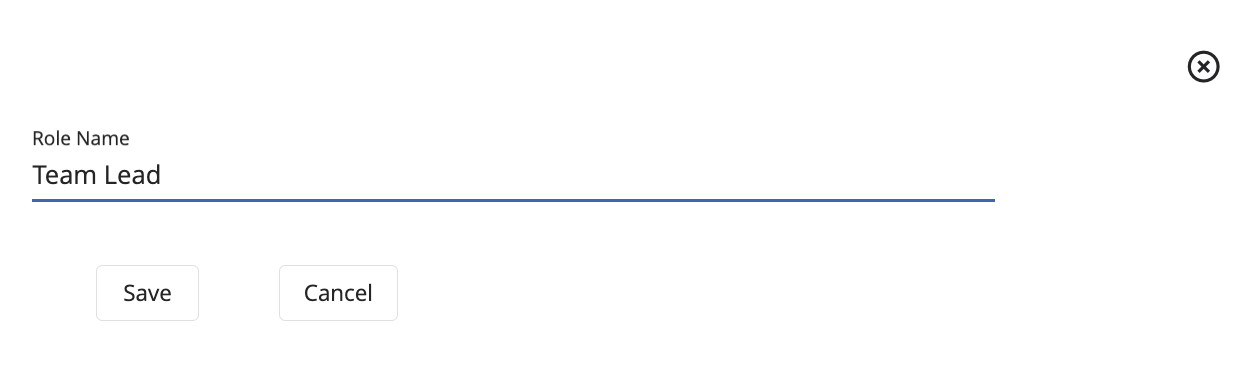
| Role Name | String | Name of the role | Team Lead |
To save these settings, click Save.
Edit a Role
To edit a role, follow these steps:
- Click the Gear icon.
- Navigate to the Roles tab.
- Select the role to edit and click Edit next to it. The system opens the same edit component used when creating a new role.
- After making all necessary edits, click Save.
Delete a Role
To delete a role, follow these steps:
- Click the Gear icon.
- Navigate to the Roles tab.
- Select the role to delete and click the Trash Can next to the role.
Submissions
The following image shows the Submissions Administration Page. Here, administrators can keep track of all score submissions provided by the different teams during an exercise. This allows administrators to compare their scores with the official score, as well as keep track of which teams are on a good track and which are not.
Additional functionalities include copying the entire score, as well as deleting a score submitted by a team.
Team Types
The following image shows the Team Types Administration Page. Here, administrators can create different types of teams to use during an exercise. This allows administrators to classify the different teams on the platform based on common characteristics and/or organizations.

Add a Team Type
If the exercise administrator grants the appropriate permissions, follow these steps to add a Team Type:

- Under the Team Type Administration View, click +.
- Fill the fields as necessary following the Data Format Table specifications.
Data Format Table
| Field | Data Type | Description | Example |
|---|---|---|---|
| TeamType Name | String | Name of the team type | Individual Organization |
| Official Score Contributor | Boolean | Select this option for teams that contribute to CITE's official score | True |
| Show TeamType Average | Boolean | Select this option to make the score average available to the team | True |
To save these settings, click Save.
Edit a Team Type
To edit a team type, follow these steps:
- Click the Gear icon.
- Navigate to the Team Types tab.
- Select the team type to edit and click Edit next to it. The system opens the same edit component used when creating a new team type.
- After making all necessary edits, click Save.
Delete a Team Type
To delete a team type, follow these steps:
- Click the Gear icon.
- Navigate to the Team Types tab.
- Select the team type to delete and click the Trash Can next to the team type.
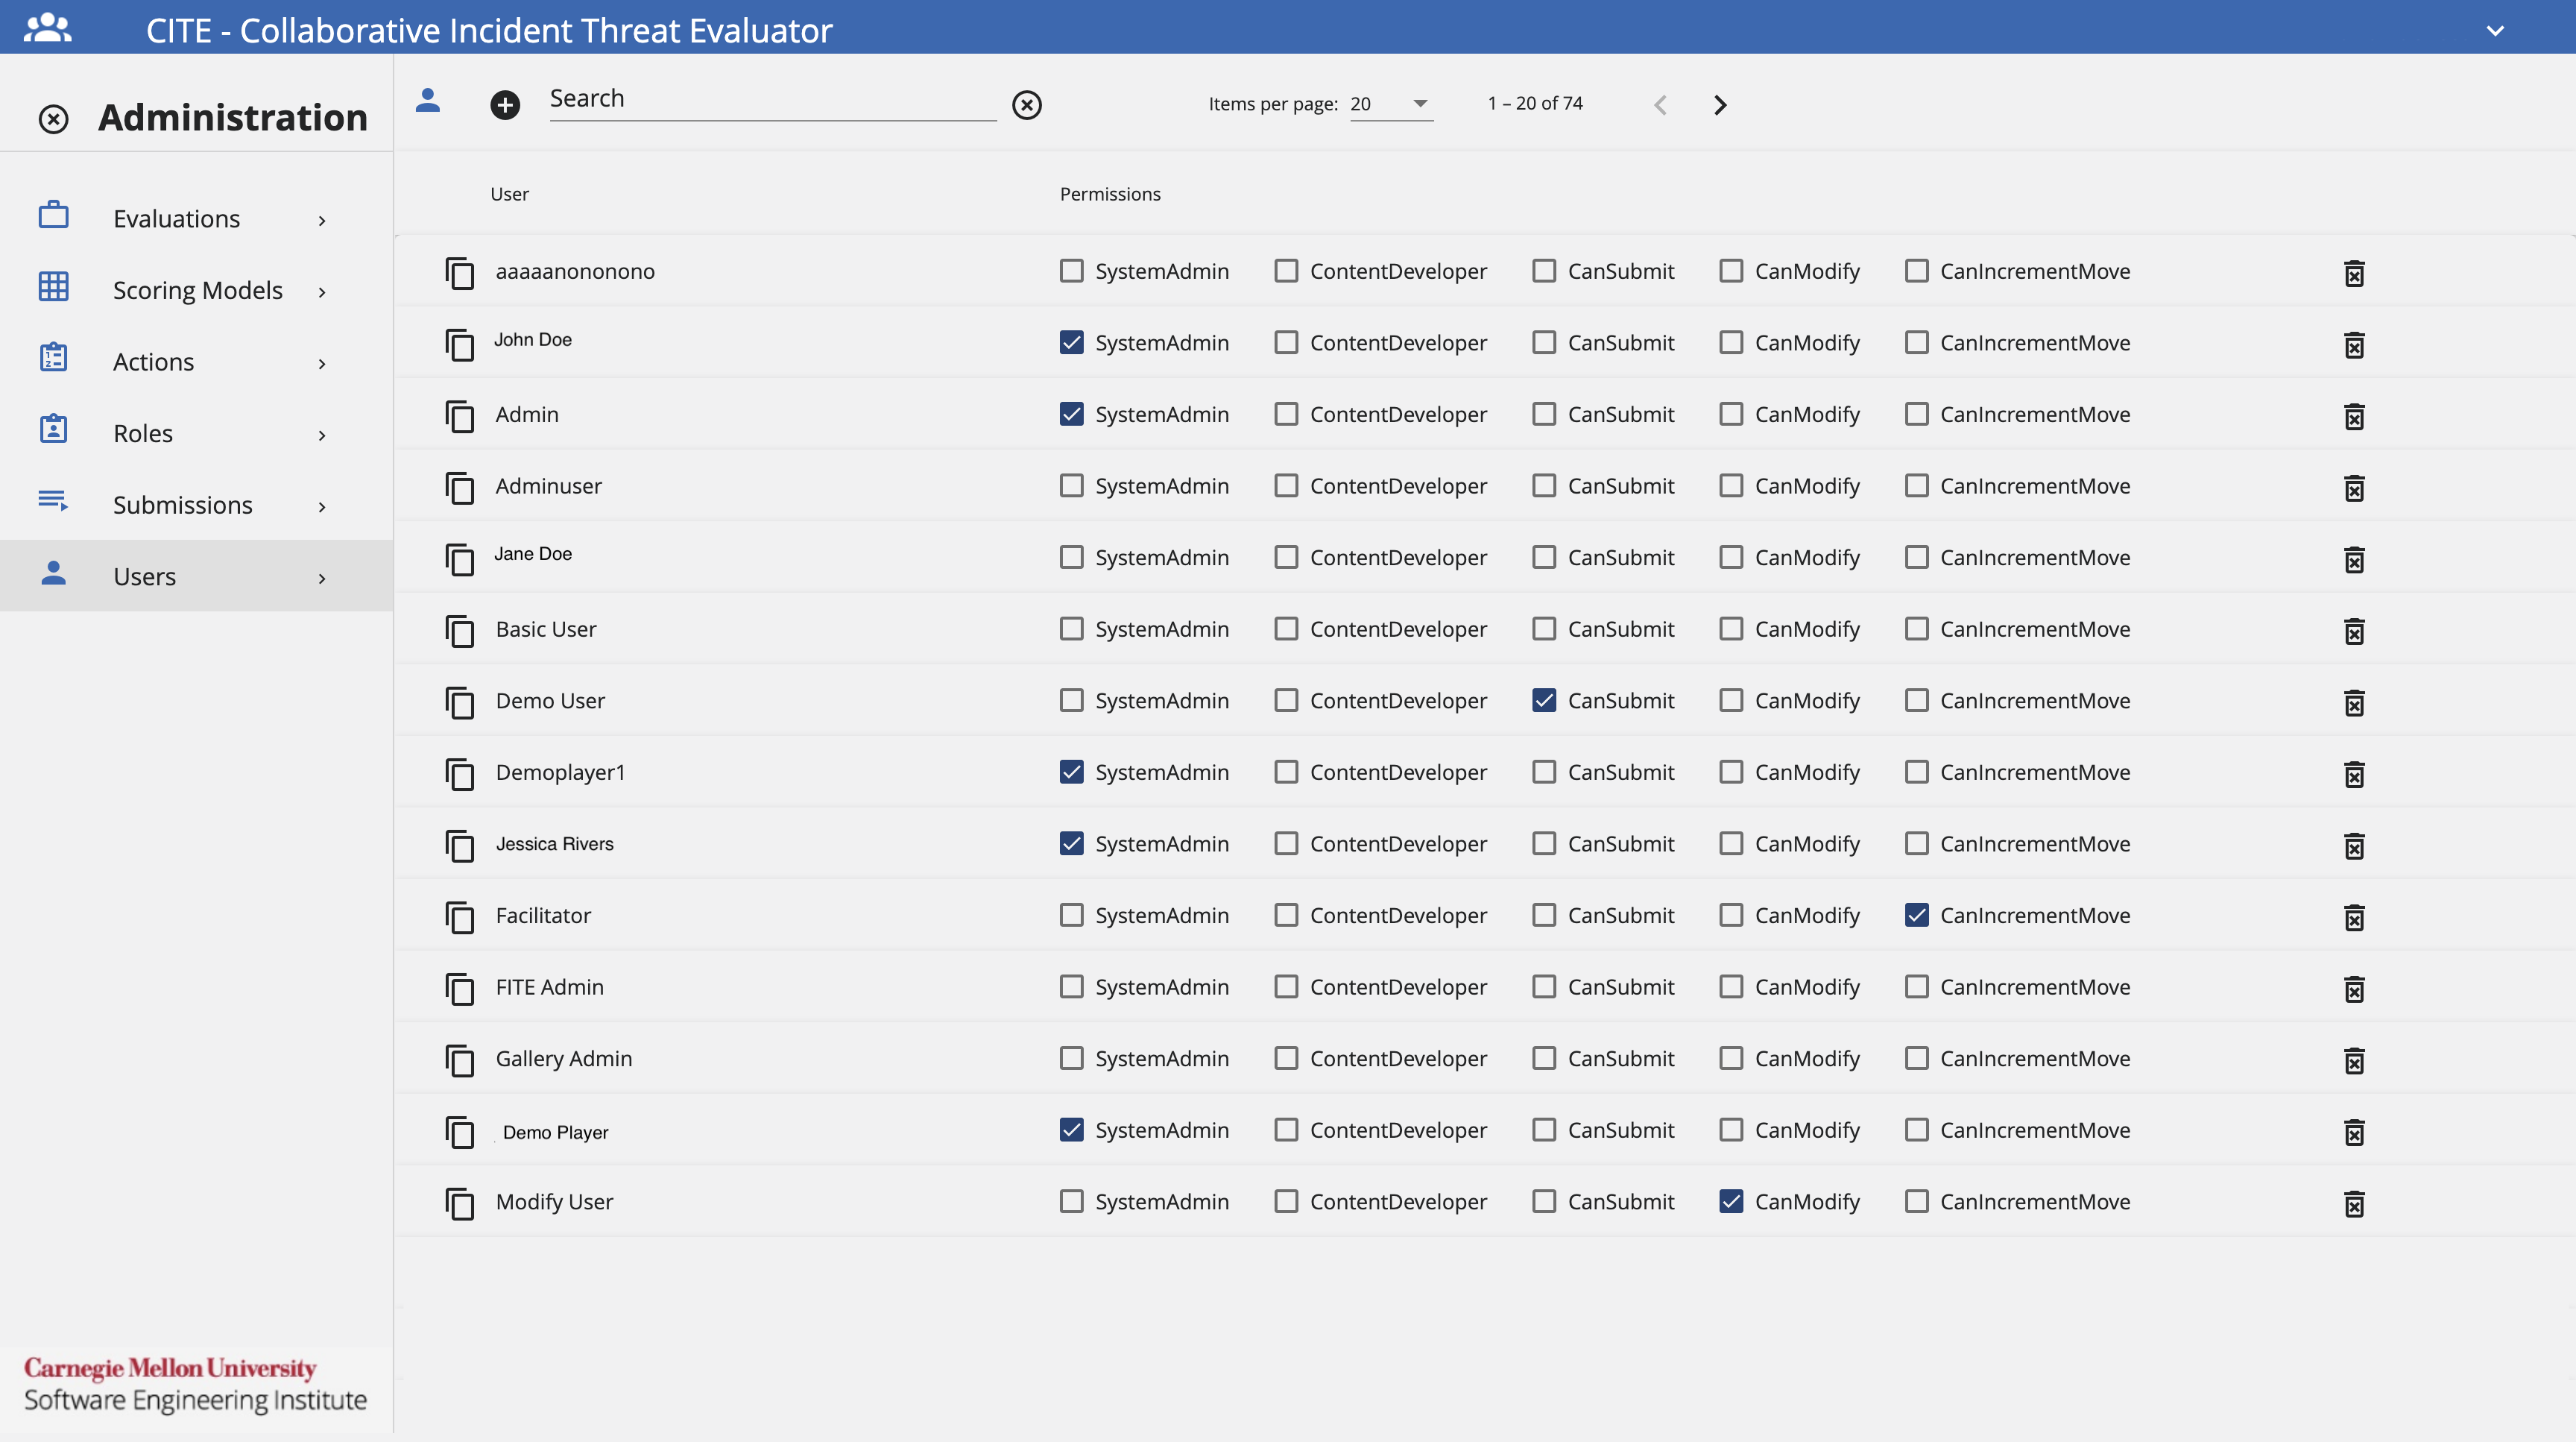
Users
The following image shows the Users Administration page. Here, administrators can add and delete users, and assign the necessary permissions to each user.
The available permissions are:
- System Admin: Grants a user all administration privileges on the CITE application.
- Content Developer: Can manage other CITE admin pages except the Users Admin page and their permissions.
- Can Submit: Lets the user submit a score for the different moves during an exercise.
- Can Modify: Lets the user modify a score for previous moves during an exercise.
- Can Increment Move: Lets the user increment the current move during an exercise.
Add a User
If the exercise administrator grants the appropriate permissions, follow these steps to add a user:

- Under the Users Administration View, click +.
- Fill the fields as necessary following the Data Format Table specifications.
Data Format Table
| Field | Data Type | Description | Example |
|---|---|---|---|
| User ID | GUID | User ID that identifies the user | 81a623e3-faeb-4a56-8b4d-0d42f90b6829 |
| User Name | string | User name that identifies the user | user-1 |
To save these settings, click Save and select the desired permissions to assign by checking the boxes next to the user.
Delete a User
To delete a user, follow these steps:
- Click the Gear icon.
- Navigate to the Users tab.
- Select the users to delete and click the Trash Can next to the user.
User Guide
Participants use the CITE Dashboard and Scoresheet to evaluate and score incidents during an exercise.
Moves
In CITE, a move is a defined exercise period. During that period the system distributes events for users to discuss and assess the current incident severity.
When in Dashboard view, users have two options for interacting with moves:
- Displayed Move: Move currently shown on the screen. Here, users can see responses to previous moves and scores, but they cannot edit a response.
- Current Move: Move that is currently active. In some cases the Displayed Move and the Current Move match. Here, users can edit the category of the move.
CITE Landing Page
The CITE landing page provides a central approach to recompiling all evaluations that the user is a participant on into a single display.
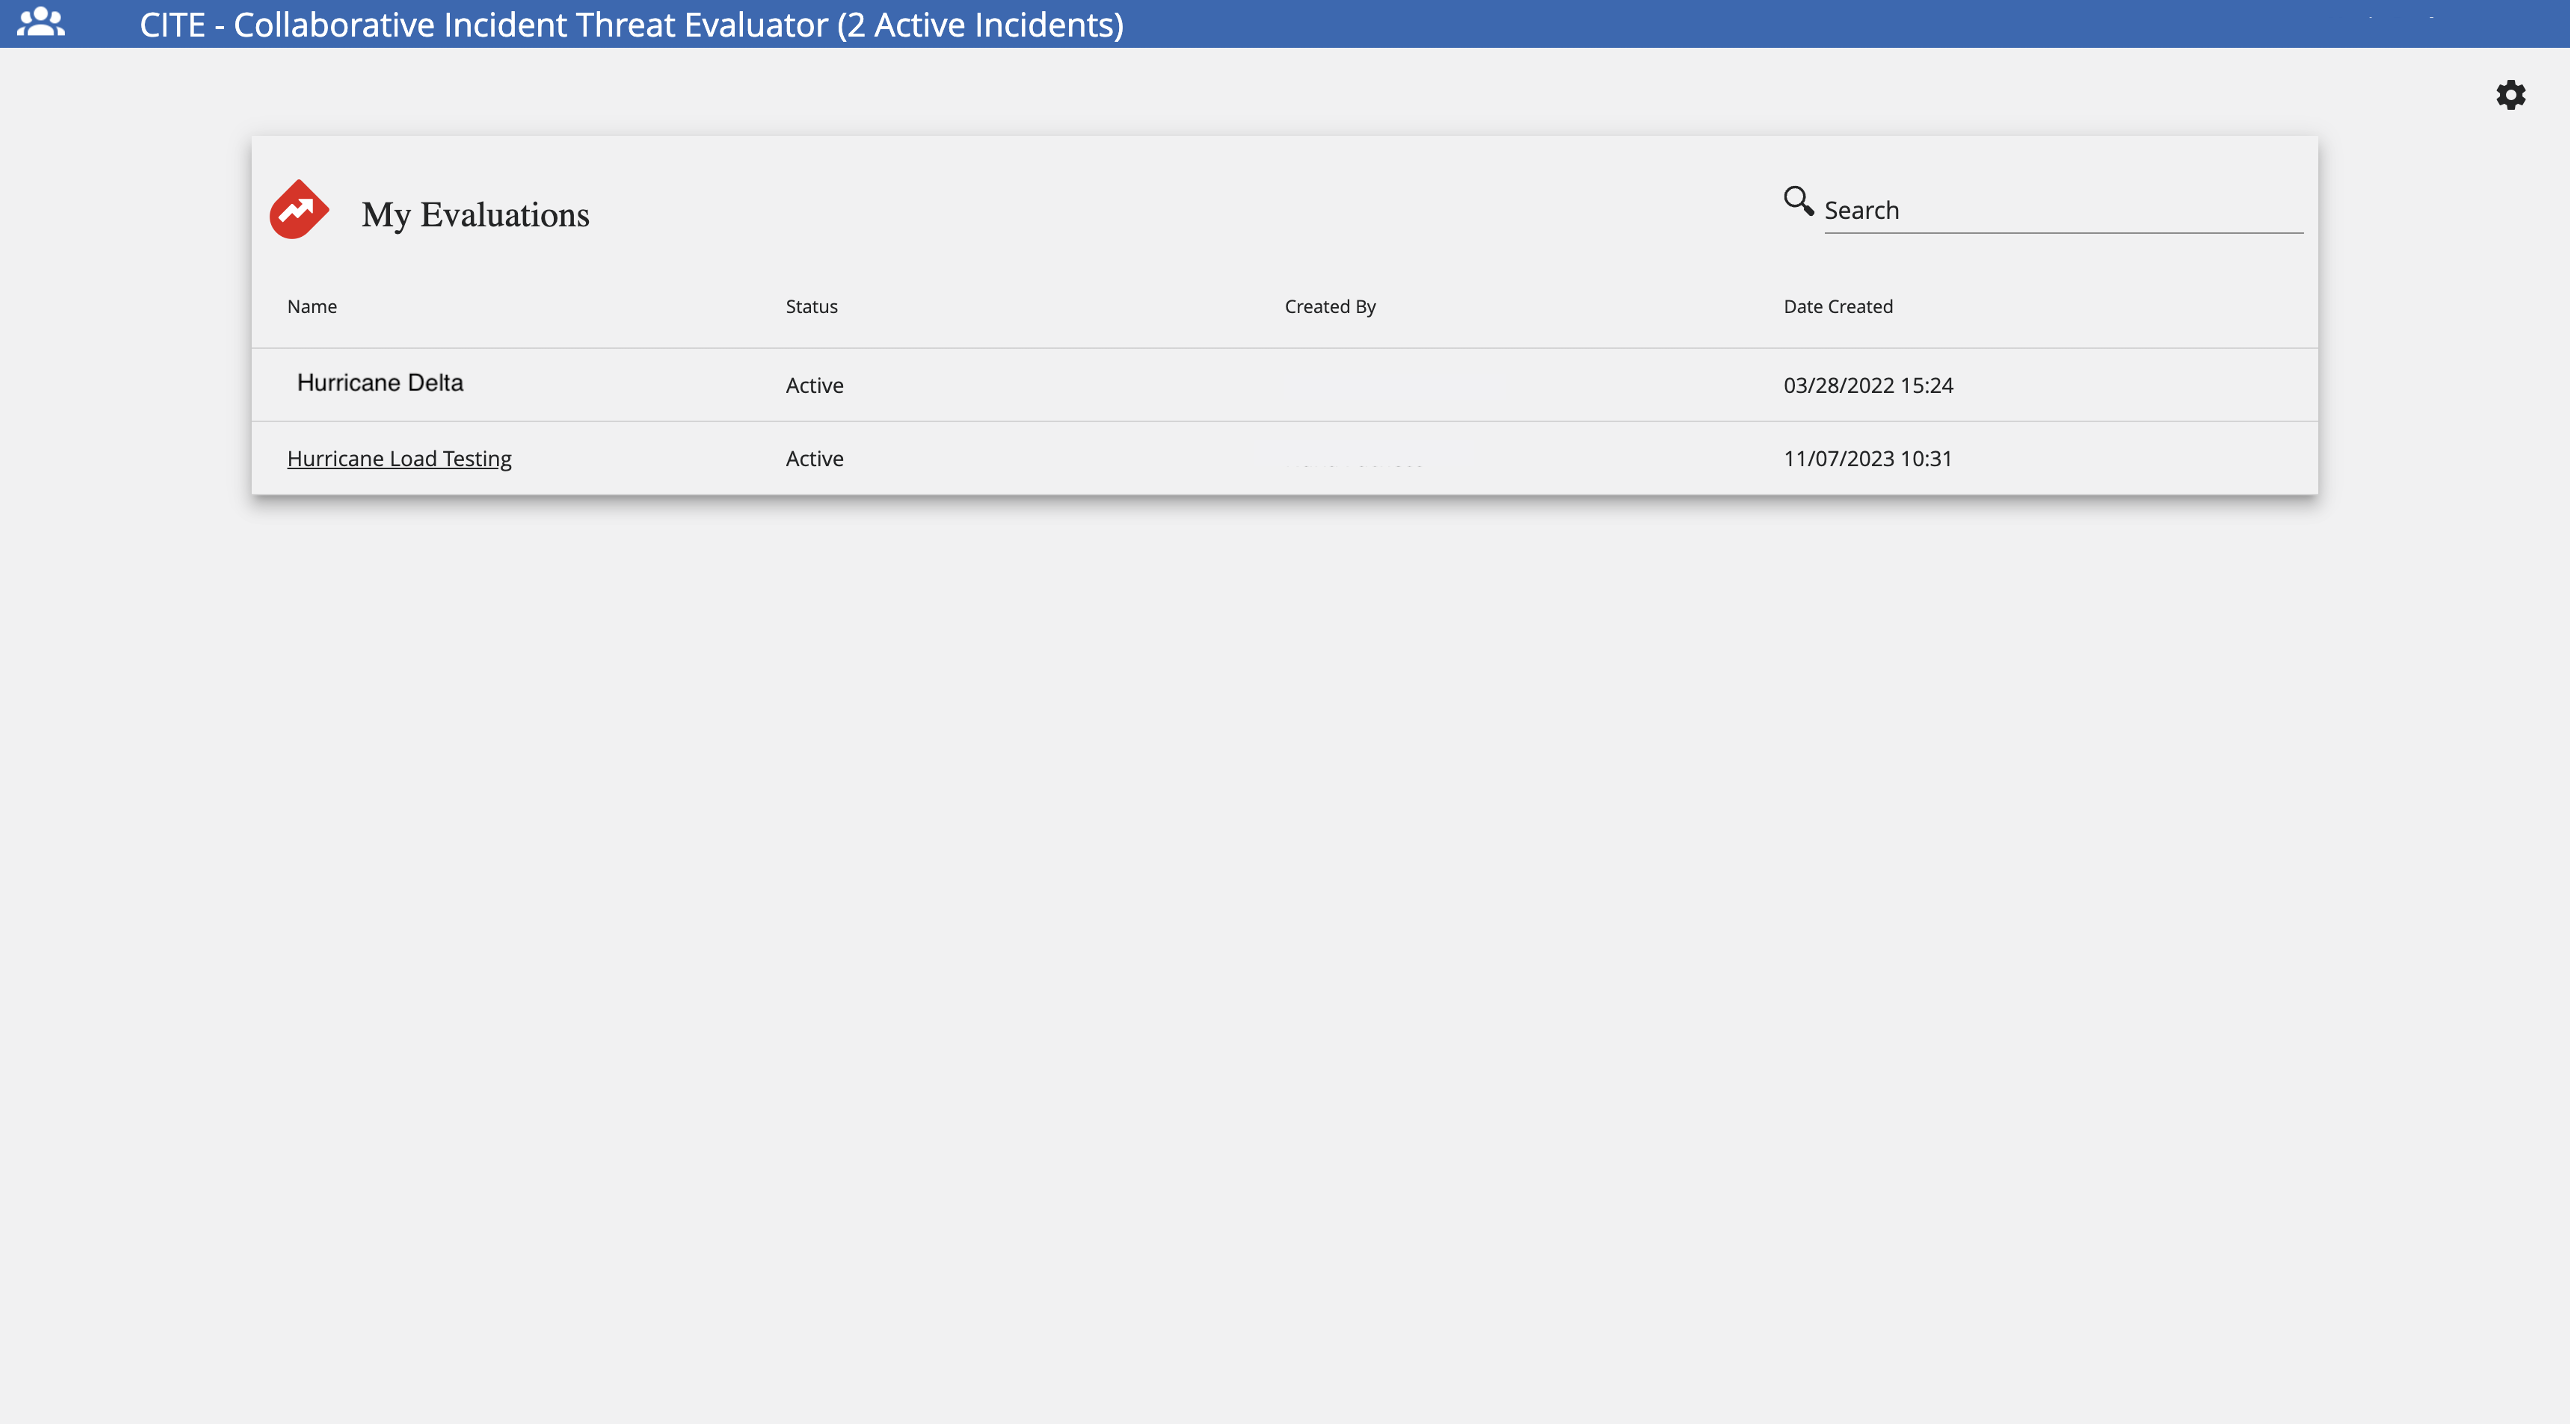
Search for an Evaluation
To search for an evaluation, follow these steps:
- Navigate to CITE's landing page.
- Click the Search Bar and add the name of the evaluation.
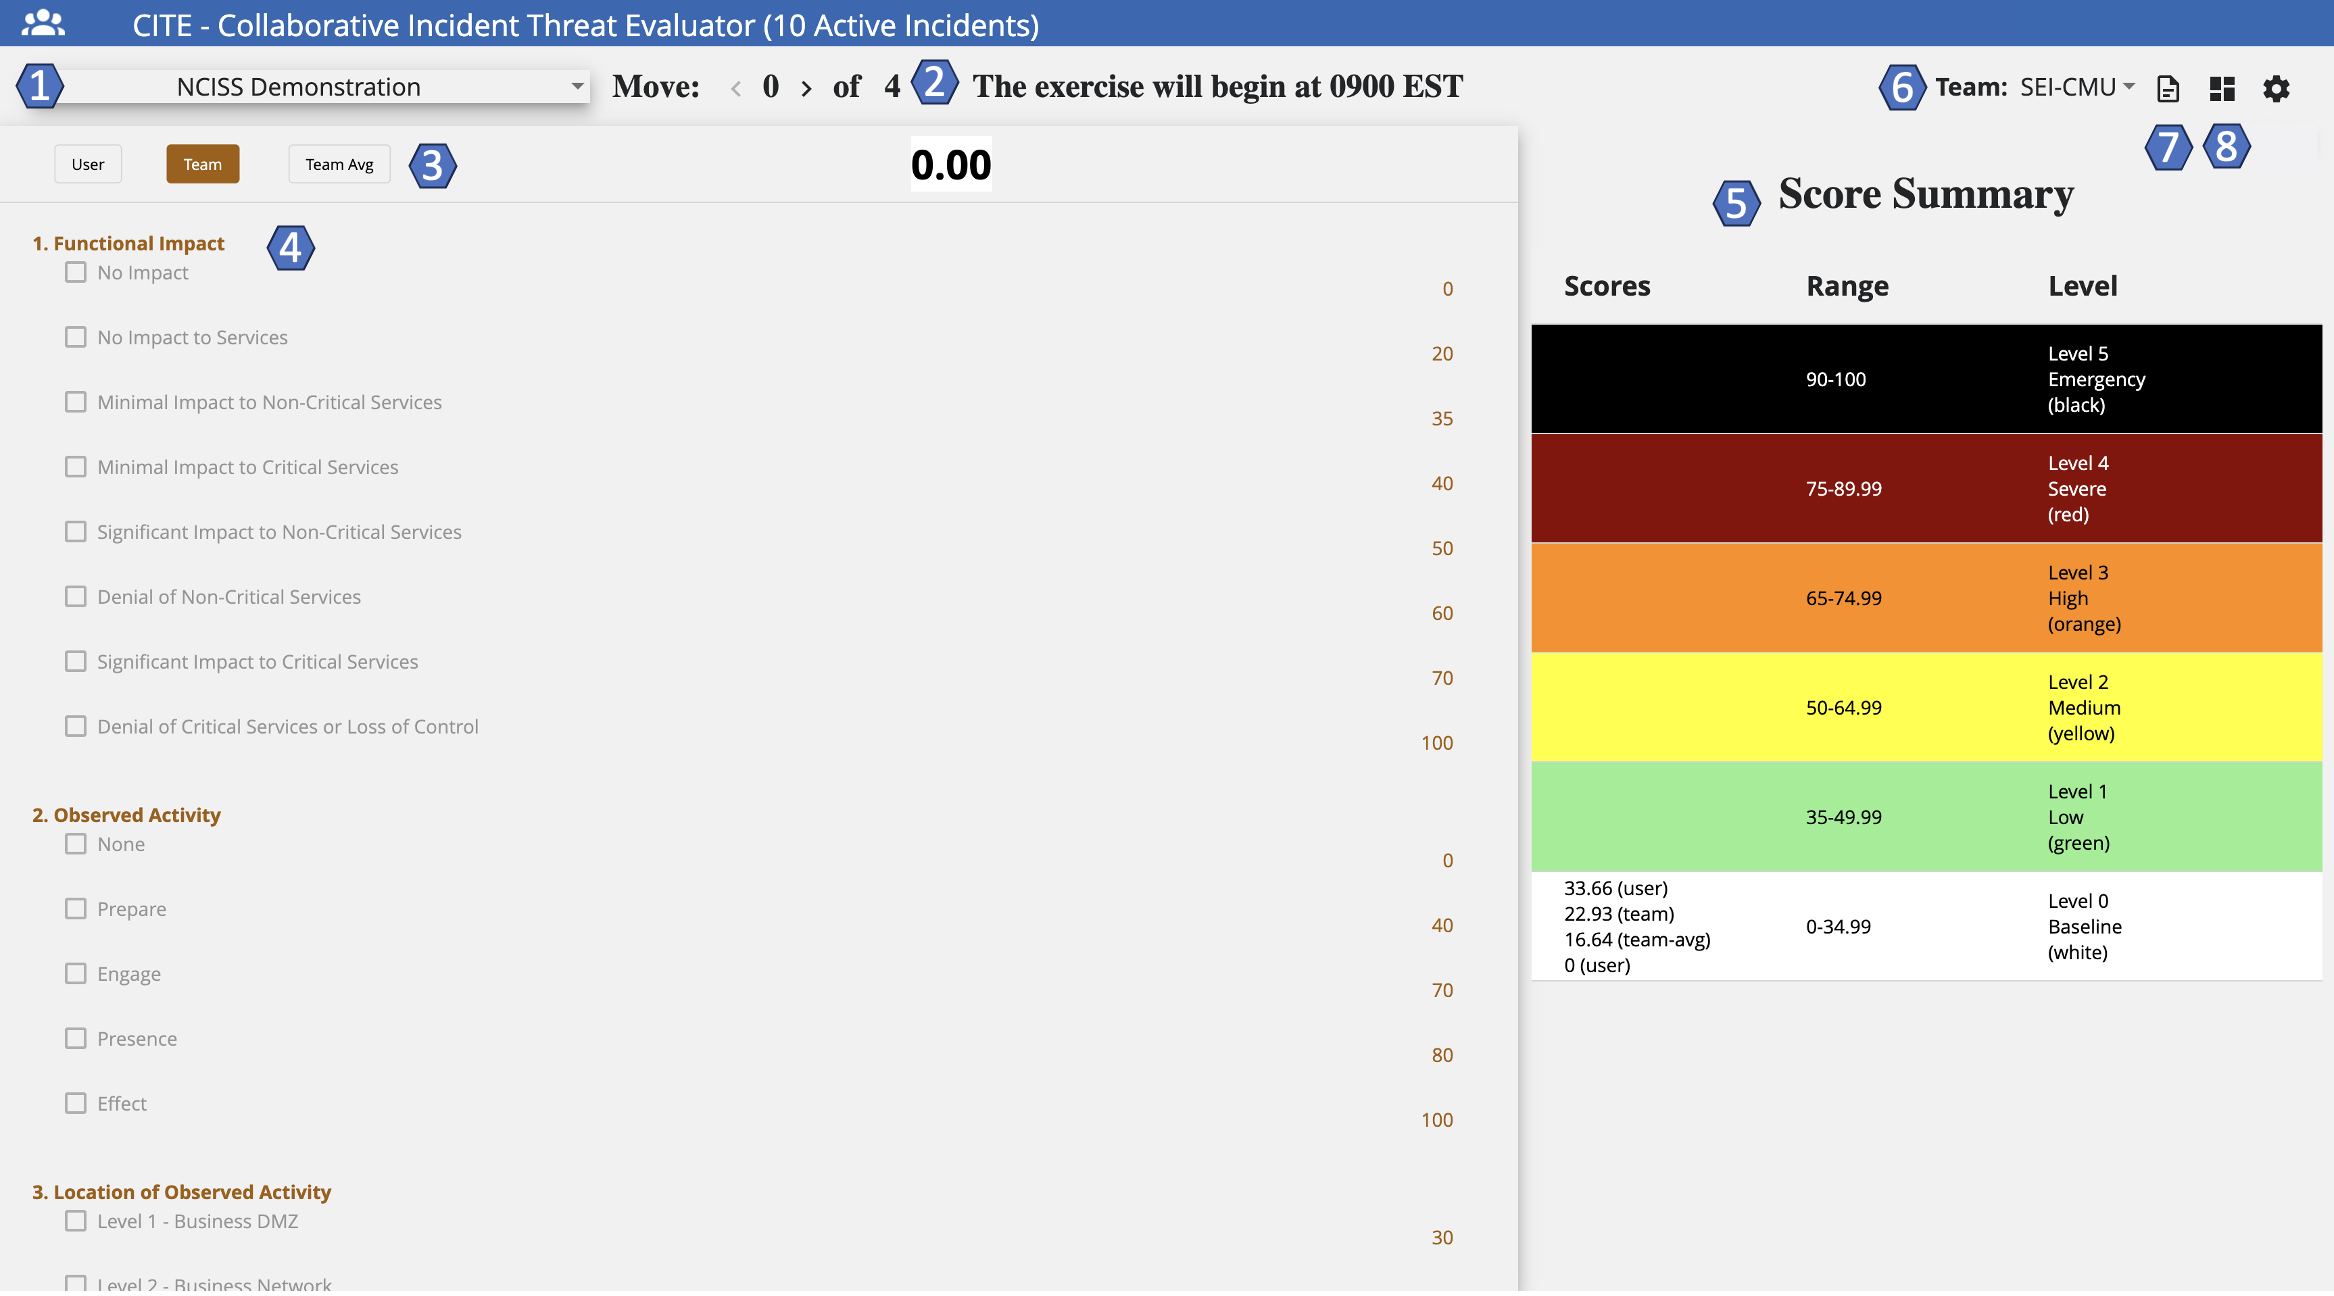
CITE Dashboard
The CITE Dashboard shows exercise details like date and time, incident summary, a suggested list of actions for participants to consider taking, and suggested participant roles.

Active Events & Moves
The name of the active event and the move number currently displayed.
Once the user obtains Can Increment Move permission, the "Advance Move" button appears. This enables the user to advance CITE's current move, and go back and forth between moves using the arrows.

Situation Date & Time
The date and time of the situation displayed.
Situation Description
Short description of the event. This section allows for the use of HTML elements, useful when receiving MSEL information from Blueprint.
Actions to Consider
Users can see the different actions necessary to execute during the exercise. These actions are for everyone on the team and are "per move", changing at each move of the exercise.
These actions guide users on an appropriate course of action during an exercise. However, these actions are not connected to the scoresheet.
Roles
The roles give each team member a clear understanding of their responsibilities during the exercise. Roles are customizable per team, and the team members decide what role to assign to each user.
Score Summary
Displays the various scores at the appropriate severity level for the displayed move. Here, scores are always visible.
Team Selection
This feature enables a user who is part of a team, as well as an observer, to toggle back and forth between teams. When assigned an observer role, the user can see other teams' progress during the exercise, as well as participate on their own team.
CITE Report Toggle
This feature redirects users to a printable version of the CITE report that recollects all user responses throughout the exercise.
Refer to the CITE Report section for more information.
Dashboard & Scoresheet Toggle
By using this icon, users can toggle between the CITE Dashboard and the CITE Scoresheet.
CITE Scoresheet
The CITE Scoresheet compares participant scores to organization scores, group average scores, and the official score.
Event Name
The name of the current event.
Displayed Move
The move currently displayed on the screen. Clicking < displays previous moves. Clicking > displays the current move. Using Displayed Move, users can see responses to previous moves and scores, but the user cannot edit a previous response.
Scoring Features
- User: This is the participant's personal score for their reference only. The user score will also appear under the Score Summary range.
- Team: Toggling the Team icon displays how the team scored this move so far. This is the score that the team collaborates on and submits for the current move. This score compares to the official score. The Team score appears under the Score Summary range.
- Team Avg: The average for all of the users on the team. The Team Avg appears under the Score Summary range for all moves except the current move.
- Group Avg: The average for all of the teams in the user's group. Group Avg appears under the Score Summary range for all moves except the current move.
- Official: The potential score; that is, how the incident would score in a real-life scenario. Official score appears under the Score Summary range for all moves except the current move.
- Submit: Submits the score, indicating that the user scored the current move. Click Yes or No. If the user clicks Yes but changes their mind, click Reopen to edit the scoring.
- Clear: Clears any selections the user has checked but does not clear comments entered. Selecting Clear returns to a score of 0.00.
- Preset: Sets the user's selections to the previous move score to use as a starting point for the current move.
Categories and Options
Categories are individually scored based upon the current move situation. For each category, select one or more relevant options. Selecting options assigns points to each category, which compile to create the move score as defined by the scoring model.
Add, Edit, and Delete a Comment
When scoring a move, the user can attach a comment (or multiple comments) to a category.
- To add a comment, click
 . Enter the comment and click Save.
 - To edit an existing comment, click
 . Make any changes, then click Save.
 - To delete an existing comment, click
 . Click Yes to delete the comment.
When finished scoring the categories and adding comments, click Submit to submit the scores.
Score Summary
The Score Summary panel displays the various scores at the appropriate severity level for the displayed move, keeping the data visible at all times.
Team Selection
This feature enables a user who is part of a team, as well as an observer, to toggle back and forth between teams. When the administrator assigns an observer role, the user can see other teams' progress during the exercise as well as participate on their own team.
CITE Report Toggle
This feature redirects users to a printable version of the CITE report that recollects all user responses throughout the exercise.
Refer to the CITE Report section for more information.
Dashboard & Scoresheet Toggle
By using this icon, users can toggle between the CITE Dashboard and the CITE Scoresheet.
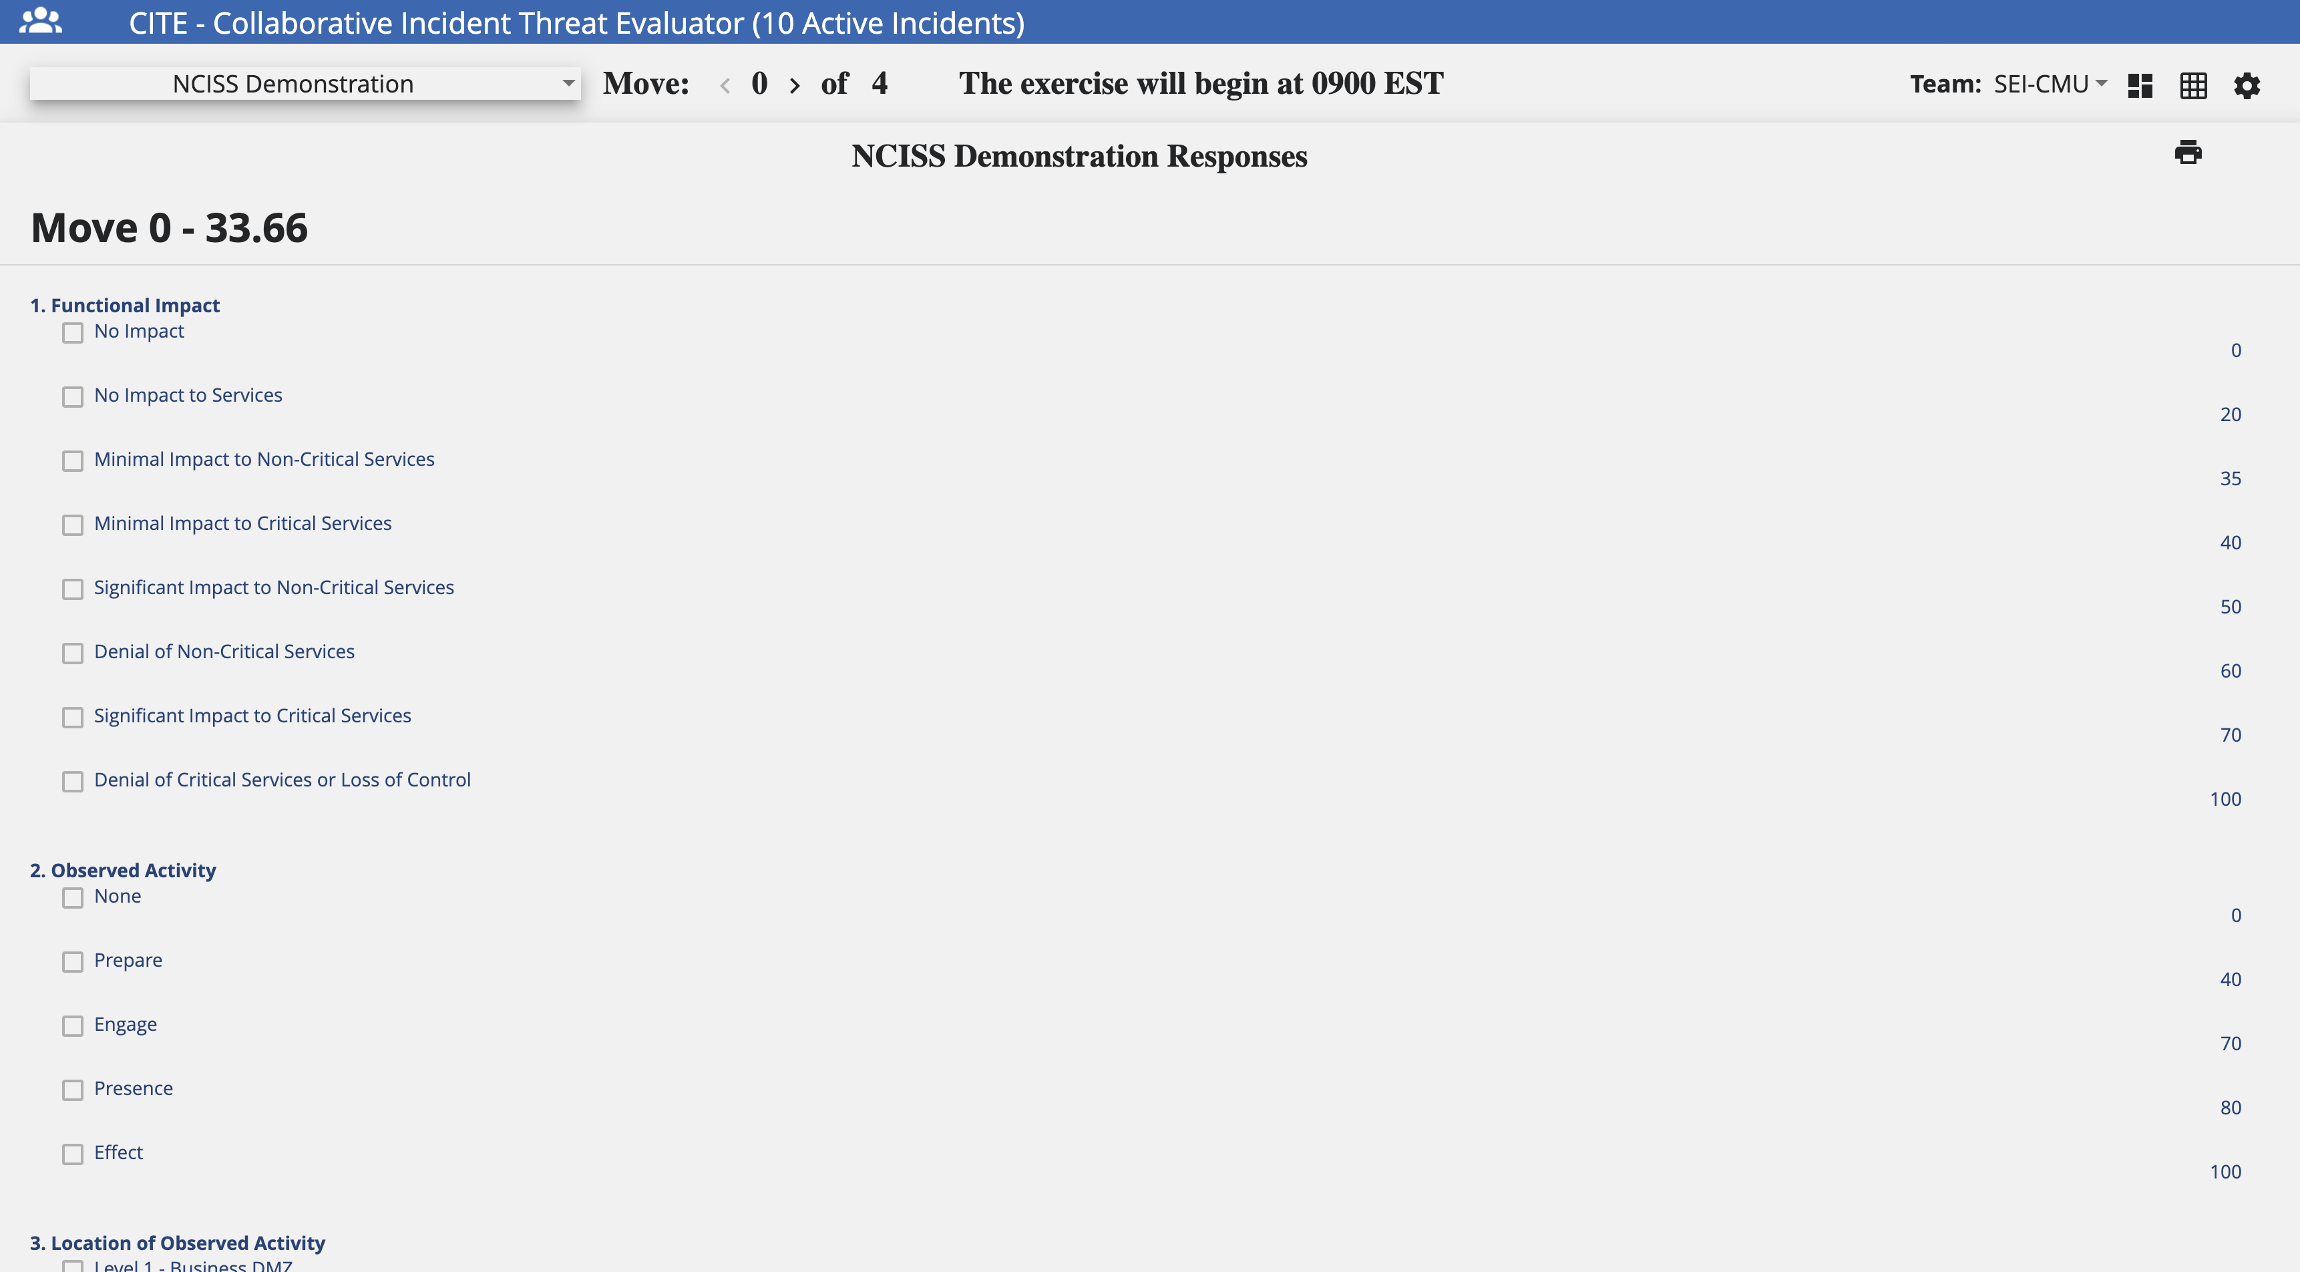
CITE Report
The CITE Report recollects all user responses into a single printable page. Users can reference this for their records, and exercise administrators can obtain valuable exercise insights from it.
The following image shows the CITE Report. Here, users can view and/or print their own copy.
Glossary
This glossary defines key terms and concepts used in the CITE application.
Actions: Series of steps to guide users on an appropriate course of action during an exercise.
Basic-Level Permission: Can only view the team score.
CITE: Web application that allows multiple participants from different organizations to evaluate, score, and comment on cyber incidents.
CITE Dashboard: Shows exercise details.
CITE Report: Recollects all user responses into a single printable page version for users to reference or keep for their records.
CITE Scoresheet: Compares participant scores to organizations scores, group average scores, and the official score.
Evaluation: Defines the scoring model used, as well as the moves and teams who will participate in the exercise.
Modifiers: If enabled, the Scoring Category score will use this value in calculations, either to add, subtract, multiply and/or divide within the equation.
Modify-Level Permission: Can view and edit the team score.
Moves: A defined period of time during an exercise in which a series of events occur for users to discuss and assess the current incident severity.
Observer Role: Individuals who impartially and objectively monitor teams during an exercise.
Roles: Provide a set of responsibilities assigned to a user during an exercise.
Scoring Category: Has a defined equation used to calculate the submission score from the category scores. Additionally, the category has a weight by which to multiply the score obtained.
Scoring Model: Tool used to assign a comparative value, takes into account the totality of the data points, their relative weights, and the scores for each of their range values.
Scoring Options: Has a preset value for calculating the submission score for a given Scoring Category.
Submission: Act of providing a score or response for an evaluation in relation to an incident presented during the current move.
Submit-Level Permission: Can view, edit, and submit the team score.
Team Types: Types of teams available to assign to different teams with similar characteristics during an exercise.