 TopoMojo: Building Virtual Labs
This documentation introduces users to the TopoMojo environment and provides information necessary to launch existing labs and create new topologies.
Overview
TopoMojo is a web application used for creating and delivering cybersecurity training labs and exercises. With TopoMojo, users can build and deploy labs in an isolated and secure virtual machine environment.
TopoMojo allows for the same functionality and connectivity that users would experience with real, physical devices. Network topologies can utilize not only IP and Ethernet, but also custom protocol solutions like 802.11 wireless packet simulation.
New topologies can be rapidly deployed using existing templates or built from the ground up with user-provided ISO's and VM specifications.
TopoMojo uses a hypervisor in the back-end to deploy virtual machines and configure virtual networks. Supported hypervisors are VMware vSphere and Proxmox.
Go to the TopoMojo repository: github.com/cmu-sei/TopoMojo.
TopoMojo Concepts
Understanding the key concepts in TopoMojo helps you build and manage labs and challenges effectively.
Workspace and Gamespace
In a workspace, engineers add VMs, save updates, author guides, and configure questions/answers to turn the topology into a lab or challenge.
Users play through a lab in a gamespace. Users get their own, isolated, read-only copies of all resources in the workspace. Players in a gamespace can interact with VMs and answer questions to complete the lab, but they cannot save changes to the environment.
Isolation Tag
The "Isolation Tag" is a unique identifier TopoMojo uses to identify a workspace or gamespace. This ID uniquely identifies each workspace and gamespace in the TopoMojo database.
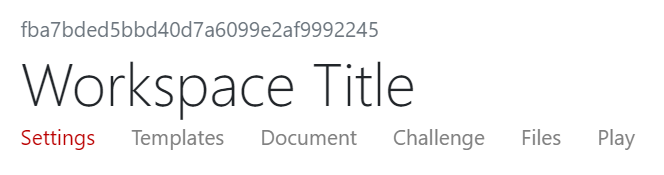
- For a workspace: the isolation tag is the workspace id visible above the Workspace Title when viewing the workspace.
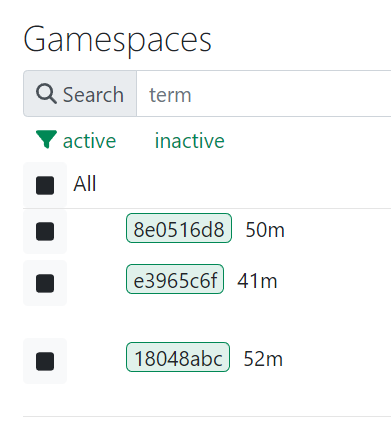
- For a gamespace: the isolation tag is the gamespace id partially visible from the Admin, Gamespaces view and fully visible in the URL bar when viewing a VM console that belongs to a gamespace.

Each resource (e.g., virtual machine, virtual network, etc.) associated with a workspace or gamespace will have the isolation tag appended to the resource name. For example: a VM named challenge-sever in the gamespace with id (isolation tag) 18048abc66f142e1804732082f4051d2, has the name challenge-server#18048abc66f142e1804732082f4051d2. Appending the isolation tag to workspace/gamespace resources ensures environment isolation and unique resource naming.
Labs and Challenges
A lab or challenge is a TopoMojo workspace built to teach or test hands-on cybersecurity skills. Labs are typically designed to be instructional with detailed documents that might resemble a full walkthrough. Challenges are typically skills assessments with minimal instructions designed to test a user's skills or for use in a competition (e.g., Capture the Flag competition).
Third-party consumers of TopoMojo content, like Gameboard and Moodle, can deploy labs and challenges.
Audience, Scope, and Publishing
TopoMojo controls who can launch a workspace, and which templates a workspace can add, by matching two lists of tokens against each other. A token is any word an administrator chooses, such as cyber-cup or blue-team. Separate tokens with spaces, commas, or semicolons. Two lists match when they share at least one token. Matching isn't case-sensitive.
| Pair | Where It's Set | What It Controls |
|---|---|---|
| User Scope and workspace Audience | Scope: Admin Users Tab. Audience: workspace Settings, or Admin Workspaces Tab View. | Which users can find a workspace and launch it as a gamespace, and which gamespaces an observer can see. |
| Workspace Template Scope and template Audience | Template Scope: Admin Workspaces Tab View. Audience: Admin Templates Tab. | Which unpublished templates a workspace can add from Add Templates. |
Any collaborator can set a workspace's Audience. Only administrators can set a user's Scope, a workspace's Template Scope, or a template's Audience.
Launching a Workspace
A user can launch a workspace as a gamespace when either of these is true:
- The user is a collaborator on the workspace.
- The workspace Audience shares a token with the user's Scope.
Every user also has the default scope everyone, even when their Scope is empty. A workspace with an Audience of everyone is open to all users. A workspace with an empty Audience can only be launched by its collaborators.
The same match decides which workspaces appear under the gamespace filter in the left panel, and which gamespaces an Observer sees on the Observe tab. The workspace filter doesn't use audience or scope; it only lists workspaces you collaborate on. The observer list uses only the observer's own Scope, without the default everyone. To let an observer see gamespaces from everyone workspaces, add everyone to the observer's Scope.
To limit a workspace to one group of users:
- Pick a token for the group, for example
cyber-cup. - In the Admin Users tab, add
cyber-cupto each user's Scope. - In the workspace Settings tab, set Audience to
cyber-cup. To open the workspace to more than one group, list each token, for examplecyber-cup blue-team.
Users already in other groups keep their tokens. A user's Scope can hold several tokens, for example cyber-cup blue-team.
Adding Templates to a Workspace
Add Templates in a workspace lists a template when either of these is true:
- The template is published. Published templates are available to every workspace. See Publishing a Template.
- The template's Audience shares a token with the workspace's Template Scope or with the Scope of the user adding it.
Template Scope doesn't limit published templates; it only adds unpublished templates with a matching Audience. Workspaces that builders create start with an empty Template Scope.
To share a set of templates with some workspaces, but not all of them:
- Pick a token, for example
cyber-cup. - In the Admin Templates tab, expand each template, set Audience to
cyber-cup, leave Published on Hidden, and click Save Settings. - In the Admin Workspaces tab, click View on each workspace that needs the templates and set Template Scope to
cyber-cup.
Builders in those workspaces now see the templates in Add Templates. A user whose own Scope contains cyber-cup sees them in any workspace they edit.
What "Published" Means
Published means different things for templates and workspaces.
- Template: A template is published when an administrator sets Published to Visible in the Admin Templates tab. Every template starts unpublished. A published template is available in every workspace's Add Templates.
- Workspace: A workspace has no publish setting. TopoMojo treats a workspace as published when its Audience isn't empty. The Janitor uses this to choose between the UnpublishedWorkspace and InactiveWorkspace reasons.
Getting Started
The following sections cover how to install TopoMojo and configure it for your environment.
Installing
Install TopoMojo using the Helm chart. The TopoMojo chart contains two sub-charts: topomojo-api and topomojo-ui which you configure and deploy using the main topomojo chart.
Info
This api/ui structure is consistent with the other Crucible apps.
TopoMojo values.yaml: Contains default configurations for the api and the ui. To deploy TopoMojo, configure the Values.yaml file according to your needs then helm install. More details on how to configure the values file is available in the helm charts repository.
For hypervisor settings, see the TopoMojo repository: Using Proxmox with TopoMojo covers network setup, ISO storage, guest settings, and High Availability, and Using vSphere with TopoMojo covers vSphere.
Proxmox certificate validation
Recent TopoMojo releases check the Proxmox server's certificate; earlier releases accepted any certificate. A Proxmox server with a self-signed or otherwise untrusted certificate now fails to connect. Install a certificate the TopoMojo host trusts, or turn off certificate checking in TopoMojo's hypervisor settings. See Proxmox Configuration in the Helm chart README.
Persistent/Shared Networks
We recommend having a persistent/shared network available to all TopoMojo workspaces/gamespaces. The administrator defines a persistent/shared network at the time they deploy the TopoMojo API.
For example, you could create a persistent/shared network that provides internet access to TopoMojo VMs connected to the network named bridge-net.
Each persistent/shared network is a VLAN reservation in TopoMojo's hypervisor settings: the VLAN ID from the hypervisor, and the network name users see. See vSphere Configuration in the Helm chart README.

An administrator can reserve more than one shared/persistent network. To connect VMs to shared/persistent networks, users must have at least Builder permissions.
Two optional settings, both off by default, relax those network restrictions:
- One lets users below Builder move a VM's network adapter onto shared/persistent networks.
- One lets Builders on vSphere connect a VM to any hypervisor network, not only the workspace's networks and the shared/persistent networks.
See Core Application Settings in the Helm chart README.
A note about bridge-net
bridge-net is just an example based on SEI's network naming convention for this persistent/shared network. It is not always configured as a reserved vlan by TopoMojo.
Using a VM Console
TopoMojo provides web-based consoles for interacting with virtual machines using only a modern web browser. The control panel on the left of the VM console offers additional options for using the VM console.
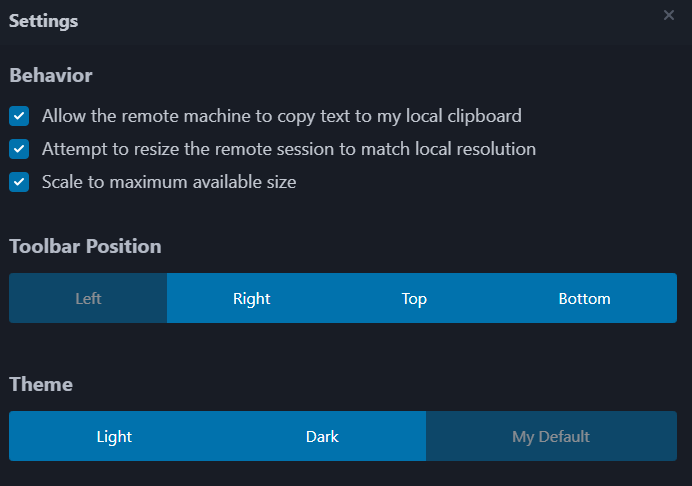
- Settings ( ): Configure behavior/preferences for the console interface.
- Reconnect ( ): Refresh the connection to the VM.
- Keyboard ( ): Send keystrokes to the VM (e.g.,
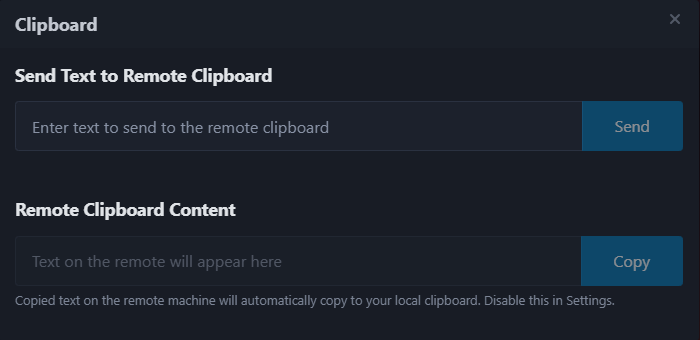
ctrl + alt + del). - Clipboard ( ): Copy/paste with this VM by selecting text to copy out of the VM to your host or paste text from your host to the VM.
- Networks ( ): Change the networks a VM's network interface card is on.
- Screenshot ( ): Take a screenshot of the VM. The screenshot is automatically copied to your host clipboard.
- Record (): Record the VMs screen and save the recording to your computer.
- Fullscreen ( ): Maximize the console's screen.
The console also shows the VM's state. When the VM is powered off, suspended, or unavailable, the console says so instead of showing a blank screen, and it shows progress while the VM starts or migrates. For a stopped VM, click Power On to start it from the console; the console connects once the VM is ready. If the connection drops, the console retries automatically.
Finding a Space
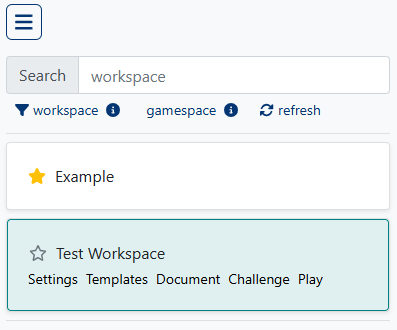
You can browse for existing TopoMojo workspaces and gamespaces using the Search field in left panel. Open the left panel from the menu button or by clicking Find A Space on the homepage. Click the pin to keep it open beside the page; unpinned, it closes when you click outside it. Enter search terms then click workspace or gamespace to filter results. The workspace section shows workspaces where you are an editor. The gamespace section shows spaces that you have permission to deploy as a gamespace (more information on permissions)
Select a gamespace, then click Start to "play" the lab -- start by reading the instructions and launching a gamespace resource. You can invite others to play in your gamespace. Click Invite to copy an invitation link for sharing. When you're finished, click End to destroy your gamespace. The timer counts down how much time remains before the gamespace expires.
Users can Favorite a workspace or gamespace using the Star ( ) button next to the title. Favorites appear at the top of the list.
While playing, the Gamespace Resources list shows the gamespace's VMs. Use Deploy to create them and Destroy to delete them.
The About page lists the UI and API versions and these keyboard shortcuts:
| Key | Action |
|---|---|
Ctrl-O |
Open workspace |
Ctrl-L |
Toggle left panel |
Ctrl-H |
Navigate home |
Ctrl-1 to Ctrl-6 |
Open the workspace Settings, Templates, Document, Challenge, Files, and Play tabs |
Building a New Workspace
To build a new TopoMojo workspace click New Workspace from the homepage. The workspace interface contains six tabs: Settings, Templates, Document, Challenge, Files, and Play.
Settings
The Settings tab holds configuration metadata for your lab.
Title: The title of your workspace. While not enforced, the title should be unique to prevent confusion when searching for spaces.
Description: A brief description of your workspace to display when browsing titles.
Tags: Space-delimited metadata added to help with searching and cataloging spaces. For example, if working several challenges for the "cyber-cup" project, you may tag a workspace with cyber-cup c01 where cyber-cup is the name of the project and c01 is a challenge number/ID.
Authorship: The names of the challenge authors.
Audience: A space-delimited list of groups that can launch the workspace as a gamespace. Users can launch a gamespace when their scope shares a token with the workspace Audience. everyone is the global audience that allows all users to launch the workspace. Leave Audience empty to limit the workspace to its collaborators. A workspace with an Audience counts as published for the Janitor. See Audience, Scope, and Publishing.
Duration: Recommended length of time, in minutes, that it takes to play through the challenge/lab.
Collaboration: To share your workspace with others, click Generate invitation and send the link to collaborators. Generating a new link invalidates the previous one. Click Remove next to a collaborator to take away their access. TopoMojo shows Collaborators alongside the author. When a collaborator connects to your workspace, you'll see them connected in the top right corner of the workspace.
Clone: Create a copy of your workspace. TopoMojo links the cloned workspace VMs to the parent workspace's VMs. The clone inherits all other settings from the parent. TopoMojo appends -CLONE to the title of the new workspace, but you can change this title.
Delete: Delete the workspace. Deleting a workspace also deletes its document and every image uploaded to it. If another workspace's document links to one of those images, that image stops loading there.
The top of the Settings tab shows the workspace's Launch Count and Last Activity. It also warns that inactive workspaces ("unpublished and idle" or "published and unused") may be deleted by the janitor. In the current release, the Janitor only reports such workspaces; it doesn't delete them.
Templates
The template selector allows you to add virtual machine templates to your workspace. Templates are "starting point" virtual machines that engineers can add to their workspace and customize as needed.
A typical TopoMojo deployment contains several types of templates.
- Base operating system installs with no software or configurations serve as a known-good starting point for customization.
- Purpose-built templates include preconfigured VMs (e.g., a web server configured to serve content).
- Blank discs let engineers install an operating system not yet available as a template.
Administrators can publish individual templates (e.g., a stand-alone base install of Kali Linux). They can also publish a "template set" of multiple VMs serving as a single "stock topology" (e.g., a full enterprise network with routers, firewalls, services, etc.).
TopoMojo templates are either published (stock) or unpublished. Published templates are available to all workspaces and appear in the Add Templates search across TopoMojo. Unpublished templates are only available within the workspace that owns them, unless an administrator shares them with other workspaces through the template's Audience. Only administrators can publish or share a template; see Publishing a Template and Audience, Scope, and Publishing.
Adding and Editing Templates
To add a template to your workspace:
- On the Templates tab, click Add Templates.
- Search for and add the templates you need for your topology.
- Click the edit icon to expand the template metadata and make changes. Making changes inside the VM requires deploying the VM.

Templates Tab Notices
The Templates tab shows notices about the workspace's state:
- Idle VMs: Any workspace VM left idle for a day may be deleted by the Janitor. Delete template VMs you aren't using.
- Running gamespaces: When gamespaces launched from this workspace are still running, TopoMojo can't save changes to its VMs. The Delete N Gamespaces button ends them so you can save again. Use it with care; it ends other people's sessions too.
- Deployed template: While a template's VM is deployed, the template's fields are read-only. Delete the VM to edit them.
The Template Manager (admin) link opens the admin Templates Tab filtered to this workspace; it only works for administrators. When you search Add Templates, a published template set shows Add (N), where N is the number of templates it adds.
Template Revisions
When an administrator publishes a new revision of a template, the Templates tab offers to move your copy onto it:
- Change parent to name? appears on a linked template. Click Resolve to relink it to the new revision. Your template then uses the new revision's disk.
- Manually updated to match name? appears on an unlinked template that came from the same parent. Click Resolve to record the new revision as its parent. This doesn't change the template's own disk.
TopoMojo only offers revisions that are published or whose Audience matches the workspace's template scope.
Template Field Definitions
The list below explains the fields in the VM template.
- Name: The name of the VM must be unique within the workspace and should be descriptive of the resource.
- Description: A short description of the VM. Include the credentials and purpose for the VM. The description is not visible to participants; it is only visible in the workspace editor.
- Networks: A space-delimited list of networks on which the VM will have a network interface. These names should be the same for all systems in your lab that need to connect to the same network. TopoMojo creates the networks on the hypervisor when it deploys the VM/lab.
-
Guest Settings: Key-value pairs in the form of
key=valueto pass data into deployed VMs via VMware guestinfo variables or the QEMU Firmware Configuration Device for Proxmox. The key is the name of the guest setting. For example,var1=testis a guest setting named "var1" with a value of "test". You can randomize guest settings values using TopoMojo Transforms.When using VMware as a backing hypervisor, use VMware Tools, such as the
vmtoolsdcommand from the open-vm-tools package, to access guest info variables from a VM.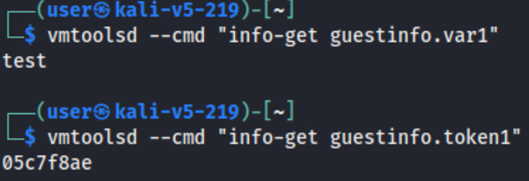
When using Proxmox as a backing hypervisor, use the QEMU Firmware Configuration (
fw_cfg) Device with a command similar to the following, wherevariableis the key of the guest setting to read: -
Replicas: Set this number to deploy copies of the same VM template. For example: to deploy three copies of a VM template when TopoMojo starts a gamespace, set Replicas to "3". To deploy one copy of the VM template for each member of the team owning the gamespace, set Replicas to "-1".
- Variant: Specify that TopoMojo should deploy the VM template only for a particular variant. For example, if the Variant is "2", TopoMojo deploys the VM template only when it launches variant 2 of the challenge.
-
ISO: Use the ISO Selector to attach an ISO image to your virtual machine. Common use: attach an OS installer ISO for a blank disk template, or mount utilities during setup. See Installing an Operating System from an ISO.
To detach an ISO, click Remove in the ISO field. TopoMojo only reads this field when it deploys the VM, and TopoMojo locks the template while its VM exists. Delete the deployed VM first (after saving any changes you want to keep), remove the ISO, then deploy again.
Proxmox: removing the ISO doesn't clear the CD drive
On Proxmox, a template with an empty ISO field doesn't get an empty CD drive. The deployed VM keeps whatever CD-ROM the underlying Proxmox template VM has, so clicking Remove doesn't detach an ISO that the Proxmox template already carries. To clear it, a Proxmox administrator sets the template VM's CD/DVD Drive to Do not use any media in Proxmox.
-
Console Access: Toggle Hidden to hide a specific VM from view while completing the lab. This is useful for back-end systems like a DHCP server that do not require user interaction or other systems where the user should not have direct console access.
Note
These VMs may still be accessible over the network; participants just cannot open a console via the lab interface.
-
Linked: Unlinking creates a new clone of the template which you can save and customize. Unlink any virtual machine that will not use the default disk included with the template (i.e., you need to save changes to the VM).
- Delete Template: Deletes the template from the workspace.
Refresh and Deploy

Once the template is in the appropriate state:
- Initialize ( ): Creates the template's disk. Appears only on an unlinked template whose disk doesn't exist yet, such as right after you click Unlink. Deploy appears once initialization finishes.
- Refresh ( ): Refresh queries the state of the VM from the hypervisor. This is useful if you run a
shutdowncommand in the VM and the TopoMojo UI icons haven't updated to reflect the powered-off state of the VM yet. - Deploy ( ): Deploys that virtual machine into your workspace.
Deployed VM Actions
The deployed virtual machine displays the following additional icons from left to right:

- Console ( ): Opens the console for the virtual machine.
- Stop/Start ( / ): Power off/on the VM, but leaves the resource deployed on the hypervisor. Clicking stop results in the hypervisor showing a deployed VM in a powered-off state. Clicking start powers on the deployed VM.
- Revert ( ): Reverts the VM to its last saved state. You lose all changes made since the last commit. TopoMojo can only revert VMs to their last saved state - there is no history of all previous saved states. Revert is only available on vSphere; TopoMojo doesn't support it on Proxmox, so the icon doesn't appear there. On Proxmox, delete the VM and deploy it again to return to the saved state.
- Delete ( ): Deletes a running VM instance. Before you click delete, make sure you have saved any changes to the disk.
-
Save ( ): Save any changes made to the VM. Sometimes called "taking a snapshot", though the technical implementation of this feature may not resemble a true "snapshot" on the hypervisor. The save icon is only available when you're using an unlinked disk, since you can't save changes to a linked disk.
Saving replaces the previous saved state. TopoMojo keeps only one saved state per template, so after a save you can't return to the state before it.
TopoMojo doesn't require a stopped VM, but saving a running VM is like pulling the power cord mid-write. Shut down from inside the guest operating system before you save, especially after installing software or an operating system.
TopoMojo refuses to save a workspace VM while any gamespace launched from the workspace is still running.

Installing an Operating System from an ISO
To build a VM from an operating system installer, combine the steps above in this order:
- Upload the ISO on the Files tab.
- Add a blank disk template on the Templates tab.
- Unlink the template so it gets its own disk.
- Select the ISO in the template's ISO field.
- Initialize, then Deploy, and install the operating system from the console.
- Shut down the VM from inside the guest and click Save.
- Delete the VM, click Remove in the ISO field, and deploy again to confirm the VM boots from its own disk.
For the full walkthrough, see Installing an Operating System from an ISO in the Creating a TopoMojo Challenge tutorial.
Lab Document
The Document tab in a TopoMojo workspace is where you write the lab instructions using Markdown syntax in TopoMojo's built-in collaborative editor. Authoring in Markdown enables you to create a formatted document using just plain text.
Because TopoMojo's built-in editor is collaborative, multiple people can work on the documentation at the same time. As long as you are "connected" (see the top-right corner) TopoMojo automatically saves your updates to the document.
For more information about Markdown, including the syntax guide, see markdownguide.org.
Inserting an Image
To insert an image into your document:
- Click Images, then click Browse (you can drag and drop too).
- After browsing to upload an image, you should see a preview of the image.
- Place your cursor in the document where you want the image, hover over the image, and click Insert.
Previewing the Doc
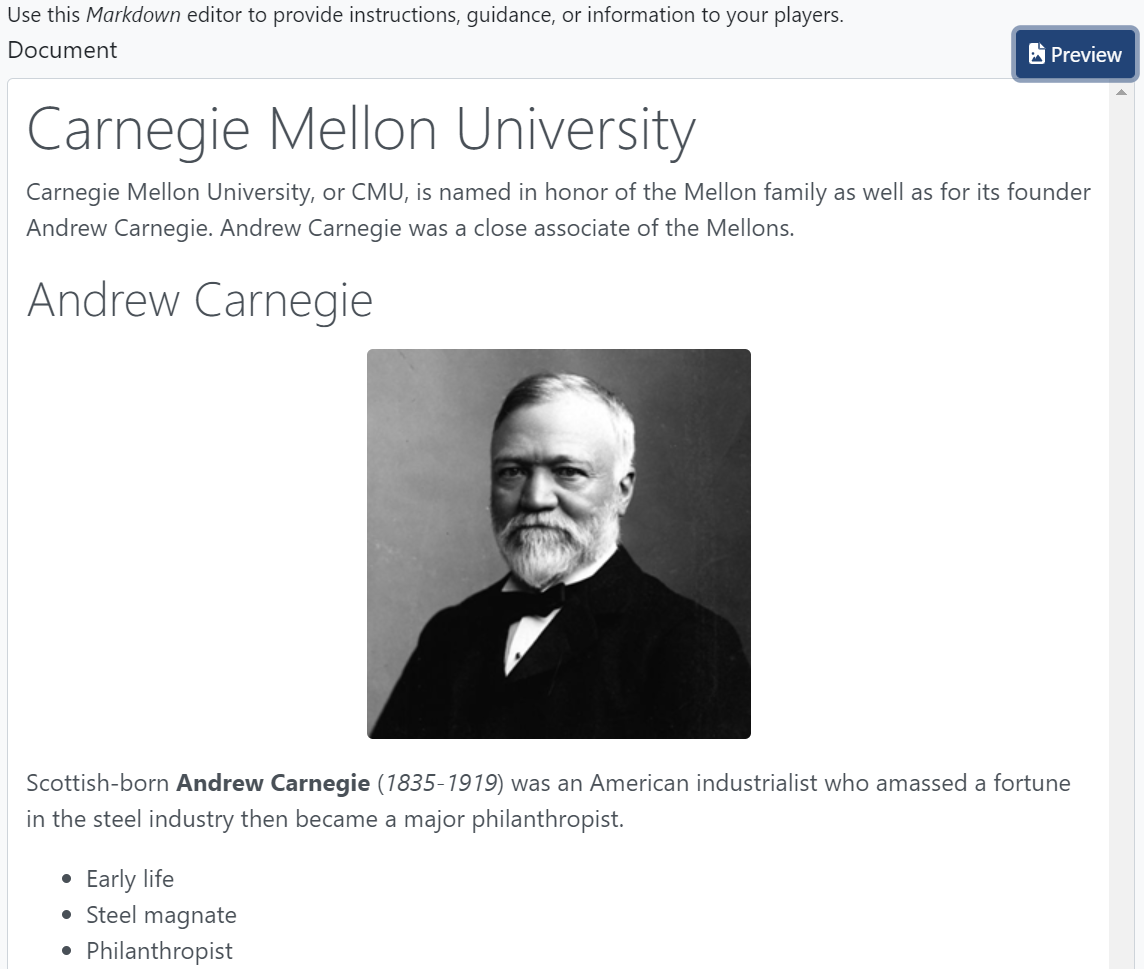
To see how your instructions will look to players when they "play" your lab, click the Preview button. The first screen capture shows the Markdown editor. The second screen capture shows the document in preview mode.
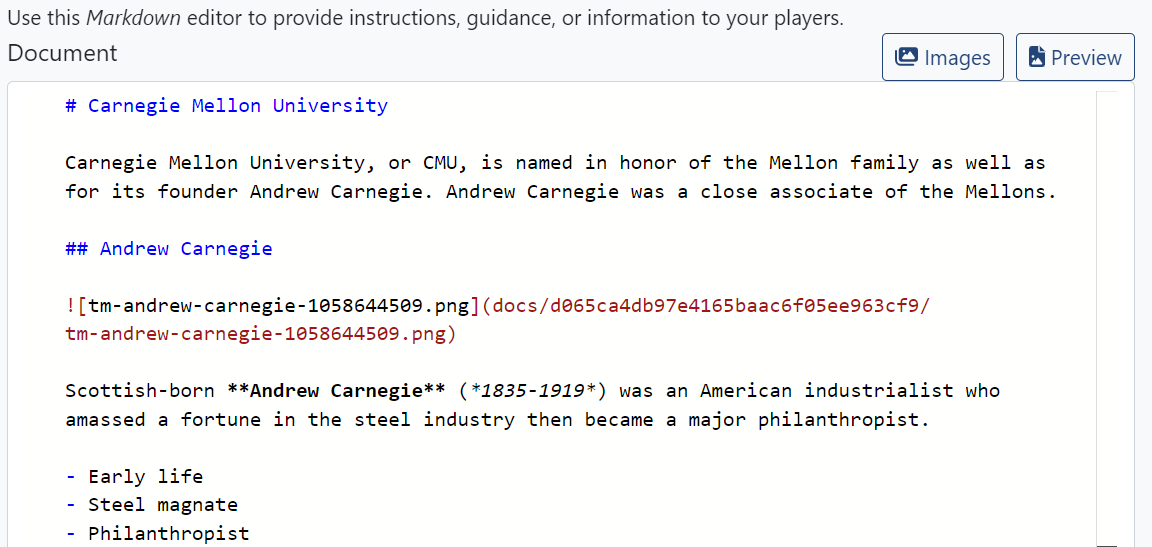
and
Challenge Tab
The Challenge tab in the TopoMojo workspace is where engineers configure randomized challenge configuration (transforms) and questions for the lab/challenge.
Unlike template fields, the Challenge tab doesn't save as you type. Click Save when you finish editing.
Transforms
Transforms allow you to define dynamic variables that TopoMojo generates at gamespace deploy time. Transforms are key/value pairs –- the key is the name of your transform and the value is the type of the transform. Expand the tooltip under the transforms text box to see details about the available transform data types. The screenshot below shows a transform named "token1" that will have a value of 8 random hexadecimal characters.
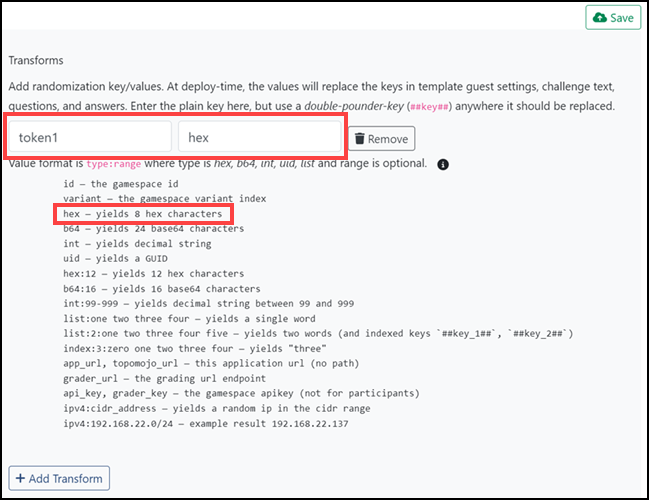
Values use the format type:range, where the range is optional:
| Value | Result |
|---|---|
hex |
8 random hexadecimal characters. hex:12 yields 12. |
b64 |
24 random base64 characters. b64:16 yields 16. |
int |
A random decimal number. int:99-999 yields one between 99 and 999. |
uid |
A random GUID. |
list:one two three four |
One word picked at random from the list. |
list:2:one two three four five |
Two words picked at random. Also creates indexed keys, ##key_1## and ##key_2##, for each word. |
index:3:zero one two three four |
The word at that zero-based position; this example yields three. |
ipv4:192.168.22.0/24 |
A random IP address in the Classless Inter-Domain Routing (CIDR) range, such as 192.168.22.137. |
id |
The gamespace ID. |
variant |
The gamespace's variant index. |
app_url, topomojo_url |
TopoMojo's URL, without a path. |
grader_url |
The grading endpoint URL. |
api_key, grader_key |
The gamespace's API key, for grading scripts inside the lab. Never expose it to participants. |
To access transforms in the challenge, use the referenced "double-pounder-key (##key##)" notation. When TopoMojo deploys a gamespace, the engine generates random values for all transforms, looks for double-pounder-keys, then replaces them with the randomly generated values for that deployment.
Sections on the Challenge tab (e.g., Transforms, Markdown, Questions, Answers) can contain double-pounder-keys that TopoMojo replaces with transform values at deploy time. You can also use transform double-pounder-keys in the Guest Settings field of a template to inject random variables into VM guest info variables when deploying a gamespace. Transforms aren't generated when deploying workspace VMs, so the value of the variable will be the double-pounder-key.
The screenshot below shows the Guest Settings of a VM template configured to use two guest info variables: var1 and token1. Var1 has a value of "test" and token1 will have a random 8-character hexadecimal string assigned when TopoMojo deploys a gamespace.
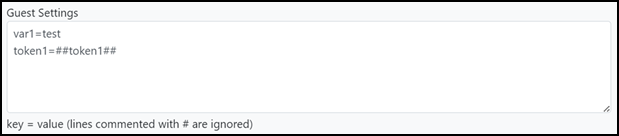
There is a detailed Guest Settings portion of the Workspace documentation.
Markdown
The markdown you enter here gets appended to the gamespace document at deploy time. This section is useful for appending randomized documentation using transforms to the base lab document authored in the Document section. For example, if a transform randomizes a system's password, you can document the randomly generated password in this section using the double-pounder-key notation for transforms.
Variants
A variant describes a different version of a challenge. Variants can contain different ISO attachments, different virtual machines, and different questions and answers. Each time TopoMojo deploys a challenge, a variant is randomly selected for the deployment. When creating a challenge using variants, make sure all variants test the same competitor skills at the same difficulty level. That is, variant #1 should test the same skills as variant #2 and one variant shouldn't be harder to solve than another variant.
Use the Clone ( ) button to create a new variant that is a copy of an existing variant. This makes minor edits between variants easy to facilitate.
Click Show Variant Detail to expand each variant's settings:
- Markdown: Variant-specific text, appended to the challenge text for players who get this variant.
- ISO: A variant-specific ISO File and the Targets (space-delimited template names) to attach it to. See Files.
Question Set
A variant can have more than one question set, for grouped tasks or a challenge that unlocks in stages. Each set has a name (shown to players; it defaults to "Question Set N"), optional Markdown with instructions for that set, and its own questions. Use the set's controls to move it up or down, clone it, or remove it, and click Add Question Set to add another.
To make a set unlock only after players score enough on earlier ones, set its prerequisites:
- Prerequisite Total Weight: The weight players must score across all challenge questions.
- Prerequisite Prev. Section Weight: The weight players must score in the previous set.
Enter both as fractions of the total score, from 0 to 1. For example, 0.5 requires half the available points. TopoMojo compares them against normalized question weights, so a value such as 50 never unlocks the set. 0 means no prerequisite. The first set can't have prerequisites. Players see locked sets as a note listing what they must score to unlock the next one.
Move Up, Move Down, Remove: Use these functions to position the question in the sequence of questions for that set or remove it.
Question: Enter the question you expect the participant to answer here. Your question should be specific, so that there is only one correct answer.
Answer: Enter the correct answer that the competitor must submit to earn a score.
You will see these options when you select Detail ( ).
Hidden: Select Hidden to prevent the question from appearing when playing the challenge. Hidden questions do not appear when playing in TopoMojo or via Gameboard.
Grader: Select the grading type here. The Grader determines if players submitted the correct answer to a question. Select one of four types:
Match: The submission must exactly match what is in the Answer field. Use this when there is exactly one possible answer to a question.MatchAny: The submission must match one of the pipe-delimited answers in the Answer field. Use this when there is more than one possible answer to a question.MatchAll: The submission must match all of the pipe-delimited answers in the Answer field. Use this for questions expecting a list of answers.MatchAlpha: The submission must exactly match what is in the Answer field after the grader removes all non-alphanumeric characters. This is useful if the user might submit symbols that don't affect the validity of an answer. For example,C:/UsersandC:\Usersare both valid answers and the symbols (/vs\) don't matter.
All four grader types are case-insensitive - the grader converts all answers and submissions to lowercase before comparing them to the expected answer.
Weight
Weight is the percentage of the total score for this question. The value should be between 0 and 1 or 0 and 100. The weights of all questions within the set must add up to 100% or one (1). TopoMojo calculates zero (0) values evenly.
Example
Providing an example answer helps players understand the required answer format. For instance, sometimes a file needs both the name and the extension, while other times only the name is necessary.
Files
The Files tab in the TopoMojo workspace allows you to upload files from your system to TopoMojo to include in your lab. You can use these files as ISOs to attach to VMs in the workspace. If your files aren't already in an ISO file format, TopoMojo wraps them in an ISO after upload. When a template has an ISO selected, the VM will deploy with the ISO attached to the CD Drive. You can attach an ISO to upload software, datasets, or other resources to the VM.
Note
The Files tab only appears when the TopoMojo UI settings include "enable_upload": true. If you don't see it, ask your administrator to enable it.
TopoMojo stores uploads in one of two ways. By default, it writes them to a folder that the hypervisor also mounts, such as an NFS (Network File System) datastore. On Proxmox, that path must end in /template/iso. Alternatively, TopoMojo can upload to hypervisor storage through the vSphere or Proxmox API, and no shared mount is needed. See File Storage in the Helm chart README.
ISOs you upload on the Files tab are local to the workspace: only the workspace that holds them can attach them. Administrators manage global ISOs, which every workspace can use.
Your TopoMojo administrator controls upload limits:
- Maximum file size: By default TopoMojo itself sets no limit, but a reverse proxy or ingress in front of TopoMojo may still cap the request size.
- Upload time-out: Defaults to 60 minutes. This applies when TopoMojo uploads the file to hypervisor storage through the vSphere or Proxmox API.
If a large ISO fails to upload, ask your administrator to check these settings.
By default, the Local filter displays only ISOs available to the current workspace. When you upload a local ISO file, TopoMojo creates a folder named by the workspace GUID--highlighted in green below--in the NFS datastore. Only the current workspace has access to local ISO files in the workspace-named folder.
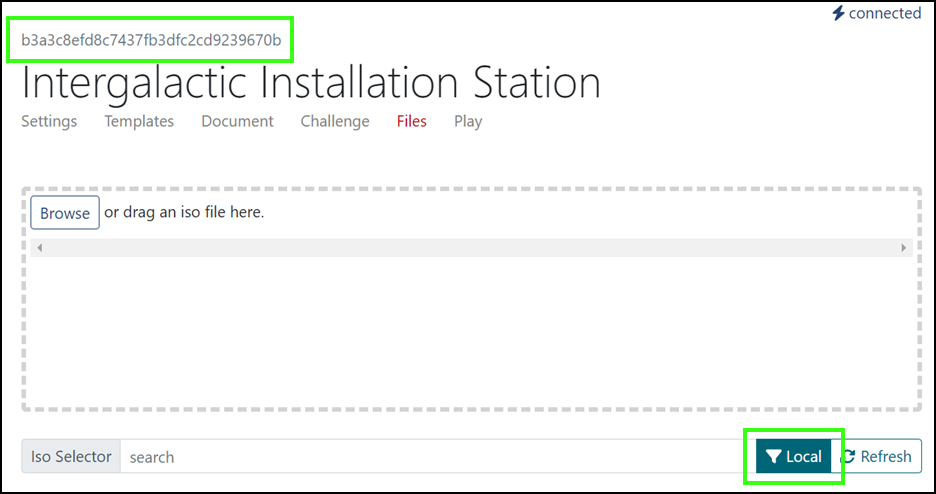
When you remove the Local filter, you see ISOs in the global folder on the NFS data store. TopoMojo names the global folder with a GUID of all zeros. These global ISOs are available to every workspace in TopoMojo. Use them for commonly reused ISOs, like operating system installers, to prevent re-uploading the same artifact in multiple workspace folders.
You can attach an ISO to a VM in the challenge workspace Templates tab. See the Adding and editing templates section of this guide. When you select an ISO here, TopoMojo attaches the ISO to the VM upon its deployment.
You can also attach an ISO to a VM using the workspace Challenge tab's Variant Detail function. This "dynamic ISO attachment" gives you the ability to attach a variant-specific ISO file to a template. You must specify a target(s) here. See the Variants section of this guide.
Deleting an ISO
To delete a local ISO, click Delete next to it in the ISO list and confirm. Any editor of the workspace can delete its local ISOs; only administrators can delete global ISOs, from the Files Tab in the Administrator Guide.
Before deleting, TopoMojo checks whether anything uses the ISO. If nothing does, it deletes the file right away. Otherwise, the Delete ISO dialog lists the Templates and Active Gamespaces that use it:
- Active gamespaces: You can't delete the ISO until those gamespaces end. Click Close.
- Templates only: Deleting leaves those templates with a broken ISO reference. Click Delete Anyway to continue, or Cancel.
Play
The Play tab is where you can interact with your lab in the same way others will when they launch your content or "play" through your challenge. Play deploys a gamespace, a read-only copy of all virtual machines in the workspace. See more about gamespaces in the Workspace and Gamespace section.
Variant: Specify which variant of the challenge you wish to play (if it is a variant challenge). Variant 0 will deploy a random variant.
Max Attempts: The maximum number of submission attempts allowed when answering questions.
Max Minutes: The maximum number of minutes permitted to play before the gamespace expires.
Points: Suggested number of points earned for successfully answering all questions. Consumers (e.g., Gameboard and Moodle) can request any point value when they deploy a gamespace.
Start: Starts the gamespace by deploying virtual machines, displaying the Markdown document, making challenge questions available, and starting the timer for the user that clicked Start.
Reset: Destroys and resets the gamespace.
Administrator Guide
Access the Admin Dashboard by clicking Admin in the top right corner of the navigation bar. You need the admin role assigned to your user to see the Admin navigation option.
The admin area has these tabs: Dashboard, Gamespaces, Workspaces, Templates, Files, Machines, Users, Settings, and Log. The Dashboard tab holds the Hub Connections, Announcement, and Janitor tools described next.
Hub Connections
Hub connections informs TopoMojo admins about which users are currently logged into TopoMojo.
Announcement
The Announcement feature allows TopoMojo admins to broadcast important messages to everyone in TopoMojo. Announcements appear in the TopoMojo interface. In the Message field, enter the content of the announcement and click Send.
Janitor
The Janitor service cleans up unused resources (e.g., a workspace VM that has been idle for a long time) in TopoMojo. It runs in the background on two schedules:
- About every minute, it ends gamespaces that have passed their expiration time plus their cleanup grace time, then deletes the VMs of ended gamespaces.
- About every one to two hours, it runs a full cleanup pass over workspaces, workspace VMs, and orphaned workspace documents.
Cleanup Report: Runs the full cleanup pass immediately and lists what it found, with sortable Reason, Name, Owner, VMs, and Last Activity columns. Click a workspace name to open it. This button doesn't just show a log: if the Janitor isn't in dry-run mode, clicking it deletes the VMs and orphaned documents it reports.
The full cleanup pass reports four kinds of items, shown in the Reason column:
- IdleWorkspaceVms: Workspaces whose VMs have been idle longer than a day. When dry run is off, the Janitor deletes these workspace VMs. Saved template disks aren't affected.
- UnpublishedWorkspace: Unpublished workspaces idle longer than a week.
- InactiveWorkspace: Published workspaces with no launches for longer than a year.
- OrphanedDocument: Documents and image folders in TopoMojo's document folder that belong to a workspace that no longer exists. Workspaces deleted before TopoMojo started removing their documents left these files behind. Name lists the files found, named for the missing workspace's ID:
{id}.md,{id}/, or both. Last Activity shows when they were last modified. The Janitor only considers files and folders named for a workspace ID and leaves everything else in the document folder alone. When dry run is off, the Janitor deletes them.
By default the Janitor runs in dry-run mode, which reports idle workspace VMs and orphaned documents without deleting them. The Janitor never deletes workspaces themselves: the two workspace reasons are always report-only. An administrator can change dry-run mode and each time limit in TopoMojo's configuration; see Core Application Settings in the Helm chart README.
Gamespaces Tab
The Gamespaces tab is where admins search for gamespaces. Search matches the gamespace ID, the manager's name, or the workspace title. Use the table headers to sort results by ID, Time Left, Created Date, and Manager / Workspace. Use filters to show active and inactive gamespaces. By default, the search is for active gamespaces. Green indicates active gamespaces and gray indicates inactive gamespaces. An active gamespace is one where the player can still interact with VMs and answer questions. An inactive gamespace is one the player has completed (answered all questions) or that has expired.
Refresh: Refreshes your search.
Delete Selected: Check the box next to All to select all gamespaces for deletion or check a box next to individual gamespaces to select for deletion.
Gamespaces in the table show the following information:
- ID: The first eight characters of the gamespace ID (e.g.
e9416013). - Time Left: Time remaining, for active gamespaces.
- Created Date: When the gamespace was created.
- Manager / Workspace: The user who manages the gamespace, and the title of the workspace it was launched from.
In the active view, click the star next to a gamespace to favorite it and pin it to the top of the list.
When you view a gamespace that has ended but still has VMs on the hypervisor, an Admin Notice reports how many VMs remain, with links to the Machines Tab and the Gamespaces tab where you can delete them.
The screenshot below shows several active and inactive gamespaces (usernames redacted).

View (Expanded)
View: Selecting View expands the gamespace information where a list of all the VMs associated with the gamespace and their state.
- Refresh ( ): Refresh the state of the VM from the hypervisor.
- Console ( ): Opens the console for the virtual machine, allowing interaction.
- Stop/Start ( / ): Power off/on the VM, but leaves the resource deployed on the hypervisor. Clicking stop results in the hypervisor showing a deployed VM in a powered-off state. Clicking start powers on the deployed VM.
- Revert ( ): Reverts the VM to its last saved state. vSphere only; the icon doesn't appear on Proxmox.
- Delete ( ): Deletes a running VM instance.
- JSON ( ): Shows detailed information about the gamespace, including: answers to questions, variables associated with the challenge, submitted answers, challenge questions and expected answers, and if the participant answered questions correctly or incorrectly.
- Dispatcher ( ) : Used to issue commands to a VM from TopoMojo provided that the TopoMojo agent program is running on that VM. The VM requires an internet connection which allows the agent program to establish a connection with TopoMojo.
targetis the hostname of the VM that you want to run the command on.commandis any command you wish to run. See TopoMojo's GitHub repository for more information on TopoMojo's agent.
Delete
Delete ( ): Deletes the gamespace and associated VMs. This deletes the full gamespace record from TopoMojo's database.
Workspaces Tab
The Workspaces tab is where the admin can search for workspaces by name or ID. Use the table headers to sort results by Workspace Name, Created Date, and Last Activity. Click the star next to a workspace to favorite it and pin it to the top of the list.
An admin can view every workspace using this menu, even without being a collaborator. Admins and non-admins use the search feature in the left navigation pane to view workspaces where they are a collaborator. See Finding a Space for more details.
- Create: Create a new workspace from the Admin Workspaces panel. For additional help, see Building a new workspace.
- UploadZip: Upload a workspace export (
.zipor.json) to import workspaces into TopoMojo. An Upload Results message lists what TopoMojo imported. - Download: Switches the list into selection mode. Check the workspaces to export, then click Download (N) to download a zipped export, or click Cancel. Workspace exports can contain one or more workspaces. TopoMojo will automatically include additional dependent workspaces and templates for workspaces that contain linked resources.
- Delete: Delete a single workspace from its row.
Selecting a workspace takes you the Settings tab of that workspace. For additional help on the Settings tab, see Building a new workspace.
The workspace id is visible above the workspace title, labeled Workspace ID. The workspace identifier matches the directory name used to track the workspace in the database, store files on the file system, and track associated VMs. Click the ID to copy it to your clipboard.

View (Expanded)
Template Limit: Defines the number of VM templates you can add to the workspace.
Template Scope: Space-delimited tokens that let the workspace add unpublished templates whose Audience contains a matching token. Published templates are always available, whatever this is set to. See Adding Templates to a Workspace.
Audience: Space-delimited tokens that decide which users can launch the workspace as a gamespace. Same as Audience on the workspace Settings tab. See Launching a Workspace.
VMs: Refresh, deploy, view the console, start/stop, revert and delete from here. Functions are the same as previously described.
Templates Tab
The Templates tab is where you can view all of the templates that exist in TopoMojo.
Search: Search for templates by workspace or name. You can apply filters to narrow your search. In the screenshot below, the filter is for linked VMs with a parent template of kali-201901.
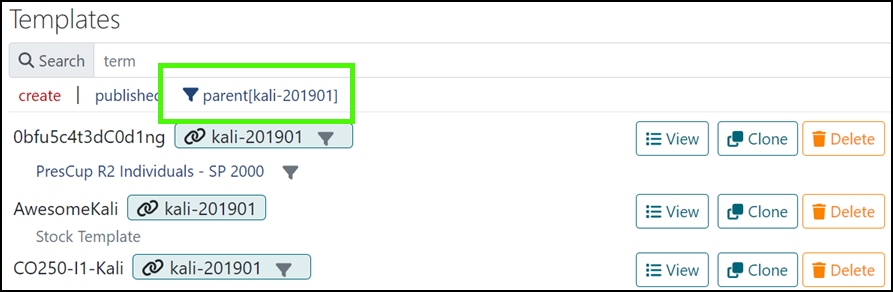
Filter for all templates from a workspace by clicking the name of the of the workspace in the list.
Linked and unlinked templates
The chain link icon ( ) next to a template name indicates the VM is linked. Use linked VMs when the prebuilt, stock templates included with TopoMojo meet your needs. Linked VMs save resources when VMs don't require custom configurations when deployed. Changes can't be saved to linked VMs when deployed. Changes can only be saved to unlinked VMs.
Unlinked VMs are marked with the unlinked icon ( ) and show the parent template name.
The Templates tab also has these tools:
- Create: Create a new template that isn't in any workspace.
- published: Filter the list to published templates.
- parent[...]: Click the parent name on a template to filter to templates derived from that parent. Click the filter to clear it.
- Workspace name: Click a template's workspace to filter to that workspace's templates. Templates outside any workspace show Stock Template.
- Favorite: Click the star next to a template to pin it to the top of the list.
- Clone: Create an unlinked, unpublished copy of a template, with the original as its parent. If the name ends in a version such as
v1, TopoMojo names the copyv2; otherwise it appends-CLONE. The copy gets its own disk, which TopoMojo copies from the original's when you click Initialize on the copy. On vSphere, each disk'sPathpoints to a new file, and itsSourcepoints to the original's disk. On Proxmox,Templatenames a new template VM, andParentTemplatenames the original's. Initialize holds the request open until the copy finishes. If you reload the page during that, Initialize reappears, but clicking it again fails with an InvalidOperation error because the copy is already in progress or finished. Wait for the copy to finish, then reload. Administrators can see the reason on the Log tab. Saving the copy never changes the original. Once you publish the copy, workspace templates derived from the same parent see a Resolve prompt. - Delete: Delete a template. TopoMojo also deletes the template's disk, but only a disk the template owns. A disk in a workspace's folder (vSphere), or a template VM named by the template's ID (Proxmox), belongs to that template. A stock template's disk or Proxmox template VM stays on the hypervisor, since other templates may clone from it.
No isolation checking outside a workspace
Templates you edit from this tab aren't inside a workspace, so TopoMojo doesn't apply its usual isolation checks.
Template Properties
The Templates tab in the Administrator Guide displays template metadata and configuration. The Detail field contains the raw JSON configuration TopoMojo passes to the hypervisor when deploying the VM. Linked templates show the read-only Parent Detail instead, since they inherit their configuration from the parent.
Expand a template to edit these fields, then click Save Settings:
- Name: A short, unique identifier for the VM template, up to 64 characters. TopoMojo uses it to build VM names and disk filenames.
- Published: Toggle between Hidden and Visible. Visible makes the template available in every workspace's Add Templates. Only unlinked templates show this toggle. See Publishing a Template.
- Description: Up to 255 characters. Include login credentials and what the VM is for.
- Audience: Space-delimited tokens, up to 64 characters, that share an unpublished template with workspaces whose Template Scope has a matching token. See Adding Templates to a Workspace.
- Networks: Space-delimited network names, up to 64 characters, such as
lan wan. Same as Networks in Template Field Definitions. - Guest Settings: One
key=valueper line, up to 1024 characters. TopoMojo ignores lines that start with#. Same as Guest Settings in Template Field Definitions. - Detail: The template's JSON configuration. Only unlinked templates show this field. See Template Detail JSON.
- Parent Detail: Read-only. Shown on linked templates in place of Detail.
Only administrators can see this form. Workspace builders edit a template's Name, Description, Networks, Guest Settings, Replicas, Variant, and ISO from the workspace's Templates tab, but can't change Published, Audience, or Detail.
Note
The Detail field hint text reads: "Advanced configuration. Keep valid JSON to avoid errors."
Template Detail JSON
Common Configuration Mistakes
- RAM must be a whole number integer (
1,2,4). Decimal values such as0.5save without error but cause a generic "Error" at deploy time. - CPU must be a string in
sockets x coresformat (1x1,1x2). Numeric values such as1or2cause the same generic error at deploy time. - Disks
Sizemust be an integer representing gigabytes (10,20). String values such as"10G"cause a JSON parse error at save time.
Top-Level Fields
| Field | Type | Default | Example | Description |
|---|---|---|---|---|
Id |
string | null |
null |
Internal identifier linking this spec to the template record. TopoMojo resolves the real template ID from the database, not this field. |
Name |
string | null |
challenge-server |
The template's display name. Used to build the VM name and disk filenames at deploy time. |
TopoId |
string | null |
a1b2c3d4-e5f6-7890-abcd-ef1234567890 |
The workspace this template belongs to. null on a library template; set to the workspace GUID when linked to a workspace. |
Cpu |
string | 1x2 |
1x2 |
CPU layout as sockets x cores-per-socket. For example, 2x2 = 2 sockets × 2 cores = 4 virtual processors. |
Guest |
string | null |
rhel7 |
VMware guest OS identifier. A Guest suffix is auto-appended if missing. Tells the hypervisor which OS optimizations to use. null defaults to other. Not used by Proxmox. |
Source |
string | null |
null |
Reference to a source template to clone disks from. Generally null at the template level; disk-level Source handles cloning. |
Iso |
string | null |
local:iso/debian.iso |
ISO image path. Format is hypervisor-specific: vSphere uses [datastore] folder/file.iso; Proxmox uses local:iso/file.iso. null causes the hypervisor to substitute an empty ISO. |
Floppy |
string | null |
null |
Floppy image path. Rarely used. vSphere only. |
Version |
string | null |
vmx-10 |
Forces a specific VMware virtual hardware version. null uses the platform default. Not used by Proxmox. |
IsolationTag |
string | null |
null |
Runtime tag identifying the isolated deployment. null on the stored template; injected by TopoMojo at deploy time. |
HostAffinity |
Boolean | false |
false |
When true, pins the VM to the same hypervisor host as the rest of its deployment. |
UseUplinkSwitch |
Boolean | false |
false |
When true, attaches networks via a shared uplink switch for templates that must reach an external network. |
Ram |
integer | 4 |
4 |
Memory in gigabytes. Multiplied by 1024 to set MB on the VM. |
VideoRam |
integer | 0 |
0 |
Video memory in MB. 0 uses the hypervisor default. |
Adapters |
integer | 1 |
1 |
Number of network adapters. Should match the number of entries in Eth. |
Delay |
integer | 0 |
0 |
Boot delay in seconds before this VM powers on. The hypervisor enforces a minimum of 10 seconds when a delay applies. |
AutoStart |
Boolean | true |
true |
When true, the VM powers on automatically when its deployment starts. |
Eth |
array | One e1000 adapter on lan |
See Eth[] table |
Array of network adapter definitions. |
Disks |
array | One 10 GB lsilogic disk |
See Disks[] table |
Array of virtual disk definitions. |
GuestSettings |
array | null |
[{"Key": "token1", "Value": "##token1##"}] |
Array of key/value pairs injected as VMware guestinfo.* properties. null when not configured. |
Template |
string | null |
debian-template |
Proxmox only. The Proxmox source template name. null on vSphere templates. |
ParentTemplate |
string | null |
null |
Proxmox only. The parent of the Proxmox source template. null on vSphere templates. |
Eth[] - Network Adapter Entries
| Field | Type | Default | Example | Description |
|---|---|---|---|---|
Id |
integer | 0 |
0 |
Index of the adapter within the VM (0-based). |
Net |
string | lan |
lan |
Network name this adapter connects to. Combined with the IsolationTag at deploy time to create an isolated network per deployment. |
Key |
string | null |
null |
Hypervisor-assigned network reference. null on the stored template; filled in at deploy time. |
Type |
string | e1000 |
e1000 |
Virtual network interface controller hardware model: e1000, e1000e, vmx3 (vmxnet3), or pcnet32. |
Mac |
string | null |
null |
Media Access Control address. null means the hypervisor auto-assigns one. |
Ip |
string | null |
null |
Informational IP annotation. Not used to configure the guest OS. |
Vlan |
integer | 0 |
0 |
Explicit VLAN ID. 0 means no fixed VLAN; TopoMojo manages isolation dynamically. |
Disks[] - Virtual Disk Entries
| Field | Type | Default | Example | Description |
|---|---|---|---|---|
Id |
integer | 0 |
0 |
Index of the disk within the VM (0-based). |
Path |
string | Derived | [ds] 00000000-0000-0000-0000-000000000000/blank-20g.vmdk |
Disk location in datastore format. Derived from the workspace and template IDs at deploy time. |
Source |
string | Derived | [ds] .../base-disk.vmdk |
Parent disk this disk originates from. Empty if no parent. |
Controller |
string | lsilogic |
lsilogic |
Disk controller type: lsilogic, lsilogic-sas, pvscsi, buslogic, or ide. |
Size |
integer | 10 |
10 |
Disk size in gigabytes. |
Status |
integer | 0 |
0 |
Internal provisioning state flag. Always 0 in the stored detail. |
GuestSettings[] - Guest Customization Entries
| Field | Type | Example | Description |
|---|---|---|---|
Key |
string | token1 |
Guest customization key. |
Value |
string | ##token1## |
Value delivered for that key. |
Special Key values:
| Key | Value | Behavior |
|---|---|---|
firmware |
efi |
Boots the VM with Extensible Firmware Interface. |
vhv.enable |
true |
Enables nested virtualization. |
iftag.* |
any string | A setting that applies when the value contains the VM's IsolationTag. For example: iftag.example = abcd1234:value is only applied if the VM's isolation tag is abcd1234. |
guestinfo.metadata |
encoded cloud-init metadata | Provides cloud-init metadata for cloud-init enabled images. |
guestinfo.metadata.encoding |
base64 |
Declares the encoding used for guestinfo.metadata. |
guestinfo.userdata |
encoded cloud-init user data | Provides cloud-init user data for cloud-init enabled images. |
guestinfo.userdata.encoding |
base64 |
Declares the encoding used for guestinfo.userdata. |
guestinfo.network |
encoded cloud-init network config | Provides cloud-init network configuration for cloud-init enabled images. |
guestinfo.network.encoding |
base64 |
Declares the encoding used for guestinfo.network. |
Publishing a Template
Every template starts unpublished. Unpublished templates are only available in the workspace that owns them. Workspace builders can't publish their own templates.
To publish a template so other workspaces can add it from Add Templates:
- Save the template's final state in its workspace. See Deployed VM Actions.
- In the Administrator Guide, click the Templates tab and search for the template.
- Expand the template.
- Set Published to Visible. The toggle only appears on unlinked templates.
- Click Save Settings.
Workspaces that add a published template get a linked copy that uses the published template's disk. To share a template with only some workspaces instead of all of them, leave it unpublished and use Audience and Template Scope. See Adding Templates to a Workspace.
Bringing In an Existing Disk
You can build a template around a disk created outside TopoMojo, such as an exported appliance or a VM built by hand on the hypervisor.
On vSphere:
- Copy the
.vmdkdisk to TopoMojo's disk datastore, in a folder that isn't a workspace GUID. Stock disks conventionally go in the00000000-0000-0000-0000-000000000000folder. TopoMojo doesn't save over or delete disks outside a workspace's own folder. - On the Templates tab, click Create a new template, or expand an existing template.
-
In Detail, set the disk's
Pathto the disk's location relative to the disk datastore. The disk datastore is part of TopoMojo's hypervisor settings; see vSphere Configuration in the Helm chart README. For example, if the disk datastore is[datastore1] topomojoand the disk is at[datastore1] topomojo/00000000-0000-0000-0000-000000000000/router.vmdk, enter:"Disks": [ { "Path": "[ds] 00000000-0000-0000-0000-000000000000/router.vmdk", "Controller": "lsilogic" } ]TopoMojo replaces the bracketed datastore name with the disk datastore's, so
[ds]works as a placeholder.Hosted VMDK disks
VMware Workstation, Fusion, VirtualBox, and Open Virtual Appliance (OVA) exports write hosted VMDK formats, such as
monolithicSparseandstreamOptimized. ESXi can't attach these disks where they sit. When a template uses a hosted disk directly, Initialize stops and the user sees "This template's disk is in a format the hypervisor can't use. Ask an administrator to convert it." The Log Tab names the disk and its format.To convert the disk, set its
Sourceto the uploaded file and itsPathto a new file, then click Initialize again. TopoMojo copies the disk through vCenter, which converts it to a format ESXi can attach, so you don't need shell access to an ESXi host: -
Set
Cpu,Ram,Guest, and theDisksControllerto match the disk. A wrong controller or guest type can keep the operating system from booting. - Click Save Settings, then publish the template if other workspaces need it.
On Proxmox, TopoMojo deploys by cloning a Proxmox template VM rather than by disk path. Import the disk into a VM on Proxmox, convert that VM to a template, and set Template in Detail to the Proxmox template's name exactly.
Common Template Errors
| Error | Likely Cause | Solution |
|---|---|---|
| Generic "Error" with no details | Invalid RAM value (decimal such as 0.5 or 1.5) |
Use a whole number integer: 1, 2, 4 |
| Generic "Error" with no details | Invalid CPU format (numeric value such as 1 or 2) |
Use string format: 1x1, 1x2 |
invalid token value! |
Hypervisor authentication failed | Check the hypervisor access token in TopoMojo's configuration |
| HTTP 405 Method Not Allowed | Wrong endpoint for the operation | Use POST /api/template-detail for new templates |
| HTTP 500 Internal Server Error | Hypervisor template not found | Verify the Template name matches the VM name on the hypervisor |
| This template's disk is in a format the hypervisor can't use. Ask an administrator to convert it. | vSphere only. The disk is a hosted VMDK, exported by VMware Workstation, Fusion, VirtualBox, or an OVA. The Log Tab shows which disk. | Convert it through Source as described in Bringing In an Existing Disk |
Files Tab
The Files tab, titled Global Files, is where administrators upload global ISOs, which every workspace can attach. Uploading works the same way as the workspace Files tab. As there, TopoMojo wraps non-ISO files in an ISO, and large files (over 1 GB) can take extra time to process after the upload finishes.
The list shows every ISO in TopoMojo, global and local, with Name and Workspace columns:
- Workspace: Shows a Global badge for global ISOs, or the owning workspace's name and ID for local ones. A (deleted) badge marks a local ISO whose workspace no longer exists. Use these to find and remove leftover files.
- Global Only: Filter the list to global ISOs.
- Refresh: Reload the list.
- Delete: Delete any global or local ISO. The same usage check applies as in Deleting an ISO.
How TopoMojo lays out ISO files depends on the hypervisor:
- vSphere: Each workspace's local ISOs are in a folder named with the workspace GUID. Global ISOs are in the folder named with a GUID of all zeros.
- Proxmox: Proxmox storage keeps all ISOs in one flat list. TopoMojo encodes the scope in the filename, as the workspace GUID (or the all-zeros GUID for global ISOs), then a separator (
__by default), then the original filename. ISOs uploaded by older releases with#as the separator still work.
For hypervisor storage settings, see Using Proxmox with TopoMojo and Using vSphere with TopoMojo in the TopoMojo repository.
Machines Tab
This tab lists VMs TopoMojo is tracking for all workspaces and gamespaces. The list is read-only; manage VMs from the Gamespaces Tab or Workspaces Tab.

Search matches the VM name, the workspace or gamespace it belongs to, the host, or a pasted gamespace GUID. The tab shows at most 100 results; if it reaches that limit, refine the search term.
Use the table headers to sort by:
- Machine Name: The VM name.
- Gamespace / Group: The workspace or gamespace the VM belongs to, linked so you can open it, with its GUID underneath. Click the GUID to copy it.
- State: The VM's power state.
- Host: The hypervisor host the VM runs on.
"Orphaned" VMs
VMs labeled Orphaned in the Gamespace / Group column are VMs that still exist but are not associated with a workspace or gamespace. VMs can become orphaned when there is an error or disconnection from the hypervisor during TopoMojo's cleanup process. Orphaned VMs should be manually removed from the hypervisor.
To quickly identify orphaned VMs, search for "orphaned" in the Search field.
Users Tab
The Users tab shows all TopoMojo users. You can create new users and assign users permissions here. To search for a user, enter the term into the Search field or filter by role (admins, observers, creators, builders), by service accounts, or by scope. TopoMojo matches a user's scope against each workspace's audience; see Audience, Scope, and Publishing.
- View ( ): Select View to see the properties for the user. Users with a service account client ID are marked Service Account.
- Delete ( ): Deletes the user.
Roles
- User: No extra permissions in TopoMojo. This is the TopoMojo default.
- Builder: Can connect to reserved networks such as
bridge-net. - Creator: Same permissions as builder with additional permissions to bypass building limits such as the number of owned workspaces and workspace template limits.
- Observer: Allows a user to view and use the Observe tab for viewing gamespaces. The scope of the user (see below) limits the list to gamespaces whose workspace has a matching audience. See Launching a Workspace.
- Admin: Full administrative access to TopoMojo.
- Disabled: No permissions in TopoMojo.
Grant the Creator role to users who need to build workspaces and troubleshoot deployed gamespaces.
An administrator can configure TopoMojo to inherit user roles from the Identity Provider (IdP). For example, an IdP administrator can add roles like administrator, builder, or a custom role then configure TopoMojo to map those IdP roles to TopoMojo roles. Inheriting roles reduces the need for redundant setup if you're already managing user roles on the identity provider across multiple Crucible apps. See the Helm deployment documentation for more information on how to configure this setting.
By default, TopoMojo reads Keycloak realm roles and maps the IdP roles administrator, builder, creator, observer, and user to the matching TopoMojo roles. The IdP can't assign Disabled.
A user's effective role is the strongest of their TopoMojo role and every role mapped from their IdP roles. When the two differ, the user's row shows an Identity Role / Effective Role badge. Click it to see both assigned roles and which one wins. Disabling a user in TopoMojo blocks them regardless of IdP roles.
Create a New User
- Name: Enter a new user name here.
- Scope: A space-delimited list of administrator-defined groups the user belongs to. Administrators can define a scope with any name here. A user can launch a workspace when their scope shares a token with the workspace's Audience, and can add unpublished templates whose Audience shares a token with their scope. See Audience, Scope, and Publishing.
- Workspace Limit: The maximum number of workspaces this user can manage.
- Gamespace Limit: The maximum number of concurrent active gamespaces allowed for this user.
- Gamespace Max Duration: The maximum amount of minutes allowed for a gamespace.
- Gamespace Cleanup Grace time: The number of minutes between gamespace expiration and when TopoMojo tears down the associated VMs.
- Service Account Client Id: Lets an OAuth client authenticate as this user with the client credentials flow, for automation. TopoMojo matches it against the
client_idclaim in the access token. An administrator can change the claim name, or turn off service accounts, in TopoMojo's identity settings. Give service accounts the Observer role at most; TopoMojo shows a warning on administrators that have a client ID. - Generate ApiKey: Generate API keys for users to programmatically interact with the TopoMojo API without needing to log in interactively.
For regular users, TopoMojo may update Name from the identity token at sign-in.
TopoMojo creates users automatically the first time they sign in. Administrators set the default limits for new users in TopoMojo's configuration; see the TopoMojo Helm chart README.
Settings Tab
Upload a custom background image to change TopoMojo's theme. Wide images usually work best. Click Clear background to return to the default. An administrator can also set the background in TopoMojo's configuration; see UI Branding in the Helm chart README.
Log Tab
The Log tab is useful from the admin point of view when trying to troubleshoot. The Log tab only shows errors here, not every log line. Click an entry to expand its stack trace, and click it again to collapse it. Use the copy button to copy an entry, for example into a bug report.